
Phân biệt 3 method setNeedsLayout() , layoutIfNeeded() và layoutSubviews()

Phân biệt 3 method setNeedsLayout() , layoutIfNeeded() và layoutSubviews()

Khi lập trình iOS, chắc hẳn các bạn cũng đã từng gặp/sử dụng qua 3 method trên, cả 3 đều có chung tiền tố layout, và cùng có vai trò xử lý layout của view. Điều này dẫn đến ít nhiều sự nhầm lẫn về bản chất và cách sử dụng của chúng, vì vậy ở bài viết này tôi sẽ làm rõ hơn về bản chất và cách sử dụng của 3 method này.

Khi một ứng dụng iOS khởi chạy, class UI, UIApplication trong iOS sẽ chạy main run loop trên main thread. Vòng lặp main run loop tổng hợp các event từ user như (chạm, ấn, giữ...) và xử lý update giao diện phù hợp với từng thao tác. Tại một vài thời điểm nào đó, tất cả các event sẽ được xử lý và control sẽ quay trở lại run loop để chờ và thực thi chuỗi thao tác tiếp theo.

Đầu tiên thì chúng ta cần phải hiểu về khái niệm Run Loop, Run loop là một cơ chế bất đồng bộ của iOS được sử dụng cho việc xử lý hệ thống input cho ứng dụng như sockets, ports, file, keyboard, mouse..vv. Từ cách đọc ta có thể hình dung nó giống như băng chuyền vậy, và ở đây Run loop được sử dụng để xử lý các thao tác của người dùng và update giao diện màn hình tương ứng với thao tác đó
Art/main_event_loop.jpg
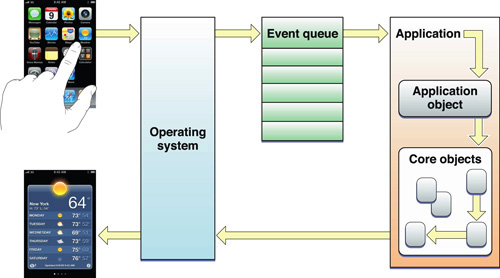
Khi tất cả các event đã xử lý và có phát sinh một vài thay đổi ở giao diện, thì những thay đổi đó sẽ không được update ngay lập tức mà hệ thống sẽ chờ cho tiến trình hiện tại hoàn thành và quay trở lại điểm khởi đầu run loop rồi mới update. Do đó chúng ta sẽ có một khoảng thời gian chờ giữa 2 công đoạn: xử lý tiến trình và cập nhật UI, thế nên chúng ta cần phải hiểu rõ 3 method trên để đảm bảo việc cập nhật giao diện được mượt mà.

setNeedsLayout()

Đây là method thuộc class UIView , nó thông báo cho hệ thống rằng bạn muốn layout và thay đổi lại view đó, bao gồm cả những subview tại thời điểm khởi đầu của chu kỳ run loop.  Method này được thực thi bất đồng bộ vì nó chạy xong và return ngay lập tức. Và bạn có thể hiểu nôm na rằng chúng ta dùng method này để đánh dấu update layout cho một hay vài item nào đó sau khi chu ky run loop hiện tại kết thúc.

layoutIfNeeded()

Ngược lại thì layoutIfNeeded  là một method đồng bộ và nó sẽ thực thi việc update layout ngay lập tức, chứ không cần phải đợi chu kỳ kết thúc như setNeedsLayOut. Có nghĩa là khi method này được gọi xong thì việc thay đổi giao diện đã diễn ra rồi.

layoutSubviews()

Như cái tên thì method này có vai trò xử lý, update layout hay constraint của subviews. Các subclass con có thể override lại method này để chỉnh sửa layout của các subview một cách chi tiết hơn nữa. Ví dụ ta có một View A chứa một subview là View B, thì chúng ta có thể sử dụng method này để chỉnh lại layout cho View B trong trường hợp các constraint chưa chuẩn vì một lý do nào đó.
Tuy nhiên thì chúng ta không nên gọi đến method này một cách trực tiếp, mà hãy sử dụng hai method ở trên là setNeedsLayout() và layoutIfNeeded(), tùy theo hướng bạn muốn thay đổi UI như thế nào.

Comments

Popular posts from this blog

Swift GCD part 1: Thread safe singletons

Preview Singletons are entities, referenced to the same instance of a class from everywhere in your code. It doesn't matter if you like them or not, you will definitely meet them, so it's better to understand how they work. Constructing and handling a set of data doesn't seem to be a big challenge at first glance. The problems appear when you try to optimise the user experience with background work and your app starts acting weird. ??‍♂️ After decades of watching your display mostly with a blank face, you finally realize that your data isn't handled consistently by the manager because you're accessing it (running tasks on it) from multiple threads at the same time. So you really do have to deal with making your singletons thread safe. This article series is dedicated to thread handling using Swift. In the first part below you will get a comprehensive insight into som...

Thread safe singleton’s in Swift

What are singletons? — Singleton is design patterns which says that there should be only one instance of the class for the lifetime of the application. One the best example of Singleton is AppDelegate . How to write a singleton class ? class DefaultDict{ private var dict:[String:Any] = [:] public static let sharedManager = DefaultDict() private init(){ } public func set(value:Any,key:String){ dict[key] = value } public func object(key:String) -> Any?{ dict[key] } public func reset(){ dict.removeAll() } }   Testing singleton class under concurrent circumstances. We are going to write an example where we will set values in dict from various threads and even try to access some with different threads. When we do this we will encounter a crash. If you look closely it will be because of race condition and the crash will be on line set(value:Any,key:String) . class ViewController: UIViewController { ...

Swift Tool Belt, Part 1: Adding a Border, Corner Radius, and Shadow to a UIView with Interface Builder

During my iOS work, I’ve assembled a set of code that I bring with me on every iOS project. I’m not talking about large frameworks or CocoaPods here. These are smaller Swift extensions or control overrides that are applicable to many projects. I think of them as my tool belt. In this post, I’ll show you an extension that will add a border, a corner radius, and a shadow to any UIView, UIButton, or UILabel and allow you to preview what it will look like in Interface Builder. Back in 2014, I wrote a blog post on Expanding User-Defined Runtime Attributes in Xcode where I added a border, corner radius, and shadow to a UIView using Interface Builder’s user-defined runtime attributes. This solution had no type checking—you had to type the property you wanted to modify by hand and often had to look up what it was called. You also had to run your project in order to see the effect of the runtime attribute. Starting with Xcode 6 , there is a new mech...