
Xử lý việc tùy chỉnh UIColors với cách chính xác trong iOS

Nếu bạn là nhà phát triển ứng dụng thì bạn chắc chắn phải đối mặt với một số thách thức khi xử lý nhiều mã màu mà bạn đã sử dụng trong nhiều ứng dụng.

Mở đầu

Nếu bạn muốn thay đổi màu sắc cho một UIView trên storyboard bạn sẽ phải thông qua một màn hình chọn màu hoặc bạn thực hiện việc này trong code thông các hàm khởi tạo màu của class UIColor như:
  • init(white: CGFloat, alpha: CGFloat)
  • init(hue: CGFloat, saturation: CGFloat, brightness: CGFloat, alpha: CGFloat)
  • init(red: CGFloat, green: CGFloat, blue: CGFloat, alpha: CGFloat)
  • init(CGColor cgColor: CGColor!)
  • init(patternImage image: UIImage)
  • init(CIColor ciColor: CIColor)
Điều này có vẻ khá là nhàm chán trong khi chúng ta phải thiết lập màu sắc bằng cách đưa ra các giá trị thích hợp, ví dụ:
self.view.backgroundColor = UIColor(red: 120/255, green: 150/255, blue: 200/255, alpha: 1)

Color Sets

Apple đã giới thiệu một thứ gọi là Color Sets từ Xcode 9. Color Sets sẽ giúp bạn xác định tất cả các màu của bạn tại một nơi. Bạn có thể dễ dàng thêm màu tùy chỉnh của mình. Thực tế, điều thú vị là bạn có thể đưa ra quy ước đặt tên thích hợp cho từng màu.
Ngoài ra nó sẽ rất hữu ích khi bạn muốn thay đổi các giá trị màu sắc, bạn sẽ thay đổi ở một nơi và nó sẽ cập nhật ở khắp mọi nơi. Là một Dev, bạn có thể dễ dàng nhớ màu đó bằng tên của nó, bạn cũng có thể reference và sử dụng nó trong một dự án khác. Điều này làm cho công việc lập trình của chúng ta dễ dàng phải không?
Nào! hãy bắt đầu với từng bước đơn giản sau đây:

Tạo Color Sets

Bạn cần thêm mới một “New Color set” trong file assets của bạn.

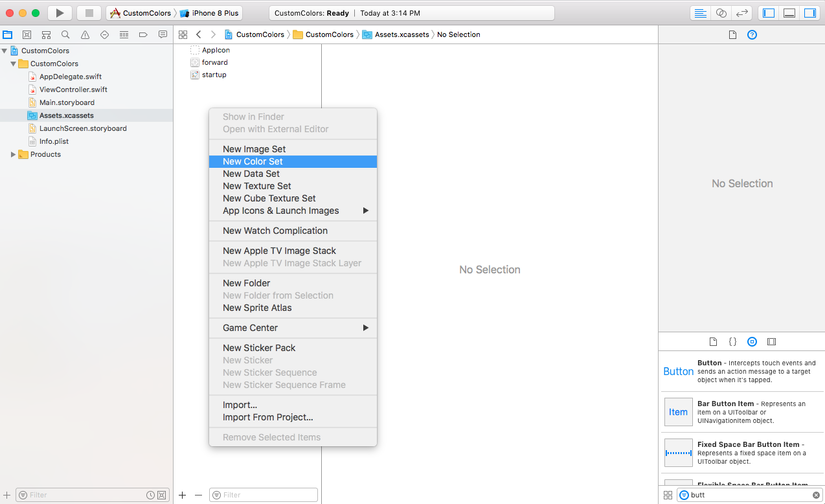
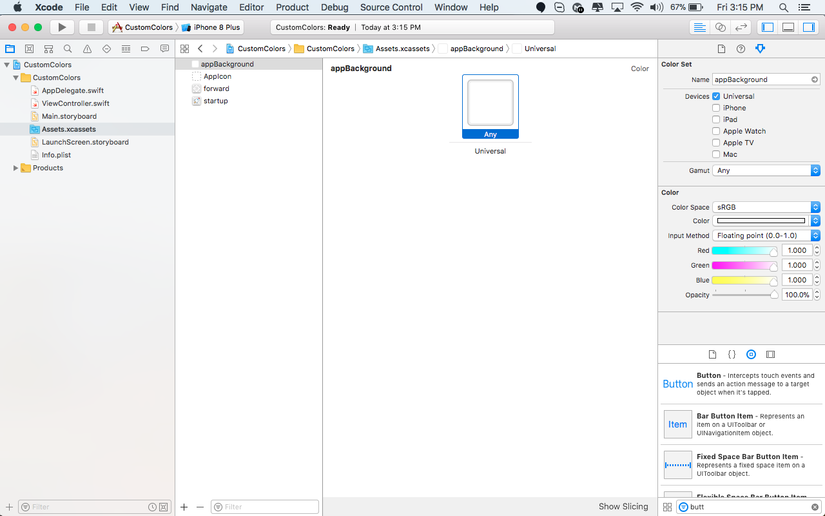
Lựa chọn một Color Sets và thay đổi màu theo yêu cầu bạn muốn trên màn hình tuỳ chỉnh màu.

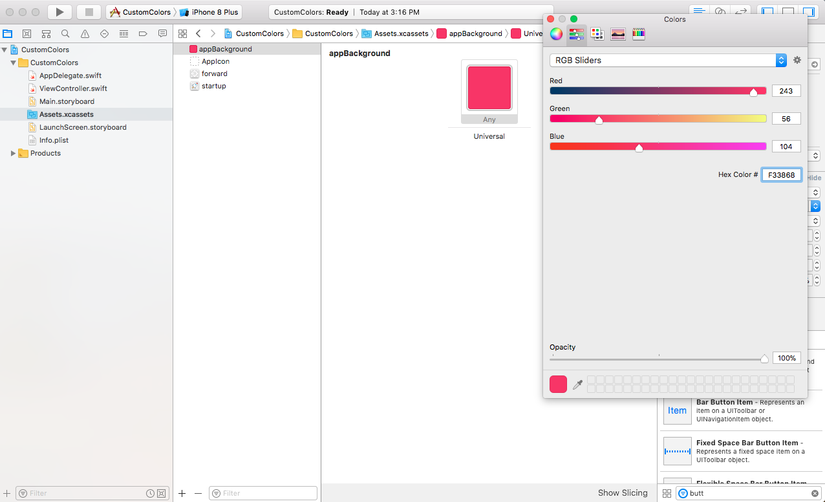
Tuỳ chỉnh màu sắc theo mong muốn của bạn.

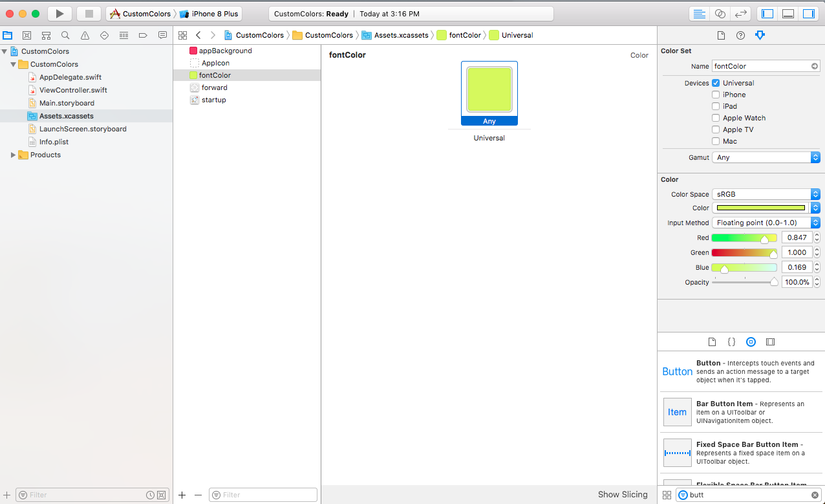
Thêm một vài màu khác với color sets ở đây tôi thêm vào màu cho Font.

Sử dụng Color Sets

Bây giờ là lúc để sử dụng màu tùy chỉnh này vào ứng dụng. Trước tiên, chúng ta có thể đặt màu sắc của UIView ngay trên Storyboard thông qua màn hình chọn màu.

Lựa chọn màu nền cho UIView.

Lựa chọn màu cho nội dung text trên Label

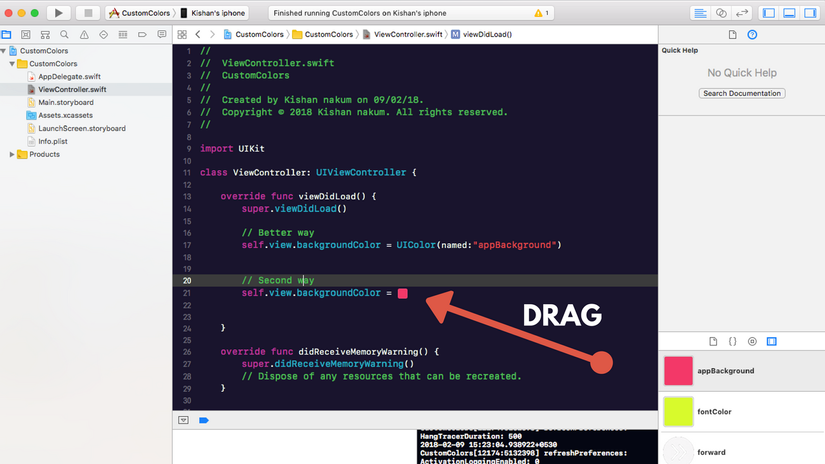
Bạn cũng có thể kéo thả nhưng Color sest này ngay trong code của mình.

Khá là đơn giản phải không

Tóm lại

Có đôi chút tiếc nối khi đến tận xCode9 nó mới xuất hiện và chỉ hỗ trợ iOS 11 trở lên. Nhưng đây cũng là một tính năng khá hay ho khi lập trình. Một mẹo vặt mà không phải ai cũng để ý đến nó, có thể là bạn đã quá quen với những cách làm trước đó. Nhưng tôi tin chắc rằng bạn sẽ cảm thấy thoải mái khi sử dụng tính năng này.

Thank for reading!

Comments

Popular posts from this blog

Swift Tool Belt, Part 1: Adding a Border, Corner Radius, and Shadow to a UIView with Interface Builder

During my iOS work, I’ve assembled a set of code that I bring with me on every iOS project. I’m not talking about large frameworks or CocoaPods here. These are smaller Swift extensions or control overrides that are applicable to many projects. I think of them as my tool belt. In this post, I’ll show you an extension that will add a border, a corner radius, and a shadow to any UIView, UIButton, or UILabel and allow you to preview what it will look like in Interface Builder. Back in 2014, I wrote a blog post on Expanding User-Defined Runtime Attributes in Xcode where I added a border, corner radius, and shadow to a UIView using Interface Builder’s user-defined runtime attributes. This solution had no type checking—you had to type the property you wanted to modify by hand and often had to look up what it was called. You also had to run your project in order to see the effect of the runtime attribute. Starting with Xcode 6 , there is a new mech...

Alamofire vs URLSession

Alamofire vs URLSession: a comparison for networking in Swift Alamofire and URLSession both help you to make network requests in Swift. The URLSession API is part of the foundation framework, whereas Alamofire needs to be added as an external dependency. Many  developers  doubt  whether it’s needed to include an extra dependency on something basic like networking in Swift. In the end, it’s perfectly doable to implement a networking layer with the great URLSession API’s which are available nowadays. This blog post is here to compare both frameworks and to find out when to add Alamofire as an external dependency. Build better iOS apps faster Looking for a great mobile CI/CD solution that has tons of iOS-specific tools, smooth code signing, and even real device testing? Learn more about Bitrise’s iOS specific solutions! This shows the real power of Alamofire as the framework makes a lot of things easier. What is Alamofire? Where URLSession...

Frame vs Bounds in iOS

This article is a repost of an answer I wrote on Stack Overflow . Short description frame = a view’s location and size using the parent view’s coordinate system ( important for placing the view in the parent) bounds = a view’s location and size using its own coordinate system (important for placing the view’s content or subviews within itself) Details To help me remember frame , I think of a picture frame on a wall . The picture frame is like the border of a view. I can hang the picture anywhere I want on the wall. In the same way, I can put a view anywhere I want inside a parent view (also called a superview). The parent view is like the wall. The origin of the coordinate system in iOS is the top left. We can put our view at the origin of the superview by setting the view frame’s x-y coordinates to (0, 0), which is like hanging our picture in the very top left corner of the wall. To move it right, increase x, to move it down increase y. To help me remember bound...