
Clean Architecture, MVVM và RxSwift


I. Clean Architecture


1. Giới thiệu:

Clean Architecture là một business architecture, nó tách rời những xử lý nghiệp vụ khỏi UIframework. Clean Architecture phân rõ vai trò và trách nhiệm của từng layer trong kiến trúc của mình.

2. Ưu nhược điểm:

Về mặt ưu điểm, Clean architecture đạt được:
  • Giúp logic nghiệp vụ trở nên rõ ràng.
  • Không phụ thuộc vào framwork
  • Các thành phần UI hoàn toàn tách biệt và độc lập.
  • Không phụ thuộc vào nguồn cung cấp dữ liệu.
  • Dễ dang kiểm thử.
Về mặt nhược điểm:
  • Clean architecture do phân tách cấu trúc thành nhiều tầng nên dẫn đến việc số lượng code sinh ra là rất lớn.

3. Các thành phần chính:


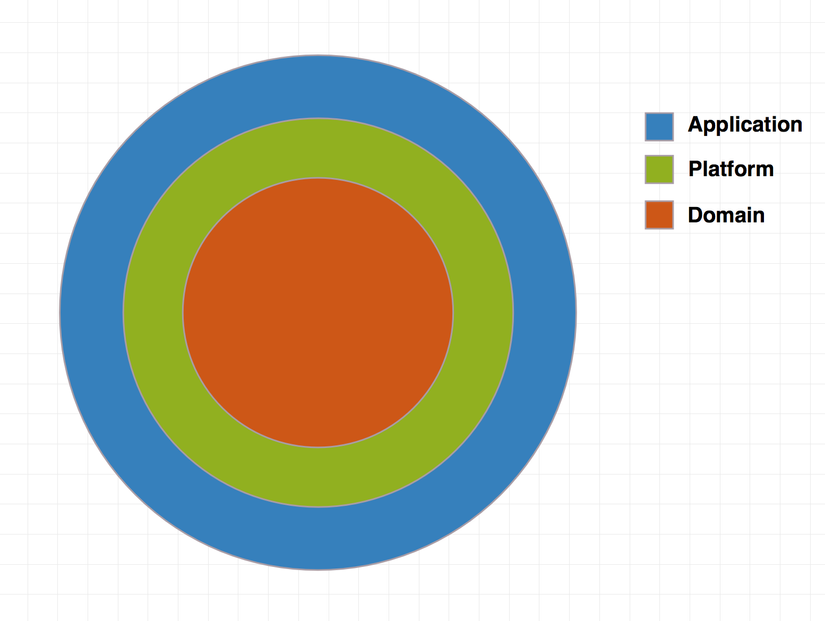
Về mặt cấu trúc, Clean architecture gồm 3 thành phần chính:
  • Domain: Là tầng chứa các thành phần cơ bản của ứng dụng như các Entity, UseCase,... Tầng Domain không phụ thuộc vào bất cứ thành phần nào của UI hay bất kỳ Framwork nào và cũng không implement bất kỳ một thành phần nào của ứng dụng tại tầng này.
  • Platform: Là tầng thực hiện triển khai (implement) thực hiện các phần cụ thể của tầng Domain. Tuy nhiên, tầng Platform sẽ che giấu đi những chi tiết được triển khai thực hiện.
  • Application: Là tầng chịu trách nhiệm cung cấp thông tin từ ứng dụng cho user và tiếp nhận những input từ user cho ứng dụng. Nó có thể được triển khai với các mô hình như MVC, MVP, MVVM,...

II. Mô hình MVVM:


1. Giới thiệu:

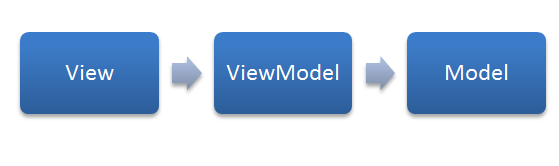
MVVM là một cấu trúc ba lớp gồm 3 thành phần chính là View - View Model - Model được tạo ra với mục đích làm đơn giản hoá việc lập trình sự kiện của giao diện người dùng.

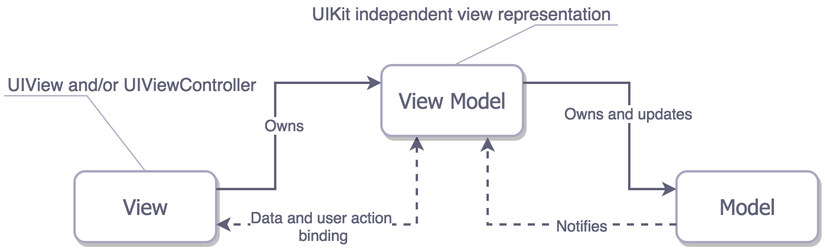
2. Các thành phần của MVVM:

  • View: Giống với mô hình MVC thì View là thành phần giao diện của ứng dụng đóng vai trò hiển thị dữ liệu và tiếp nhận những tương tác từ người dùng. Tuy nhiên, khác với MVC thì View trong MVVM hoạt động tích cực hơn bởi nó có khả năng thực hiện những hành vi phản hồi lại người dùng thông qua tính năng Binding hoặc Command.
  • Model: Cũng tương tự như mô hình MVC, Model là các đối tượng giúp truy xuất và thao tác với dữ liệu.
  • View Model: Là lớp trung gian giữa ViewModel. ViewModel đóng vai trò chung chuyển dữ liệu giữa ViewModel với nhau và là nơi chứa các mã lệnh cần thiết để thực hiện Binding, Command.
Khác với MVC thì View và Model của MVVM hoàn toàn độc lập với nhau. Trong MVVM, các tầng phía nằm phía bên dưới sẽ không nắm được bất cứ thông tin gì của tầng nằm phía bên trên nó. Điều đó có nghĩa rằng, Model sẽ không biết bất cứ gì về View ModelView Model sẽ không biết bất cứ gì về View.

3. Ưu điểm của MVVM:

MVVM mang những ưu điểm sau:
  • Tăng tính lỏng của code: Có thể dễ dàng thay thế View mà không ảnh hưởng tới View Model.
  • Code dễ dàng được bảo trì và nâng cấp.
  • Dễ dàng cho việc viết UnitTest.

4. Data Binding:

Một điều đặc biệt nữa ở trong mô hình MVVM đó là do View và Model không ràng buộc chặt với nhau mà được "bind" với nhau, nghĩa là mọi thay đổi ở Model sẽ ngay lập tức được cập nhật lên View và mọi thay đổi từ View cũng sẽ được cập nhật lại Model.
Để có thể binding được dữ liệu giữa View và Model thì chúng ta cần phải sử dụng tới sự giúp đỡ của các thư viện và framework và RxSwift chính là một trong những lựa chọn tối ưu.

III. Tài liệu tham khảo:


https://github.com/sergdort/CleanArchitectureRxSwift http://blog.cleancoder.com/uncle-bob/2012/08/13/the-clean-architecture.html

Comments

Popular posts from this blog

Alamofire vs URLSession

Alamofire vs URLSession: a comparison for networking in Swift Alamofire and URLSession both help you to make network requests in Swift. The URLSession API is part of the foundation framework, whereas Alamofire needs to be added as an external dependency. Many  developers  doubt  whether it’s needed to include an extra dependency on something basic like networking in Swift. In the end, it’s perfectly doable to implement a networking layer with the great URLSession API’s which are available nowadays. This blog post is here to compare both frameworks and to find out when to add Alamofire as an external dependency. Build better iOS apps faster Looking for a great mobile CI/CD solution that has tons of iOS-specific tools, smooth code signing, and even real device testing? Learn more about Bitrise’s iOS specific solutions! This shows the real power of Alamofire as the framework makes a lot of things easier. What is Alamofire? Where URLSession...

Swift Tool Belt, Part 1: Adding a Border, Corner Radius, and Shadow to a UIView with Interface Builder

During my iOS work, I’ve assembled a set of code that I bring with me on every iOS project. I’m not talking about large frameworks or CocoaPods here. These are smaller Swift extensions or control overrides that are applicable to many projects. I think of them as my tool belt. In this post, I’ll show you an extension that will add a border, a corner radius, and a shadow to any UIView, UIButton, or UILabel and allow you to preview what it will look like in Interface Builder. Back in 2014, I wrote a blog post on Expanding User-Defined Runtime Attributes in Xcode where I added a border, corner radius, and shadow to a UIView using Interface Builder’s user-defined runtime attributes. This solution had no type checking—you had to type the property you wanted to modify by hand and often had to look up what it was called. You also had to run your project in order to see the effect of the runtime attribute. Starting with Xcode 6 , there is a new mech...

Frame vs Bounds in iOS

This article is a repost of an answer I wrote on Stack Overflow . Short description frame = a view’s location and size using the parent view’s coordinate system ( important for placing the view in the parent) bounds = a view’s location and size using its own coordinate system (important for placing the view’s content or subviews within itself) Details To help me remember frame , I think of a picture frame on a wall . The picture frame is like the border of a view. I can hang the picture anywhere I want on the wall. In the same way, I can put a view anywhere I want inside a parent view (also called a superview). The parent view is like the wall. The origin of the coordinate system in iOS is the top left. We can put our view at the origin of the superview by setting the view frame’s x-y coordinates to (0, 0), which is like hanging our picture in the very top left corner of the wall. To move it right, increase x, to move it down increase y. To help me remember bound...