This article is a repost of an answer I wrote on Stack Overflow.
Short description
- frame = a view’s location and size using the parent view’s coordinate system (important for placing the view in the parent)
- bounds = a view’s location and size using its own coordinate system (important for placing the view’s content or subviews within itself)
Details
To help me remember frame, I think of a picture frame on a wall.
The picture frame is like the border of a view. I can hang the picture
anywhere I want on the wall. In the same way, I can put a view anywhere I
want inside a parent view (also called a superview). The parent view is
like the wall. The origin of the coordinate system in iOS is the top
left. We can put our view at the origin of the superview by setting the
view frame’s x-y coordinates to (0, 0), which is like hanging our
picture in the very top left corner of the wall. To move it right,
increase x, to move it down increase y.
To help me remember bounds, I think of a basketball court where sometimes the basketball gets knocked out of bounds.
You are dribbling the ball all over the basketball court, but you don’t
really care where the court itself is. It could be in a gym, or outside
at a high school, or in front of your house. It doesn’t matter. You
just want to play basketball. In the same way, the coordinate system for
a view’s bounds only cares about the view itself. It doesn’t know
anything about where the view is located in the parent view. The bounds’
origin (point (0, 0) by default) is the top left corner of the view.
Any subviews that this view has are laid out in relation to this point.
It is like taking the basketball to the front left corner of the court.
Now
the confusion comes when you try to compare frame and bounds. It
actually isn’t as bad as it seems at first, though. Let’s use some
pictures to help us understand.
Frame vs Bounds
In the first picture on the left we have a view that is located at the top left of its parent view. The yellow rectangle represents the view’s frame.
On the right we see the view again but this time the parent view is not
shown. That’s because the bounds don’t know about the parent view. The green rectangle represents the view’s bounds. The red dot in both images represents the origin of the frame or bounds.
Frame
    origin = (0, 0)
    width = 80
    height = 130

 Bounds
    origin = (0, 0)
    width = 80
    height = 130
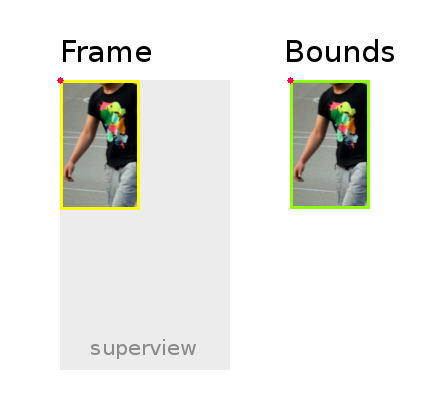
So the frame and bounds were exactly the same in that picture. Let’s look at an example where they are different.
 Frame
     origin = (40, 60) // That is, x=40 and y=60
     width = 80
     height = 130

 Bounds
     origin = (0, 0)
     width = 80
     height = 130

So
you can see that changing the x-y coordinates of the frame moves it in
the parent view. But the content of the view itself still looks exactly
the same. The bounds have no idea that anything is different.
Up
to now the width and height of both the frame and the bounds have been
exactly the same. That isn’t always true, though. Look what happens if
we rotate the view 20 degrees clockwise. (Rotation is done using
transforms. See the the documentation and these view and layer examples for more information.)
Frame
   origin = (20, 52) // These are just rough estimates.
   width = 118
   height = 187

Bounds
   origin = (0, 0)
   width = 80
   height = 130
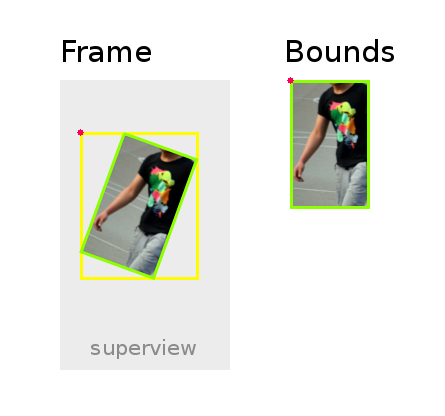
You
can see that the bounds are still the same. They still don’t know
anything has happened! The frame values have all changed, though.
Now it is a little easier to see the difference between frame and bounds, isn’t it? The article You Probably Don’t Understand frames and bounds defines a view frame as
…the smallest bounding box of that view with respect to it’s parents
coordinate system, including any transformations applied to that view.
It
is important to note that if you transform a view, then the frame
becomes undefined. So actually, the yellow frame that I drew around the
rotated green bounds in the image above never actually exists. That
means if you rotate, scale or do some other transformation then you
shouldn’t use the frame values any more. You can still use the bounds
values, though. The Apple docs warn:
Important: If a view’stransformproperty does not contain the identity transform, the frame of that view is undefined and so are the results of its autoresizing behaviors.
Rather unfortunate about the autoresizing…. There is something you can do, though.
When modifying thetransformproperty of your view, all transformations are performed relative to the center point of the view.
So if you do need to move a view around in the parent after a transformation has been done, you can do it by changing the
view.center coordinates. Like frame, center uses the coordinate system of the parent view.
Ok,
let’s get rid of our rotation and focus on the bounds. So far the
bounds origin has always stayed at (0, 0). It doesn’t have to, though.
What if our view has a large subview that is too big to display all at
once? We’ll make it a
UIImageView
with a large image. Here is our second picture from above again, but
this time we can see what the whole content of our view’s subview would
look like.Frame
origin = (40, 60)
width = 80
height = 130
Bounds
origin = (0, 0)
width = 80
height = 130
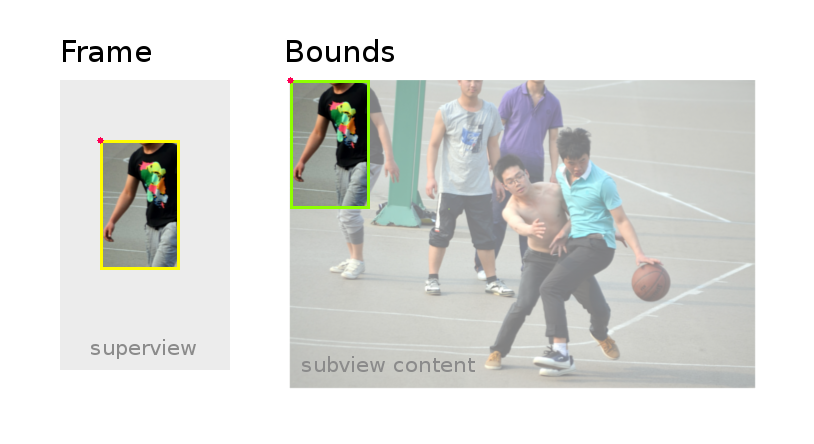
Only
the top left corner of the image can fit inside the view’s bounds. Now
look what happens if we change the bounds’ origin coordinates.
Frame
    origin = (40, 60)
    width = 80
    height = 130

Bounds
    origin = (280, 70)
    width = 80
    height = 130
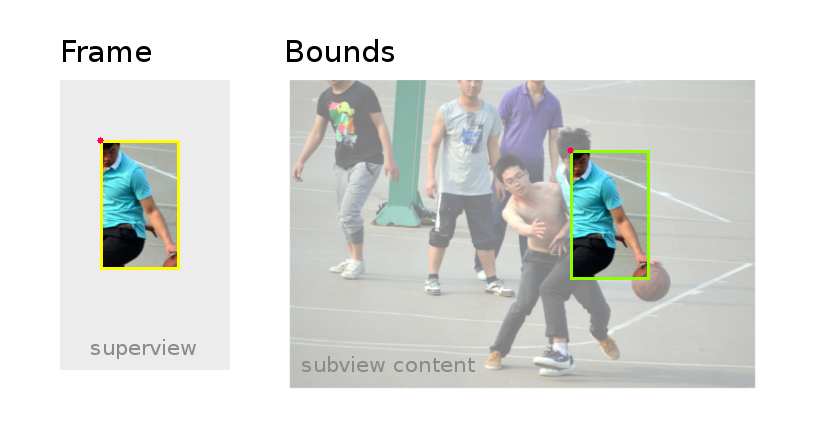
The
frame hasn’t moved in the superview but the content inside the frame
has changed because the origin of the bounds rectangle starts at a
different part of the view. This is the whole idea behind a
UIScrollView and it’s subclasses (for example, a UITableView). See Understanding UIScrollView for more explanation.When to use frame and when to use bounds
Since
frame relates a view’s location in its parent view, you use it when you are making outward changes, like changing its width or finding the distance between the view and the top of its parent view.
Use the
bounds when you are making inward changes,
like drawing things or arranging subviews within the view. Also use the
bounds to get the size of the view if you have done some transfomation
on it.Articles for further research:
Apple docs
Other resources
- You Probably Don’t Understand frames and bounds
- iOS Fundamentals: Frames, Bounds, and CGGeometry
- CS193p Lecture 5 — Views, Drawing, Animation
Practice yourself
In
addition to reading the above articles, it helps me a lot to make a
test app. You might want to try to do something similar. (I got the idea
from this video course but unfortunately it isn’t free.)
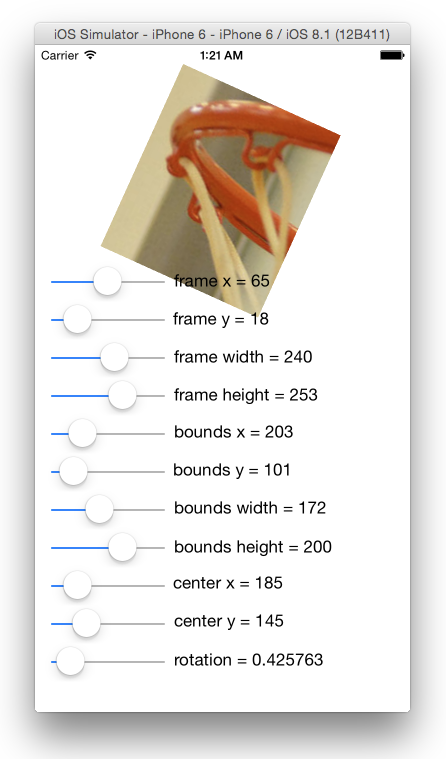
Here is the code for your reference:
import UIKit

   class ViewController: UIViewController {


    @IBOutlet weak var myView: UIView!

    // Labels
    @IBOutlet weak var frameX: UILabel!
    @IBOutlet weak var frameY: UILabel!
    @IBOutlet weak var frameWidth: UILabel!
    @IBOutlet weak var frameHeight: UILabel!
    @IBOutlet weak var boundsX: UILabel!
    @IBOutlet weak var boundsY: UILabel!
    @IBOutlet weak var boundsWidth: UILabel!
    @IBOutlet weak var boundsHeight: UILabel!
    @IBOutlet weak var centerX: UILabel!
    @IBOutlet weak var centerY: UILabel!
    @IBOutlet weak var rotation: UILabel!

    // Sliders
    @IBOutlet weak var frameXSlider: UISlider!
    @IBOutlet weak var frameYSlider: UISlider!
    @IBOutlet weak var frameWidthSlider: UISlider!
    @IBOutlet weak var frameHeightSlider: UISlider!
    @IBOutlet weak var boundsXSlider: UISlider!
    @IBOutlet weak var boundsYSlider: UISlider!
    @IBOutlet weak var boundsWidthSlider: UISlider!
    @IBOutlet weak var boundsHeightSlider: UISlider!
    @IBOutlet weak var centerXSlider: UISlider!
    @IBOutlet weak var centerYSlider: UISlider!
    @IBOutlet weak var rotationSlider: UISlider!

    // Slider actions
    @IBAction func frameXSliderChanged(sender: AnyObject) {
        myView.frame.origin.x = CGFloat(frameXSlider.value)
        updateLabels()
    }
    @IBAction func frameYSliderChanged(sender: AnyObject) {
        myView.frame.origin.y = CGFloat(frameYSlider.value)
        updateLabels()
    }
    @IBAction func frameWidthSliderChanged(sender: AnyObject) {
        myView.frame.size.width = CGFloat(frameWidthSlider.value)
        updateLabels()
    }
    @IBAction func frameHeightSliderChanged(sender: AnyObject) {
        myView.frame.size.height = CGFloat(frameHeightSlider.value)
        updateLabels()
    }
    @IBAction func boundsXSliderChanged(sender: AnyObject) {
        myView.bounds.origin.x = CGFloat(boundsXSlider.value)
       updateLabels()
    }
    @IBAction func boundsYSliderChanged(sender: AnyObject) {
        myView.bounds.origin.y = CGFloat(boundsYSlider.value)
        updateLabels()
    }
    @IBAction func boundsWidthSliderChanged(sender: AnyObject) {
        myView.bounds.size.width = CGFloat(boundsWidthSlider.value)
        updateLabels()
    }
    @IBAction func boundsHeightSliderChanged(sender: AnyObject) {
        myView.bounds.size.height = CGFloat(boundsHeightSlider.value)
        updateLabels()
    }
    @IBAction func centerXSliderChanged(sender: AnyObject) {
        myView.center.x = CGFloat(centerXSlider.value)
        updateLabels()
    }
    @IBAction func centerYSliderChanged(sender: AnyObject) {
        myView.center.y = CGFloat(centerYSlider.value)
        updateLabels()
    }
    @IBAction func rotationSliderChanged(sender: AnyObject) {
        let rotation = CGAffineTransform(rotationAngle: CGFloat(rotationSlider.value))
        myView.transform = rotation
        updateLabels()
    }

    private func updateLabels() {

        frameX.text = “frame x = \(Int(myView.frame.origin.x))”
        frameY.text = “frame y = \(Int(myView.frame.origin.y))”
        frameWidth.text = “frame width = \(Int(myView.frame.width))”
        frameHeight.text = “frame height = \(Int(myView.frame.height))”
        boundsX.text = “bounds x = \(Int(myView.bounds.origin.x))”
        boundsY.text = “bounds y = \(Int(myView.bounds.origin.y))”
        boundsWidth.text = “bounds width = \(Int(myView.bounds.width))”
        boundsHeight.text = “bounds height = \(Int(myView.bounds.height))”
        centerX.text = “center x = \(Int(myView.center.x))”
        centerY.text = “center y = \(Int(myView.center.y))”
        rotation.text = “rotation = \((rotationSlider.value))”

    }

}
Comments
Post a Comment