Nếu
bạn là một developer, chắc hẳn bạn phải thừa nhận rằng unittest đóng
một vai trò cực kỳ quan trọng trong việc giúp ta phát hiện sớm các vấn
đề của dự án trong quá trình phát triển, cả về mặt thực thi lẫn các
requirement. Một yếu tố quan trọng của unittest chính là độ bao phủ
code, thứ giúp ta đo lường được bao nhiêu phần trăm của code được test
qua khi chạy unittest. Về mặt tổng quan, số phần trăm này càng cao thì
mức độ đảm bảo của code càng cao, và đa số mọi người đều muốn vậy.
Vậy thì làm thế nào để đo lường được con số này? Từ version 7, Xcode đã có tính năng code coverage cho phép ta đo và hình dung được độ bao phủ code. Bài viết này sẽ giới thiệu cách đo đại lượng này và làm sao để tăng độ bao phủ lên.
Sau đó chọn tab Test > Options, tick chọn Code Coverage - Gather coverage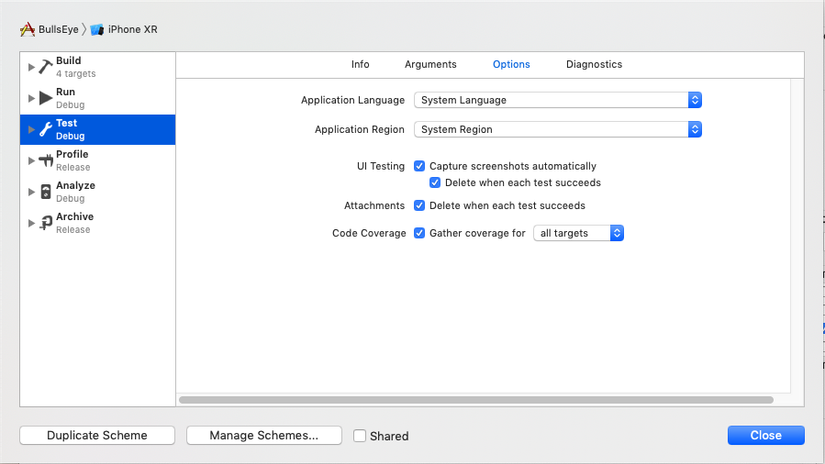
Tiếp theo, hãy chạy unittest, bài viết này sử dụng một demo projects để chạy test, bạn có thể sử dụng app của mình để thực hiện: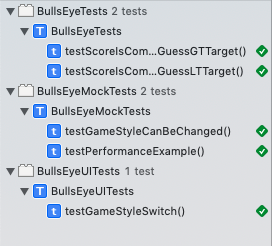
Tất cả các testcase đều đã pass, kích vào Report Navigator, ta sẽ thấy được báo cáo về độ bao phủ mà unittest đang đạt được: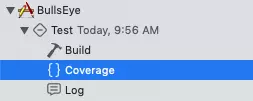
Demo này đạt được 58.18%, ta còn có thể xem được chi tiết từng file đang được bao phủ bao nhiêu phần trăm:
Ta có thể áp dụng các cách sau:
Và dòng màu đỏ đánh dấu đoạn code này chưa được test
Dựa vào những phân tích này ta có thể viết thêm các test case phù hợp để nâng code coverage lên.
Ngoài ra, còn có một cách để nâng độ bao phủ code rất hiệu quả đó là viết UI test, nếu ta chỉ viết logic, thì mới đảm bảo tầm 30-40% độ bao phủ, tuy nhiên, nếu sử dụng cả UI test thì hầu như có thể đạt được khoảng 80%, vì code UI chiếm một lượng khá lớn trong toàn app.
Để viết UI test, bạn có thể tham khảo một số framework như Quick and Nimble (https://github.com/Quick/Nimble), KIF (https://github.com/kif-framework/KIF).
Tuy nhiên, độ bao phủ cao chưa chắc đã đảm bảo được ứng dụng có chất lượng tốt, điều quan trọng là phải đảm bảo testcase cover được những luồng logic quan trọng của dự án, và cover được càng nhiều trường hợp càng tốt. Vì vậy ta cần đảm bảo cả về mặt chất lượng lẫn số lượng thì chất lượng của dự án càng được nâng cao.
Vậy thì làm thế nào để đo lường được con số này? Từ version 7, Xcode đã có tính năng code coverage cho phép ta đo và hình dung được độ bao phủ code. Bài viết này sẽ giới thiệu cách đo đại lượng này và làm sao để tăng độ bao phủ lên.
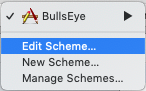
Xem độ bao phủ code trong Xcode
Xcode cung cấp sẵn cho người dùng giao diện để xem được độ bao phủ một cách chi tiết nhất, để xem được chức năng này, vào Product > Scheme > Edit SchemeSau đó chọn tab Test > Options, tick chọn Code Coverage - Gather coverage
Tiếp theo, hãy chạy unittest, bài viết này sử dụng một demo projects để chạy test, bạn có thể sử dụng app của mình để thực hiện:
Tất cả các testcase đều đã pass, kích vào Report Navigator, ta sẽ thấy được báo cáo về độ bao phủ mà unittest đang đạt được:
Demo này đạt được 58.18%, ta còn có thể xem được chi tiết từng file đang được bao phủ bao nhiêu phần trăm:
Tăng độ bao phủ cho unittest
Để tăng độ bao phủ ta có thể rà soát toàn bộ dự án, kiểm tra những nơi unittest chưa chạy qua và viết test cho tất cả những nơi có thể.Ta có thể áp dụng các cách sau:
- Viết test cho mọi phương thức public
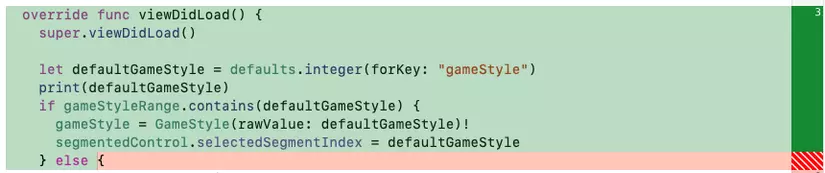
- Tăng độ bao phủ cho các phương thức public bằng việc kiểm tra xem dòng code nào chưa được chạy qua.
Và dòng màu đỏ đánh dấu đoạn code này chưa được test
Dựa vào những phân tích này ta có thể viết thêm các test case phù hợp để nâng code coverage lên.
Ngoài ra, còn có một cách để nâng độ bao phủ code rất hiệu quả đó là viết UI test, nếu ta chỉ viết logic, thì mới đảm bảo tầm 30-40% độ bao phủ, tuy nhiên, nếu sử dụng cả UI test thì hầu như có thể đạt được khoảng 80%, vì code UI chiếm một lượng khá lớn trong toàn app.
Để viết UI test, bạn có thể tham khảo một số framework như Quick and Nimble (https://github.com/Quick/Nimble), KIF (https://github.com/kif-framework/KIF).
Tuy nhiên, độ bao phủ cao chưa chắc đã đảm bảo được ứng dụng có chất lượng tốt, điều quan trọng là phải đảm bảo testcase cover được những luồng logic quan trọng của dự án, và cover được càng nhiều trường hợp càng tốt. Vì vậy ta cần đảm bảo cả về mặt chất lượng lẫn số lượng thì chất lượng của dự án càng được nâng cao.
Comments
Post a Comment