Đã
là lập trình viên iOS, hẳn ai trong chúng ta cũng đã từng sử dụng Core
Data, Realm hay SQLite để lưu dữ liệu của App vào database.
SQLite là một cơ sở dữ liệu tốt để lưu trữ dữ liệu trong bộ nhớ trong. Để làm việc với SQLite, chúng ta phải thực hiện rất nhiều thao tác: xây dựng khung chương trình, mô hình, helper, truy vấn,... Điều này đòi hỏi rất nhiều thời gian trong quá trình phát triển phần mềm. Những người mới tìm hiểu SQLite sẽ bỏ ra khá nhiều thời gian trong việc khởi tạo, nhập xuất, tạo các truy vấn và đặc biệt là code sẽ dài và rất khó quản lý.
Core Data tương đối khó xử dụng ngay cả với những người đã có kinh nghiệm, code dài dòng, và việc quản lý dữ liệu rất khó khăn. Core Data lưu dữ liệu vào SQLite, và để nhìn thấy dữ liệu và quản lý dữ liệu trong SQLite một cách trực quan, chúng ta cần sử dụng các công cụ trả phí đắt tiền như SQLite Professional, Core Data Editor,…
Realm là một cơ sở dữ liệu nhẹ, có thể thay thế cả hai thư viện SQL và ORM. Realm không sử dụng SQLite làm engine của nó. Thay vào đó, nó dùng core C++ nhằm mục đích cung cấp một thư viện cơ sở dữ liệu thay thế SQLite
Realm có rất nhiều lợi thế:
Nếu ứng dụng của bạn đang trong quá trình lập trình ở bước đầu thì việc này là khá đơn giản tuy nhiên nếu ứng dụng của bạn đã chạy, bạn có thể sẽ không muốn phải làm gián đoạn quá trình sử dụng của người dùng bở việc ddos có thể sẽ khiến bạn mất đi một số lượng người dùng lớn và đó là lí do chúng ta phải sử dụng migration. Trong bài này mình sẽ nói về Migration trong trong Realm. Nếu các bạn muốn biết cách migration trong coredata các bạn có thể tham khảo bài sau https://viblo.asia/p/migrations-voi-core-data-trong-lap-trinh-ung-dung-ios-l0rvmmxavyqA
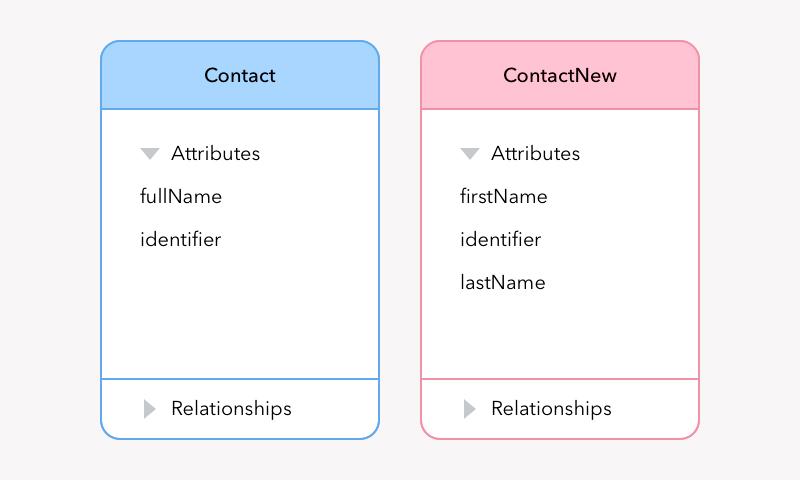
Nào! giờ chúng ta sẽ đi vào Migration trong Realm thông qua một ví dụ. ban đầu chúng ta có 1 class object
Trên đây là hướng dẫn cơ bản về migration trong realm. hi vọng nó có thể giúp ích được ho mọi người khi cần. Xin cảm ơn.
tài liệu tham khảo: https://realm.io/docs/swift/latest/
SQLite là một cơ sở dữ liệu tốt để lưu trữ dữ liệu trong bộ nhớ trong. Để làm việc với SQLite, chúng ta phải thực hiện rất nhiều thao tác: xây dựng khung chương trình, mô hình, helper, truy vấn,... Điều này đòi hỏi rất nhiều thời gian trong quá trình phát triển phần mềm. Những người mới tìm hiểu SQLite sẽ bỏ ra khá nhiều thời gian trong việc khởi tạo, nhập xuất, tạo các truy vấn và đặc biệt là code sẽ dài và rất khó quản lý.
Core Data tương đối khó xử dụng ngay cả với những người đã có kinh nghiệm, code dài dòng, và việc quản lý dữ liệu rất khó khăn. Core Data lưu dữ liệu vào SQLite, và để nhìn thấy dữ liệu và quản lý dữ liệu trong SQLite một cách trực quan, chúng ta cần sử dụng các công cụ trả phí đắt tiền như SQLite Professional, Core Data Editor,…
Realm là một cơ sở dữ liệu nhẹ, có thể thay thế cả hai thư viện SQL và ORM. Realm không sử dụng SQLite làm engine của nó. Thay vào đó, nó dùng core C++ nhằm mục đích cung cấp một thư viện cơ sở dữ liệu thay thế SQLite
Realm có rất nhiều lợi thế:
- Dễ dàng sử dụng hơn
- Tốc độ query nhanh hơn
- Quản lý dữ liệu dễ dàng và trực quan hơn
- Open source và tài liệu tham khảo được viết rất tốt
- Cross platform Với rất nhiều lợi thế như trên, Realm ngày càng được sử dụng phổ biến hơn.
Nếu ứng dụng của bạn đang trong quá trình lập trình ở bước đầu thì việc này là khá đơn giản tuy nhiên nếu ứng dụng của bạn đã chạy, bạn có thể sẽ không muốn phải làm gián đoạn quá trình sử dụng của người dùng bở việc ddos có thể sẽ khiến bạn mất đi một số lượng người dùng lớn và đó là lí do chúng ta phải sử dụng migration. Trong bài này mình sẽ nói về Migration trong trong Realm. Nếu các bạn muốn biết cách migration trong coredata các bạn có thể tham khảo bài sau https://viblo.asia/p/migrations-voi-core-data-trong-lap-trinh-ung-dung-ios-l0rvmmxavyqA
Nào! giờ chúng ta sẽ đi vào Migration trong Realm thông qua một ví dụ. ban đầu chúng ta có 1 class object
class Person: Object {
    @objc dynamic var firstName = ""
    @objc dynamic var lastName = ""
    @objc dynamic var age = 0
}
class Person: Object {
    @objc dynamic var fullName = ""
    @objc dynamic var age = 0
}
func applicationDidFinishLaunching(_ application: UIApplication) {
let config = Realm.Configuration(
    // version (if you've never set a schema version before, the version is 0).
    schemaVersion: 1, migrationBlock: { migration, oldSchemaVersion in
        // We haven’t migrated anything yet, so oldSchemaVersion == 0
        if (oldSchemaVersion < 1) {
                migration.enumerateObjects(ofType: Person.className()) { oldObject, newObject in
                // combine name fields into a single field
                let firstName = oldObject!["firstName"] as! String
                let lastName = oldObject!["lastName"] as! String
                newObject!["fullName"] = "\(firstName) \(lastName)"
        }
    })
Realm.Configuration.defaultConfiguration = config
}
func applicationDidFinishLaunching(_ application: UIApplication) {
let config = Realm.Configuration(
    // version (if you've never set a schema version before, the version is 0).
    schemaVersion: 2, migrationBlock: { migration, oldSchemaVersion in
        // We haven’t migrated anything yet, so oldSchemaVersion == 0
        if (oldSchemaVersion < 1) {
                migration.enumerateObjects(ofType: Person.className()) { oldObject, newObject in
                // combine name fields into a single field
                let firstName = oldObject!["firstName"] as! String
                let lastName = oldObject!["lastName"] as! String
                newObject!["fullName"] = "\(firstName) \(lastName)"
        }
        if (oldSchemaVersion < 2) {
            migration.renameProperty(onType: Person.className(), from: "age", to: "yearsSinceBirth")
        }
    })
Realm.Configuration.defaultConfiguration = config
}
Trên đây là hướng dẫn cơ bản về migration trong realm. hi vọng nó có thể giúp ích được ho mọi người khi cần. Xin cảm ơn.
tài liệu tham khảo: https://realm.io/docs/swift/latest/
Comments
Post a Comment