Chào các bạn.
Ở bài trước mình đã giới thiệu network với generics. Và lần này cũng vậy, nhưng sẽ dành cho layout.
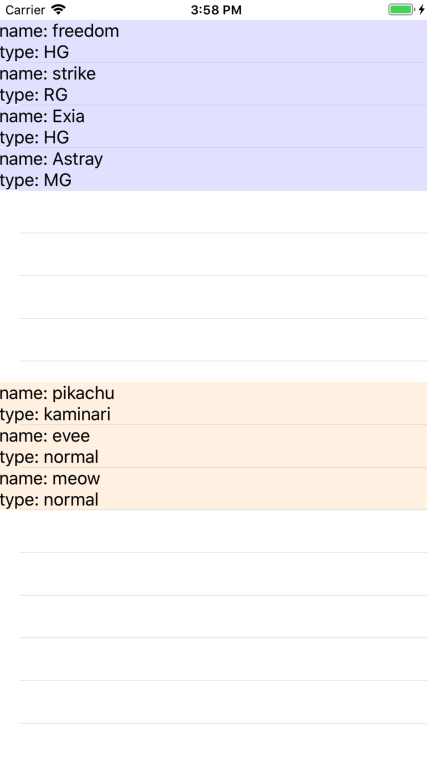
Hình trên bao gồm 2 View chứa tableVIew. Mỗi view chiếm 1 nửa màn hình.
Table này chứa 1 list item Gundam.
Config tương tự y hệt với tableView2 chứa list items Pokemon.
Vậy thì chuyện gì sảy ra nếu bạn có 10 tableView hiển thị 10 Model khác nhau với 10 layout khác nhau cho từng loại.
Có lẽ việc viết copy paste 10 lần 1 đoạn code y hệt không phải ý hay. Và lúc này Generic xuất hiện.
Mà đơn giản chỉ là:
Có nghĩa là mình nên có một baseCell có thể nhận được tất cả các Model như sau.
Và để nhận được thì BaseTable sẽ phải được viết lại chút như sau.
Rất dễ hiểu và không mất công copy lại code cũ.
Bài viết của mình giúp ích được cho các bạn thì mình rất vui . Nếu còn các sử dụng generic nào khác nữa thì nhờ các bạn comment bên dưới nhé.
source: https://github.com/nguyentienhoang810/GenericTableView
Ở bài trước mình đã giới thiệu network với generics. Và lần này cũng vậy, nhưng sẽ dành cho layout.
Tình huống
GIả sử mình có 2 tableView với 2 cell có layout khác nhau và hiển thị nội dung với các model khác nhau như thế này.Hình trên bao gồm 2 View chứa tableVIew. Mỗi view chiếm 1 nửa màn hình.
- Cụ thể:
struct Gundam {
    var name: String?
    var type: String?
}

struct Pokemon {
    var name: String?
    var type: String?
}
Table này chứa 1 list item Gundam.
Config tương tự y hệt với tableView2 chứa list items Pokemon.
//Table bên trên cùng cell 1
class Table1: UIView, UITableViewDelegate, UITableViewDataSource {

 var items = [Gundam]()
 private let tb = UITableView()

 override init(frame: CGRect) {
     super.init(frame: frame)

     addView()
     tb.delegate = self
     tb.dataSource = self
     tb.register(Cell1.self, forCellReuseIdentifier: "Cell")
 }

 private func addView() {
     self.addSubview(tb)
     tb.translatesAutoresizingMaskIntoConstraints  = false
     NSLayoutConstraint.activate([
         tb.leadingAnchor.constraint(equalTo: self.leadingAnchor),
         tb.trailingAnchor.constraint(equalTo: self.trailingAnchor),
         tb.topAnchor.constraint(equalTo: self.topAnchor),
         tb.bottomAnchor.constraint(equalTo: self.bottomAnchor)
         ])
 }

 func tableView(_ tableView: UITableView, numberOfRowsInSection section: Int) -> Int {
     return items.count
 }

 func tableView(_ tableView: UITableView, cellForRowAt indexPath: IndexPath) -> UITableViewCell {
     let cell = tableView.dequeueReusableCell(withIdentifier: "Cell", for: indexPath) as! Cell1
     cell.item = items[indexPath.item]
     return cell
 }

 required init?(coder aDecoder: NSCoder) {
     fatalError("init(coder:) has not been implemented")
 }
}
class ViewController: UIViewController {

    private var gundams = [Gundam]()
    private var pokemons = [Pokemon]()

    private let tb1 = Table1()
    private let tb2 = Table2()


    override func viewDidLoad() {
        super.viewDidLoad()
        addDummyData()
        view.addSubview(tb1)
        view.addSubview(tb2)
        tb1.translatesAutoresizingMaskIntoConstraints = false
        tb2.translatesAutoresizingMaskIntoConstraints = false
        NSLayoutConstraint.activate([
            tb1.leadingAnchor.constraint(equalTo: view.leadingAnchor),
            tb1.trailingAnchor.constraint(equalTo: view.trailingAnchor),
            tb1.topAnchor.constraint(equalTo: view.topAnchor),
            tb1.heightAnchor.constraint(equalTo: view.heightAnchor, multiplier: 1/2),

            tb2.leadingAnchor.constraint(equalTo: view.leadingAnchor),
            tb2.trailingAnchor.constraint(equalTo: view.trailingAnchor),
            tb2.topAnchor.constraint(equalTo: tb1.bottomAnchor),
            tb2.heightAnchor.constraint(equalTo: view.heightAnchor, multiplier: 1/2)
        ])
    }

    private func addDummyData() {
        tb1.items = [
            Gundam.init(name: "freedom", type: "HG"),
            Gundam.init(name: "strike", type: "RG"),
            Gundam.init(name: "Exia", type: "HG"),
            Gundam.init(name: "Astray", type: "MG")
        ]

        tb2.items = [
            Pokemon.init(name: "pikachu", type: "kaminari"),
            Pokemon.init(name: "evee", type: "normal"),
            Pokemon.init(name: "meow", type: "normal")
        ]

    }
}
Vậy thì chuyện gì sảy ra nếu bạn có 10 tableView hiển thị 10 Model khác nhau với 10 layout khác nhau cho từng loại.
Có lẽ việc viết copy paste 10 lần 1 đoạn code y hệt không phải ý hay. Và lúc này Generic xuất hiện.
Giải pháp
Tạo một BaseTableView dùng chung cho tất cả các Cell
//BaseTableView sẽ nhận kiểu T như một UITableViewCell
class BaseTable<T: UITableViewCell> : UIView, UITableViewDataSource, UITableViewDelegate {

    func tableView(_ tableView: UITableView, numberOfRowsInSection section: Int) -> Int {
        return 3 //Giá trị mặc định vì chưa đổ data vào tableView này.
    }

    func tableView(_ tableView: UITableView, cellForRowAt indexPath: IndexPath) -> UITableViewCell {
        let cell = tableView.dequeueReusableCell(withIdentifier: "Cell", for: indexPath)

        return cell
    }


    private let tb = UITableView()

    override init(frame: CGRect) {
        super.init(frame: frame)
        addView()
        tb.delegate = self
        tb.dataSource = self
        tb.register(T.self, forCellReuseIdentifier: "Cell") //Đăng ký cell T
    }

    private func addView() {
        self.addSubview(tb)
        tb.translatesAutoresizingMaskIntoConstraints = false
        NSLayoutConstraint.activate([
            tb.leadingAnchor.constraint(equalTo: self.leadingAnchor),
            tb.trailingAnchor.constraint(equalTo: self.trailingAnchor),
            tb.topAnchor.constraint(equalTo: self.topAnchor),
            tb.bottomAnchor.constraint(equalTo: self.bottomAnchor)
        ])
    }

    required init?(coder aDecoder: NSCoder) {
        fatalError("init(coder:) has not been implemented")
    }
}
Mà đơn giản chỉ là:
//Tạo tableView trong ViewController.
//BaseTable sẽ tự đăng ký custom cell tương ứng.
private let tb1 = BaseTable<Cell1>()
private let tb2 = BaseTable<Cell2>()
Kiểu dữ liệu tương ứng với cell
Giả thuyết trong bài này là mỗi cell sẽ có một layout riêng tương ứng với từng Model truyền vào cell đó.Có nghĩa là mình nên có một baseCell có thể nhận được tất cả các Model như sau.
//có thể nhận tất các kiểu Model đại diện bởi chữ U,
//tất nhiên mình có thể dùng chữ Z,X...thay thế.
class BaseCell<U>: UITableViewCell {
    var item: U?
}
Và để nhận được thì BaseTable sẽ phải được viết lại chút như sau.
//Thay vì UITableViewCell như trên, BaseTable sẽ nhận BaseCell cùng các kiểu Model được định nghĩa bằng U
class BaseTable<T: BaseCell<U>, U> : UIView, UITableViewDataSource, UITableViewDelegate {

    var items = [U]() //items list được truyền vào BaseTable

    private let tb = UITableView()

    override init(frame: CGRect) {
        super.init(frame: frame)
        addView()
        tb.delegate = self
        tb.dataSource = self
        tb.register(T.self, forCellReuseIdentifier: "Cell") //register Cell
    }

    func tableView(_ tableView: UITableView, numberOfRowsInSection section: Int) -> Int {
        return items.count
    }

    func tableView(_ tableView: UITableView, cellForRowAt indexPath: IndexPath) -> UITableViewCell {
        let cell = tableView.dequeueReusableCell(withIdentifier: "Cell", for: indexPath) as! T
        cell.item = items[indexPath.row] //truyền item vào cell, có index dựa vào indexPath
        return cell
    }
    //Phần layout giữ nguyên
}
Custom Cell dựa vào BaseCell
//CustomCell1 này sẽ kê thừa BaseCell và nhận Model Gundam
class CustomCell1: BaseCell<Gundam> {
    private let nameLbl = UILabel()
    private let typeLbl = UILabel()

    override var item: Gundam? {
        didSet {
            nameLbl.text = "name: \(item?.name ?? "no name")"
            typeLbl.text = "type: \(item?.type ?? "no type")"
        }
    }
    //Custom layout 1
    func configView() {
        contentView.addSubview(nameLbl)
        contentView.addSubview(typeLbl)
        nameLbl.backgroundColor = UIColor.blue.withAlphaComponent(0.1)
        typeLbl.backgroundColor = UIColor.blue.withAlphaComponent(0.1)
        nameLbl.numberOfLines = 0
        typeLbl.numberOfLines = 0
        nameLbl.translatesAutoresizingMaskIntoConstraints = false
        typeLbl.translatesAutoresizingMaskIntoConstraints = false
        NSLayoutConstraint.activate([
            nameLbl.leadingAnchor.constraint(equalTo: contentView.leadingAnchor),
            nameLbl.trailingAnchor.constraint(equalTo: contentView.trailingAnchor),
            nameLbl.topAnchor.constraint(equalTo: contentView.topAnchor),

            typeLbl.leadingAnchor.constraint(equalTo: contentView.leadingAnchor),
            typeLbl.trailingAnchor.constraint(equalTo: contentView.trailingAnchor),
            typeLbl.topAnchor.constraint(equalTo: nameLbl.bottomAnchor),
            typeLbl.bottomAnchor.constraint(equalTo: contentView.bottomAnchor)
            ])
    }
    override init(style: UITableViewCell.CellStyle, reuseIdentifier: String?) {
        super.init(style: .default, reuseIdentifier: "Cell")
        configView()
    }
    required init?(coder aDecoder: NSCoder) {
        fatalError("init(coder:) has not been implemented")
    }
}

//Tương tự với CustomCell2, nhận Model Pokemon
class CustomCell2: BaseCell<Gundam> {
    // Custom Layout 2
}
Rất dễ hiểu và không mất công copy lại code cũ.
    private let tb1 = BaseTable<CustomCell1, Gundam>() //CustomCell1 cho table1 cùng Model Gundam
    private let tb2 = BaseTable<CustomCell2, Pokemon>() //CustomCell2 cho table2 cùng Model Pokemon
Bài viết của mình giúp ích được cho các bạn thì mình rất vui . Nếu còn các sử dụng generic nào khác nữa thì nhờ các bạn comment bên dưới nhé.
source: https://github.com/nguyentienhoang810/GenericTableView
Comments
Post a Comment