Tôi
rất thích sử dụng Interface Builder (IB) khi lập trình iOS. Nó giúp tôi
làm giảm bớt rất nhiều dòng code mà có thể xuất hiện trên các view
layer. Nhưng sử dụng storyboards cũng mang lại rất nhiều vấn đề. Bài
viết này tôi sẽ giải thích cho các bạn vì sao sử dụng file xib riêng
biệt giúp hiệu suất của tôi hiệu quả hơn là sử dụng Storyboard.
Note: Đây hoàn toàn là ý kiến và quan điểm cá nhân của riêng tôi, do vậy bạn vẫn có thể làm theo cách khác nếu như nó phù hợp và hiệu quả hơn với bạn.
Mặc dù storyboard mang lại rất nhiều lợi ích, nhưng bên cạnh đó nó cũng mang lại một số phiền phức như sau: git merge conflicts, mutable variables, coupled view controllers.
Tùy thuộc vào độ lớn của project team bạn và mức độ hỏng ở storyboard, bạn sẽ có nhiều hoặc ít conflict, nhưng chắc chắn giải quyết đống conflict này không phải là điều dễ chịu gì.
Truyền dữ liệu khi sử dụng storyboard thường là qua cách override phương thức prepareForSegue ở ViewControllerA để đặt giá trị cho variable bên ViewControllerB. Vấn để ở đây là không có gì ngăn bạn thực hiện chuyển segue mà không thiết lập giá trị đó.
Việc không set giá trị của biến unwrapped đó mà đáng lẽ ra đã được set trước khi thực thi segue là một trong những nguyên nhân gây crash app mà sử dụng storyboard.
View controller không nên có gắn kết như vậy. Một view controller không nên biết về view controller tiếp theo trong navigation flow. Một trong những cách phổ biến để giải quyết vấn đề này đó là sử dụng navigation coordinators và ủy quyền cho navigation flow thực thi tới đối tượng mới
View Controller có thể thiết lập theo đoạn mã dưới đây:
Khi bạn đang phát triển ứng dụng độc lập. Như vậy sẽ không có conflict khi merge code. Ứng dụng đã có sẵn một flow rõ ràng, các View Controller cố định. Ở trường hợp này, storyboard sẽ đi theo flow của app mà không gặp vấn đề gì.
Hy vọng qua bài viết trên các bạn sẽ hiểu rõ được sự khác nhau giữa file Xib và Storyboard, từ đó chọn ra được phương án tối ưu nhất cho project của mình.
Note: Đây hoàn toàn là ý kiến và quan điểm cá nhân của riêng tôi, do vậy bạn vẫn có thể làm theo cách khác nếu như nó phù hợp và hiệu quả hơn với bạn.
Storyboard thực chất là cái gì?
Có thể coi storyboard như là một bản thiết kế của ứng dụng, bao gồm cả giao diện và luồng chạy của ứng dụng. Sẽ thật là tuyệt vời nếu như bạn join vào một project mà team đó sử dụng storyboards và team đó phối hợp, phân chia công việc rất hiệu quả. Bạn sẽ có cái nhìn rõ ràng về cấu trúc thiết kế của ứng dụng và từ đó bạn sẽ hiểu project đó rất nhanh.Mặc dù storyboard mang lại rất nhiều lợi ích, nhưng bên cạnh đó nó cũng mang lại một số phiền phức như sau: git merge conflicts, mutable variables, coupled view controllers.
Git merge conflicts
Tưởng tượng rằng bạn đang làm ở màn hình login. Một người khác trong team bạn làm ở màn hình register. Cuối ngày, cả hai đều cố push code lên remote git và BOOM!. Conflict ở khắp mọi nơi.Tùy thuộc vào độ lớn của project team bạn và mức độ hỏng ở storyboard, bạn sẽ có nhiều hoặc ít conflict, nhưng chắc chắn giải quyết đống conflict này không phải là điều dễ chịu gì.
Mutable variables
Khi sử dụng storyboard, bạn sẽ không thể tạo hàm custom init, do vậy bạn sẽ gặp vấn đề khi muốn truyền dữ liệu từ màn này sang màn khác.Truyền dữ liệu khi sử dụng storyboard thường là qua cách override phương thức prepareForSegue ở ViewControllerA để đặt giá trị cho variable bên ViewControllerB. Vấn để ở đây là không có gì ngăn bạn thực hiện chuyển segue mà không thiết lập giá trị đó.
Việc không set giá trị của biến unwrapped đó mà đáng lẽ ra đã được set trước khi thực thi segue là một trong những nguyên nhân gây crash app mà sử dụng storyboard.
Coupled view controllers
Khi bạn sử dụng storyboard, bạn thiết lập segue giữa những view controllers. Nếu ViewController A có segue đến ViewControllerB, chúng sẽ bị dính chặt vào nhau. ViewController A biết rằng ViewControllerB sẽ được hiển thị sau đó.View controller không nên có gắn kết như vậy. Một view controller không nên biết về view controller tiếp theo trong navigation flow. Một trong những cách phổ biến để giải quyết vấn đề này đó là sử dụng navigation coordinators và ủy quyền cho navigation flow thực thi tới đối tượng mới
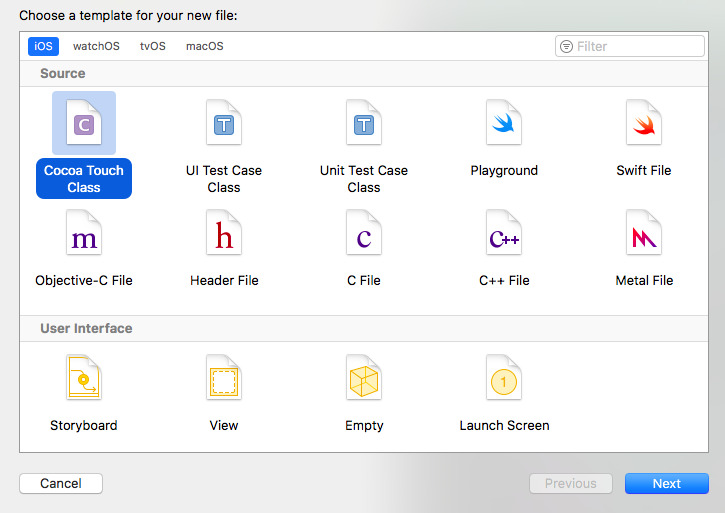
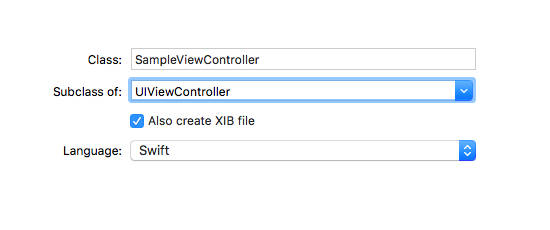
Sử dụng Xibs
Tạo một file xib cũng đơn giản như tạo một ClassView Controller có thể thiết lập theo đoạn mã dưới đây:
//
//  SampleViewController.swift
//  MediumSamples
//
//  Created by Fernando Ortiz on 1/4/17.
//  Copyright © 2017 Fernando Martín Ortiz. All rights reserved.
//
import UIKit

class SampleViewController: UIViewController {

    // This Very important attribute is necessary for this view controller
    // to perform some actions.
    //
    // Note that, in this case, this attribute is declared as 'let',
    // it's IMMUTABLE.
    let veryImportantAttribute: String

    override func viewDidLoad() {
        super.viewDidLoad()
    }

    // In this custom initializer we can send dependencies that are needed
    // from this view controller to work properly.
    // We simply can't forget to pass data. In that case, the project won't compile.
    init(veryImportantAttribute: String) {
        self.veryImportantAttribute = veryImportantAttribute
        super.init(nibName: "SampleViewController", bundle: nil)
    }

    // This will be never called, so we don't need to care
    // about its implementation.
    required init?(coder aDecoder: NSCoder) {
        fatalError("init(coder:) has not been implemented")
    }

}
Chỉnh sửa AppDelegate
AppDelegate cần phải chỉnh sửa để cho phép khởi động ứng dụng mà không cần sử dụng storyboard://
// AppDelegate.swift
// MediumSamples
//
// Created by Fernando Ortiz on 1/3/17.
// Copyright © 2017 Fernando Martín Ortiz. All rights reserved.
//
import UIKit
@UIApplicationMain
class AppDelegate: UIResponder, UIApplicationDelegate {
var window: UIWindow?
func application(_ application: UIApplication, didFinishLaunchingWithOptions launchOptions: [UIApplicationLaunchOptionsKey: Any]?) -> Bool {
self.window = UIWindow(frame: UIScreen.main.bounds)
let attribute = "Sample"
let initialViewController = SampleViewController(veryImportantAttribute: attribute)
window!.rootViewController = initialViewController
window!.makeKeyAndVisible()
return true
}
}
Điểm khác biệt khi sử dụng file XIB riêng biệt
Sử dụng file XIB riêng biệt cho từng View Controller có những lợi thế sau: Phân tách rõ ràng từng màn hình, qua đó tránh được tình trạng 2 người cùng làm ở 1 file và gây conflict khi merge code. Nó cho phép chúng ta dùng những immutable variable. Khi bạn khởi tạo view controlelr, nó sẽ được tạo bởi những thành phần sẵn có, do vậy bạn sẽ không mắc phải những sai lầm khi truyền dữ liệu. Phân tách các View ra theo từng View Controller riêng rẽ, không liên quan gì đến nhau. Tuân thủ qui tắc loosely coupling. Sau này cũng sẽ dễ dàng hơn cho việc maintain code, dễ thay thế.Khi nào sử dụng Storyboard?
Xib và Storyboard thực ra cũng chỉ là công cụ, tài nguyên để chúng ta sử dụng. Không có công cụ nào là hoàn hảo cả. Và vẫn có những trường hợp sử dụng Storyboard là phương án tối ưu hơn. Ví dụ như:Khi bạn đang phát triển ứng dụng độc lập. Như vậy sẽ không có conflict khi merge code. Ứng dụng đã có sẵn một flow rõ ràng, các View Controller cố định. Ở trường hợp này, storyboard sẽ đi theo flow của app mà không gặp vấn đề gì.
Hy vọng qua bài viết trên các bạn sẽ hiểu rõ được sự khác nhau giữa file Xib và Storyboard, từ đó chọn ra được phương án tối ưu nhất cho project của mình.
Comments
Post a Comment