Chào
mọi người, trong bài viết lần này mình sẽ chia sẻ cách áp dụng rxswift
vào một project nhỏ dùng để validate các textfield mà người dùng nhập
vào kết hợp với mô hình MVVM.
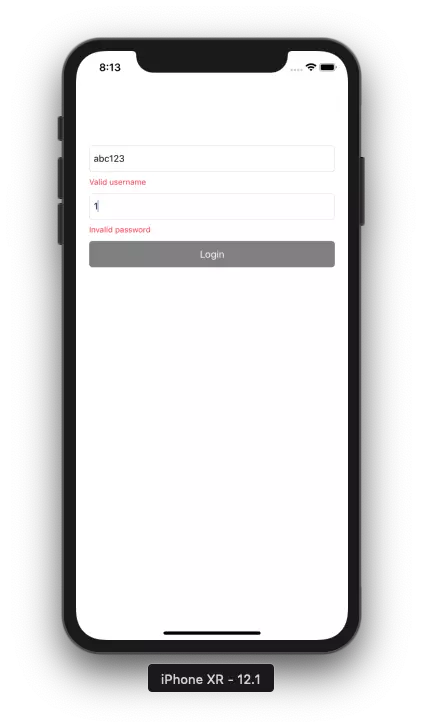
 Không thoả mãn điều kiện
Đầu tiên, chúng ta sẽ tạo một project. Ở đây mình đặt tên project là "RxExample1". Tiếp theo mình sẽ pod thư viện RxSwift về project. Sau khi pod install thành công, mở thư mục chứa project và mở file "RxExample1.xcworkspace". Đầu tiên, chúng ta sẽ cần tạo UI cơ bản. Ở đây mình tạo UI chỉ đơn giản với 2 textfield cho việc nhập thông tin bao gồm: email và password. Tiếp theo là 2 label dành cho việc hiển thị messsage error đối với mỗi textfield. Cuối cùng là một button cho việc handle login.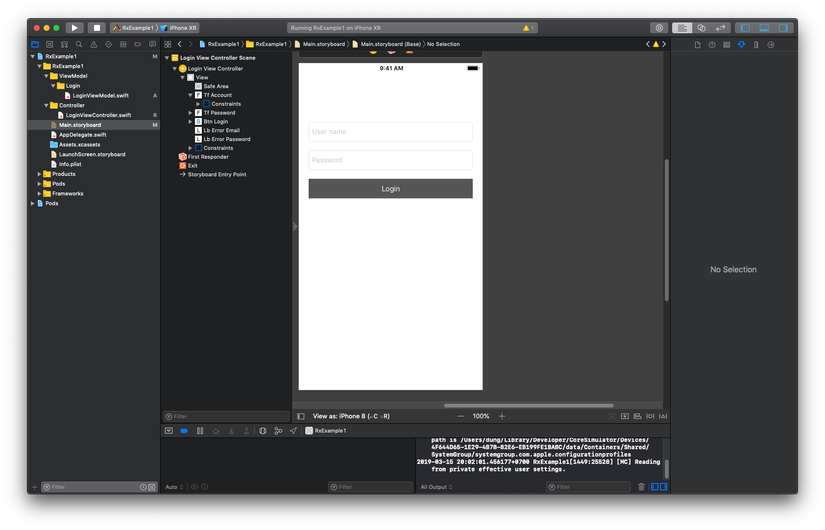
--
Tiếp theo là chúng ta sẽ xử lý trong ViewController
Xin cảm ơn mọi người đã đọc đến đây
Github repo:https://github.com/dungkv95/RxExample1
MVVM
Mô hình MVVM thì chắc các bạn dev đều đã biết đến. Ưu điểm của MVVM là gì? Mình có đọc được bài viết của một anh rất hay nên có dẫn link ngay trong bài này: Swift: Những lợi ích của MVVM (Model - View - ViewModel)Bắt đầu với RxSwift
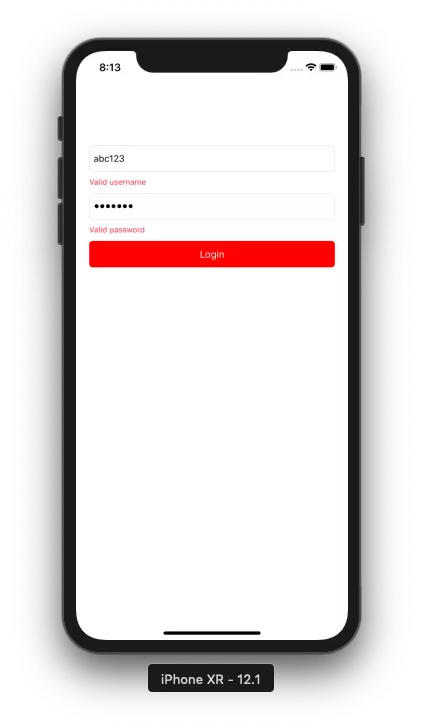
Đây là hình ảnh phần demo nhỏ Thoả mãn điều kiện
Không thoả mãn điều kiện
Đầu tiên, chúng ta sẽ tạo một project. Ở đây mình đặt tên project là "RxExample1". Tiếp theo mình sẽ pod thư viện RxSwift về project. Sau khi pod install thành công, mở thư mục chứa project và mở file "RxExample1.xcworkspace". Đầu tiên, chúng ta sẽ cần tạo UI cơ bản. Ở đây mình tạo UI chỉ đơn giản với 2 textfield cho việc nhập thông tin bao gồm: email và password. Tiếp theo là 2 label dành cho việc hiển thị messsage error đối với mỗi textfield. Cuối cùng là một button cho việc handle login.
MVVM
Ở đây mình sẽ sử dụng mô hình MVVM để tạo ra class LoginViewModel sử dụng cho việc sử lý logic và mapping dữ liệu với Model. import RxSwift
class LoginViewModel {
// Khai báo biến để hứng dữ liệu từ VC
var usernameText = Variable<String>("")
var passwordText = Variable<String>("")
// Khai báo viến Bool để lắng nghe sự kiện và trả về kết quả thoả mãn điều kiện
var isValidUsername: Observable<Bool> {
return self.usernameText.asObservable().map { username in
username.count >= 6
}
}
var isValidPassword: Observable<Bool> {
return self.passwordText.asObservable().map {
password in
password.count >= 6
}
}
// Khai báo biến để lắng nghe kết quả của cả 2 sự kiện trên
var isValid: Observable<Bool> {
return Observable.combineLatest(isValidUsername, isValidPassword) {$0 && $1}
}
}
--
Tiếp theo là chúng ta sẽ xử lý trong ViewController
import UIKit
import RxSwift
import RxCocoa

class LoginViewController: UIViewController {

    @IBOutlet fileprivate weak var tfAccount: UITextField!
    @IBOutlet fileprivate weak var tfPassword: UITextField!
    @IBOutlet fileprivate weak var lbErrorEmail: UILabel!
    @IBOutlet fileprivate weak var lbErrorPassword: UILabel!
    @IBOutlet fileprivate weak var btnLogin: UIButton!

    var viewModel: LoginViewModel!
    let disposeBag = DisposeBag()
    override func viewDidLoad() {
        super.viewDidLoad()
        // set delegate
        tfAccount.delegate = self
        tfPassword.delegate = self
        //init viewmodel
        viewModel = LoginViewModel()

        //bind value of textfield to variable of viewmodel
        _ = tfAccount.rx.text.map { $0 ?? "" }.bind(to: viewModel.usernameText)
        _ = tfPassword.rx.text.map { $0 ?? "" }.bind(to: viewModel.passwordText)

        //  subscribe result of variable isValid in LoginViewModel then handle button login is enable or not?
        _ = viewModel.isValid.subscribe({ [weak self] isValid in
            guard let strongSelf = self, let isValid = isValid.element else { return }
            strongSelf.btnLogin.isEnabled = isValid
            strongSelf.btnLogin.backgroundColor = isValid ? UIColor.red : UIColor.gray
        })
    }

    @IBAction func actionLogin(_ sender: Any) {
        //do something
    }

}

extension LoginViewController: UITextFieldDelegate {
    func textFieldDidBeginEditing(_ textField: UITextField) {
        switch textField {
        case self.tfAccount:
            self.viewModel.isValidUsername.subscribe({ [weak self] isValid in
                self?.lbErrorEmail.text = isValid.element! ? "Valid username" : "Invalid username"
            }).disposed(by: disposeBag)
        case self.tfPassword:
            viewModel.isValidPassword.subscribe({ [weak self] isValid in
                self?.lbErrorPassword.text = isValid.element! ? "Valid password" : "Invalid password"
            }).disposed(by: disposeBag)
        default:
            return
        }
    }
}
Xin cảm ơn mọi người đã đọc đến đây
Github repo:https://github.com/dungkv95/RxExample1
Comments
Post a Comment