Thuật toán Dijkstra trong Swift
 Xin chào các bạn hôm nay mình xin phép trình bày về thuật toán Dijkstra
và minh hoạ nó thông qua ví dụ sử dụng ngôn ngữ Swift. Nếu ai đã từng
nghe về thuật ngữ Lý thuyết đồ thị hay học qua môn Toán Rời Rạc thì chắc
chắn rằng bạn đã từng làm quen với thuật toán Dijkstra. Còn nếu chưa
thì bạn đừng quá lo lắng bởi vì trong bài viết này mình sẽ trình bày chi
tiết bao gồm toàn bộ mọi thứ bạn cần biết.
Bài viết sẽ gồm các mục sau:
Xin chào các bạn hôm nay mình xin phép trình bày về thuật toán Dijkstra
và minh hoạ nó thông qua ví dụ sử dụng ngôn ngữ Swift. Nếu ai đã từng
nghe về thuật ngữ Lý thuyết đồ thị hay học qua môn Toán Rời Rạc thì chắc
chắn rằng bạn đã từng làm quen với thuật toán Dijkstra. Còn nếu chưa
thì bạn đừng quá lo lắng bởi vì trong bài viết này mình sẽ trình bày chi
tiết bao gồm toàn bộ mọi thứ bạn cần biết.
Bài viết sẽ gồm các mục sau:- Giới thiệu qua về lý thuyết đồ thị
- Giới thiệu về thuật toán Dijkstra
- Implement thuật toán trong Swift
- Tổng kết
- Tài liệu tham khảo
Giới thiệu qua về lý thuyết đồ thị
Trong mục này mình sẽ trình bày về một số kiến thức cơ bản về lý thuyết đồ thị. Các bạn hãy để ý cái hình ở mục đầu bài viết. Cái này trong khoa học máy tính được gọi là đồ thị. Các vòng trong được gọi là một Node và chúng sẽ là đại diện cho một thực thể trong đồ thị. Trong khi các đường kết nối các nút với nhau thì được gọi là cạnh(edges). Các kết này có 2 loại: Bidirectional(2 chiều) hoặc mono-directional(1 chiều).Tuy là những khái niệm đơn giản nhưng có rất nhiều ứng dụng khổng lồ trên toàn thế giới và có lẽ bạn đang sử dụng chúng mọi lúc!
Một số ví dụ trong đời sống hằng ngày
Bidirectional Graph: Facebook Để hình dung được bạn bè trên facebook của chính bạn thông qua hình ảnh dưới đây
Trong biểu đồ này, mỗi node là một người và mỗi kết nối (Bidirectional) là đại diện cho tình bạn giữa những người này.
Mono-directional Graph: Twitter
Nếu chúng ta xem những người mà đang follower mình trên Twitter thì kết quả sẽ như sau
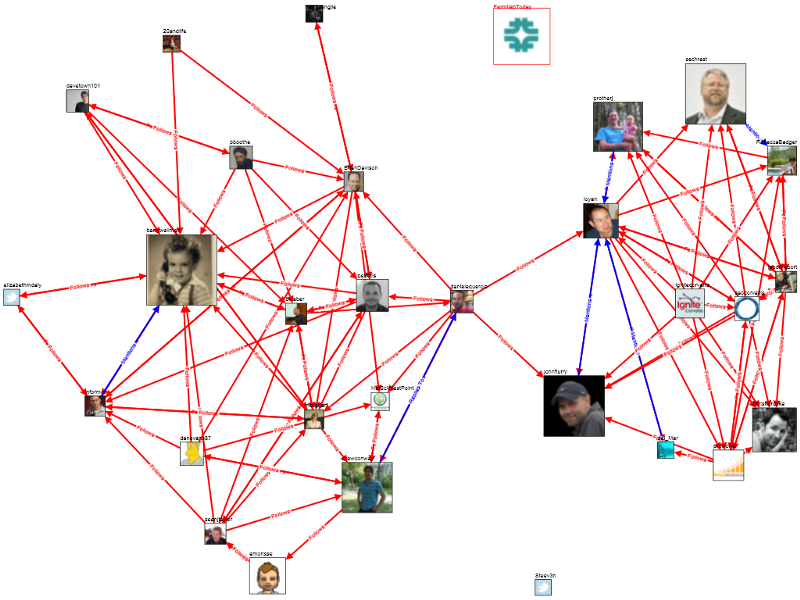
Trong trường hợp này, mỗi node là một tài khoản Twitter. Nhưng các kết nối bây giờ là mono-directional (đơn hướng) có nghĩa là nếu tôi theo dõi bạn thì cũng không có nghĩa là bạn đang theo dõi tôi.
Giới thiệu về thuật toán Dijkstra
Tản mạn từ đầu đến giờ mà chưa nhắc đến mục đích của thuật toán Dijkstra là gì?? Vâng vấn đề muôn thủa ở trong đồ thị đó là tìm được đường đi từ một node đến một node bất kì sao cho có đường đi(nếu nó tồn tại) và chi phí thấp nhất.Đối với chúng ta thì đây là một trò chơi đơn giản(như giải mã một mê cung) nhưng đối với một cái máy tính thì đó là một thử thách lớn - vừa phải giải quyết được - vừa phải giải quyết nhanh nhất có thể.
Cũng giống như GoogleMap, AppleMap áp dụng để có thể tính toán để tìm ra tuyến đường tốt nhất cho người sử dụng.
Thuật toán Dijkstra dựa trên 3 bước:
- Tìm node có chi phí thấp nhất mà chưa truy cập
- Đánh dấu đã truy cập và theo dõi những node nào mà ở đó có thể truy cập
- Repeat
Implement thuật toán trong Swift
Trong phần này mình sẽ thực hiện để hình dung hoá lại tất cả trong Swift.Node
Trước tiên ta sẽ tạo 1 class là Node sẽ có thuộc tính làvisited để đánh dấu Node đã được truy cập và một mảng các kết nối đến Node khacssssclass Node {
var visited = false
var connections: [Connection] = []
}
Connection
Tiếp theo ta sẽ tạo 1 class là Connection có khai báo một biến làweight đại diện cho chi phí của cạnh đó và có thêm 1 biến nữa để biết Node mà nó sẽ kết nối.class Connection {
public let to: Node
public let weight: Int
public init(to node: Node, weight: Int) {
assert(weight >= 0, "weight has to be equal or greater than zero")
self.to = node
self.weight = weight
}
}var connections: [Connection] = []
}
Path
Cuối cùng chúng ta cần xác định một đường dẫn. Nó chính là một chuỗi các Node. Cái này sẽ giúp chúng ta theo dõi những đường nào trong biểu đồ mà chúng ta đã truy cập và cách mà chúng ta biết đến nó.class Path {
public let cumulativeWeight: Int
public let node: Node
public let previousPath: Path?
init(to node: Node, via connection: Connection? = nil, previousPath path: Path? = nil) {
if
let previousPath = path,
let viaConnection = connection {
self.cumulativeWeight = viaConnection.weight + previousPath.cumulativeWeight
} else {
self.cumulativeWeight = 0
}
self.node = node
self.previousPath = path
}
}
cumulativeWeight. Chi phí này là tổng của tất cả các kết nối mà nó đã đi từ node nguồn đến node này.The Algorithm
func shortestPath(source: Node, destination: Node) -> Path? {
var frontier: [Path] = [] {
didSet { frontier.sort { return $0.cumulativeWeight < $1.cumulativeWeight } } // the frontier has to be always ordered
}
frontier.append(Path(to: source)) // the frontier is made by a path that starts nowhere and ends in the source
while !frontier.isEmpty {
let cheapestPathInFrontier = frontier.removeFirst() // getting the cheapest path available
guard !cheapestPathInFrontier.node.visited else { continue } // making sure we haven't visited the node already
if cheapestPathInFrontier.node === destination {
return cheapestPathInFrontier // found the cheapest path 😎
}
cheapestPathInFrontier.node.visited = true
for connection in cheapestPathInFrontier.node.connections where !connection.to.visited { // adding new paths to our frontier
frontier.append(Path(to: connection.to, via: connection, previousPath: cheapestPathInFrontier))
}
} // end while
return nil // we didn't find a path 😣
}
frontier: Tập hợp cá đường dẫn đến các node có thể tiếp cận từ các node mà chúng ta đã visitedVâng đến đây thì chúng ta sẽ bắt đầu theo các step của thuật toán Dijkstra:
- Tìm node chưa truy cập rẻ nhất
let cheapestPathInFrontier = frontier.removeFirst() - Đánh dấu là đã truy cập và theo dõi các node nào mà ta có thể truy cập từ nó
cheapestPathInFrontier.node.visited = truefor connection in cheapestPathInFrontier.node.connections where !connection.to.visited { // adding new paths to our frontier frontier.append(Path(to: connection.to, via: connection, previousPath: cheapestPathInFrontier)) } - Repeat
if cheapestPathInFrontier.node === destination {
return cheapestPathInFrontier // found the cheapest path 😎
}
return nil // we didn't find a path 😣
Swift Playground
Trên kia đang chỉ là chia nhỏ ra từng mục và từng phần để mọi người có thể hiểu rõ hơn từng phần. Đến đây ta sẽ bắt đầu thực hiện trò chơi với thuật toán Dijkstra trên Playgroundclass Node {
var visited = false
var connections: [Connection] = []
}
class Connection {
public let to: Node
public let weight: Int
public init(to node: Node, weight: Int) {
assert(weight >= 0, "weight has to be equal or greater than zero")
self.to = node
self.weight = weight
}
}
class Path {
  public let cumulativeWeight: Int
  public let node: Node
  public let previousPath: Path?

  init(to node: Node, via connection: Connection? = nil, previousPath path: Path? = nil) {
    if
      let previousPath = path,
      let viaConnection = connection {
      self.cumulativeWeight = viaConnection.weight + previousPath.cumulativeWeight
    } else {
      self.cumulativeWeight = 0
    }

    self.node = node
    self.previousPath = path
  }
}
extension Path {
var array: [Node] {
var array: [Node] = [self.node]
var iterativePath = self
while let path = iterativePath.previousPath {
array.append(path.node)
iterativePath = path
}
return array
}
}
func shortestPath(source: Node, destination: Node) -> Path? {
  var frontier: [Path] = [] {
    didSet { frontier.sort { return $0.cumulativeWeight < $1.cumulativeWeight } } // the frontier has to be always ordered
  }

  frontier.append(Path(to: source)) // the frontier is made by a path that starts nowhere and ends in the source

  while !frontier.isEmpty {
    let cheapestPathInFrontier = frontier.removeFirst() // getting the cheapest path available
    guard !cheapestPathInFrontier.node.visited else { continue } // making sure we haven't visited the node already

    if cheapestPathInFrontier.node === destination {
      return cheapestPathInFrontier // found the cheapest path 😎
    }

    cheapestPathInFrontier.node.visited = true

    for connection in cheapestPathInFrontier.node.connections where !connection.to.visited { // adding new paths to our frontier
      frontier.append(Path(to: connection.to, via: connection, previousPath: cheapestPathInFrontier))
    }
  } // end while
  return nil // we didn't find a path 😣
}
// **** EXAMPLE BELOW ****
class MyNode: Node {
let name: String
init(name: String) {
self.name = name
super.init()
}
}
let nodeA = MyNode(name: "A")
let nodeB = MyNode(name: "B")
let nodeC = MyNode(name: "C")
let nodeD = MyNode(name: "D")
let nodeE = MyNode(name: "E")
nodeA.connections.append(Connection(to: nodeB, weight: 1))
nodeB.connections.append(Connection(to: nodeC, weight: 3))
nodeC.connections.append(Connection(to: nodeD, weight: 1))
nodeB.connections.append(Connection(to: nodeE, weight: 1))
nodeE.connections.append(Connection(to: nodeC, weight: 1))
let sourceNode = nodeA
let destinationNode = nodeD
var path = shortestPath(source: sourceNode, destination: destinationNode)
if let succession: [String] = path?.array.reversed().flatMap({ $0 as? MyNode}).map({$0.name}) {
print("🏁 Quickest path: \(succession)")
} else {
print("💥 No path between \(sourceNode.name) & \(destinationNode.name)")
}

Comments
Post a Comment