
Tìm hiểu về Thread trong Swift iOS


Tìm hiểu về Thread trong Swift iOS

Đối với những lập trình viên lần đầu làm quen với iOS, hoặc đã quen với cách tiếp cận của các nền tảng khác, sẽ khá nhiều khó khăn khi làm việc với Thread trong iOS.
Bài viết này sẽ giới thiệu một số điểm lưu ý khi làm việc với Thread trong iOS sử dụng GCD.
Về cơ bản, cũng giống như những nền tảng khác, quản lý Thread chính là quản lý mức độ ưu tiên của các tác vụ sẽ được thực hiện trong ứng dụng của bạn.
Việc tối ưu thuật toán và mã nguồn để chương trình chạy nhanh hơn là một phần hết sức quan trọng. Nhưng bên cạnh đó ta cần phải xác định được mức độ ưu tiên của các tác vụ trong ứng dụng của mình, khi nào người dùng sẽ cần và tương tác với chúng, qua đó nâng cao trải nghiệm người dùng, gây cảm giác ứng dụng chạy nhanh và mượt mà hơn. Áp dụng Thread trong ứng dụng sẽ làm cải thiện điều này trong ứng dụng của bạn.
Dưới đây làm một số lưu ý khi bạn sử dụng Thread trong iOS

Chỉ sử dụng Main Thread để cập nhật giao diện

Điều này nhằm mục đích đảm bảo tương tác người dùng, các hiệu ứng trên giao diện không bị block bởi các tác vụ khác (như load dữ liệu) trong Main Queue. Đây cũng là cách đơn giản nhất để tránh những lỗi không đáng có khi xử lý tương tác người dùng. Như ví dụ dưới đây:
// Không nên
DispatchQueue.main.async {
    //Lay du lieu tu server
    self.doWork()
    self.view.backgroundColor = .black
}

// Nên
let queue = DispatchQueue(label: "queue_name")
queue.async {
    //Lay du lieu tu server
    self.doWork()
}

DispatchQueue.main.async {
    self.view.backgroundColor = .black
}
Chỉ sử dụng MainThread để cập nhật giao diện sẽ đảm bảo UI không bị block khi ta thực hiện các tác vụ dài như tải dữ liệu, download file... Tránh các side effect khi tải dữ liệu, tải ảnh trên Main Thread

Các mức độ ưu tiên trong GCD

Có một số mức độ ưu tiên khi thực hiện các tác vụ trong iOS. Các tác vụ có độ ưu tiên cao sẽ được xử lý trước, các tác vụ có mức độ ưu tiên thấp hơn sẽ được xử lý sau, sau khi hệ thống phục vụ các tác vụ ưu tiên cao hơn trước đó. Bảng dưới đây liệt kê các mức độ ưu tiên và ý nghĩa:
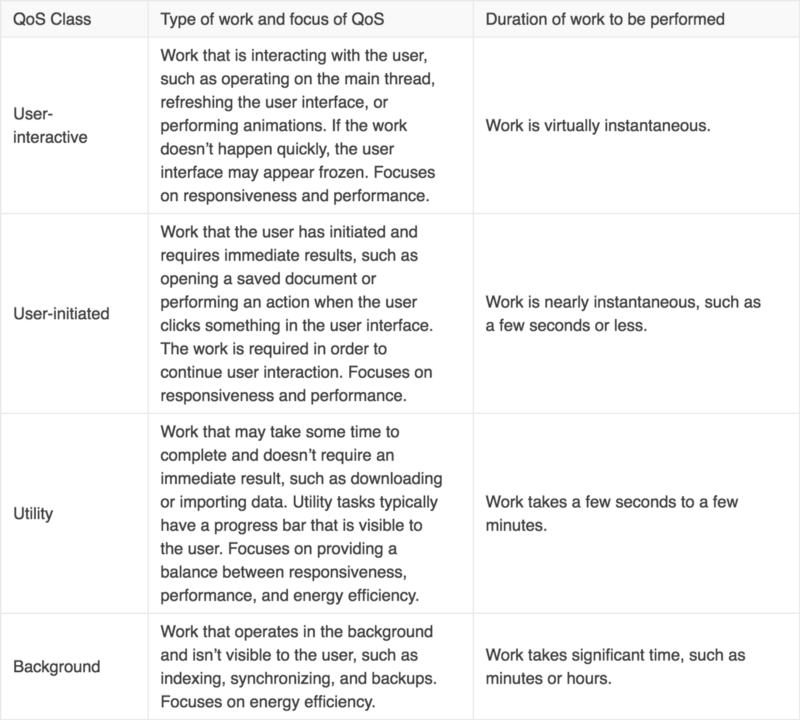
Ngoài ra ta có thể tự tạo queue với QoS thông qua đoạn code dưới đây:
var queue = DispatchQueue(label: "queu_name", qos: .utility)

Xác định tác vụ hiện đang chạy trên Thread nào

Để biết tác vụ hiện đang chạy trên Thread nào ta có thể biết thông qua Thread.current như đoạn code ví dụ sau:
func doWork() {
    print("Current thread in \(#function) is \ (Thread.current)")
}

// prints "Current thread in doWork() is <NSTrhead: 0x294345345>{number =3, name = (null)}"
Dựa vào cách này ta sẽ biết chính xác mức độ ưu tiên của tác vụ đang thực hiện. Ngoài ra ta có thể kiểm tra xem tác vụ có chạy ở Main Thread hay không thông qua hàm
Thread.current.isMainThread

Nên sử dụng cơ chế bất đồng bộ thay vì đồng bộ.

.async closure cho phép thực thi các tác vụ một cách bất đồng bộ, nên có thể thực thi các tác vụ khác trong khi tác vụ này đang thực thi.
Việc sử dụng cơ chế bất đồng bộ cho phép ta thực hiện nhiều tác vụ khác nhau thay vì phải chờ đợi các tác vụ khác, hạn chế hiện tượng block đối với tương tác UI.
Không nên sử dụng cơ chế động bộ ở Main DispatchQueue như đoạn code dưới đây:
DispatchQueue.main.sync {
    self.updateView()
}
Và tránh sử dụng cơ chế đồng bộ trên .userInteractive Queue vì nó sẽ có cùng mức độ ưu tiên với main queue

Kết luận

Mong rằng những lưu ý ở trên sẽ giúp mọi người dễ dàng làm quen với Thread trong iOS Ngoài ra mọi người có thể tham khảo thêm những nguồn sau để có thông tin chi tiết hơn
Nguồn tham khảo: https://medium.com/@gabriel_lewis/threading-in-swift-simply-explained-5c8dd680b9b2

Comments

Popular posts from this blog

Alamofire vs URLSession

Alamofire vs URLSession: a comparison for networking in Swift Alamofire and URLSession both help you to make network requests in Swift. The URLSession API is part of the foundation framework, whereas Alamofire needs to be added as an external dependency. Many  developers  doubt  whether it’s needed to include an extra dependency on something basic like networking in Swift. In the end, it’s perfectly doable to implement a networking layer with the great URLSession API’s which are available nowadays. This blog post is here to compare both frameworks and to find out when to add Alamofire as an external dependency. Build better iOS apps faster Looking for a great mobile CI/CD solution that has tons of iOS-specific tools, smooth code signing, and even real device testing? Learn more about Bitrise’s iOS specific solutions! This shows the real power of Alamofire as the framework makes a lot of things easier. What is Alamofire? Where URLSession...

Swift Tool Belt, Part 1: Adding a Border, Corner Radius, and Shadow to a UIView with Interface Builder

During my iOS work, I’ve assembled a set of code that I bring with me on every iOS project. I’m not talking about large frameworks or CocoaPods here. These are smaller Swift extensions or control overrides that are applicable to many projects. I think of them as my tool belt. In this post, I’ll show you an extension that will add a border, a corner radius, and a shadow to any UIView, UIButton, or UILabel and allow you to preview what it will look like in Interface Builder. Back in 2014, I wrote a blog post on Expanding User-Defined Runtime Attributes in Xcode where I added a border, corner radius, and shadow to a UIView using Interface Builder’s user-defined runtime attributes. This solution had no type checking—you had to type the property you wanted to modify by hand and often had to look up what it was called. You also had to run your project in order to see the effect of the runtime attribute. Starting with Xcode 6 , there is a new mech...

Frame vs Bounds in iOS

This article is a repost of an answer I wrote on Stack Overflow . Short description frame = a view’s location and size using the parent view’s coordinate system ( important for placing the view in the parent) bounds = a view’s location and size using its own coordinate system (important for placing the view’s content or subviews within itself) Details To help me remember frame , I think of a picture frame on a wall . The picture frame is like the border of a view. I can hang the picture anywhere I want on the wall. In the same way, I can put a view anywhere I want inside a parent view (also called a superview). The parent view is like the wall. The origin of the coordinate system in iOS is the top left. We can put our view at the origin of the superview by setting the view frame’s x-y coordinates to (0, 0), which is like hanging our picture in the very top left corner of the wall. To move it right, increase x, to move it down increase y. To help me remember bound...