
Fileprivate vs private: Giải thích sự khác biệt

Fileprivate vs private in Swift: The differences explained

Fileprivate and private are part of the access control modifiers in Swift. These keywords, together with internal, public, and open, make it possible to restrict access to parts of your code from code in other source files and modules.
The private access level is the lowest and most restrictive level whereas open access is the highest and least restrictive. The documentation of Swift will explain all access levels in detail to you, but in this blog post, I’m going to explain the differences between two close friends: fileprivate and private.
Open access is the highest (least restrictive) access level and private access is the lowest (most restrictive) access level.
This will improve readability and makes it easier to use and understand your code for others.

When to use fileprivate

Although the keywords are almost the same, there is a clear difference in their use cases. Fileprivate access restricts the use of an entity within the same defined source file. The only reason you would use fileprivate is when you want to access your code within the same file from different classes or structs.
In the following example, we have an ImageProvider and an ImageViewController. We can use fileprivate if they’re defined within the same file and we want to allow access to the image view from the image provider.
final class ImageViewController: UIViewController {

    fileprivate var imageView: UIImageView!

}

struct ImageProvider {

    let newImage: UIImage

    func updateImage(in viewController: ImageViewController) {
        viewController.imageView.image = newImage
    }
}
However, if we would create a separated file for the `ImageProvider` struct, we would get a compiler error:
Inaccessible image view due to fileprivate
In my opinion, this makes it a very small use case. It’s often better for the structure of your project to define entities in their own files.

When to use private

The private keyword is used a lot more and restricts the use of an entity to the enclosing declaration and its extensions. The extensions, however, have to be defined within the same file. In other words, private declarations will not be visible outside the file. You can use this keyword to only expose the minimal code needed to interact with the entity. This will improve readability and makes it easier to use and understand your code for others.

Fileprivate vs private

It’s best to explain the differences by taking the image provider example. Declared within the same file, they will result in the following compiler error:
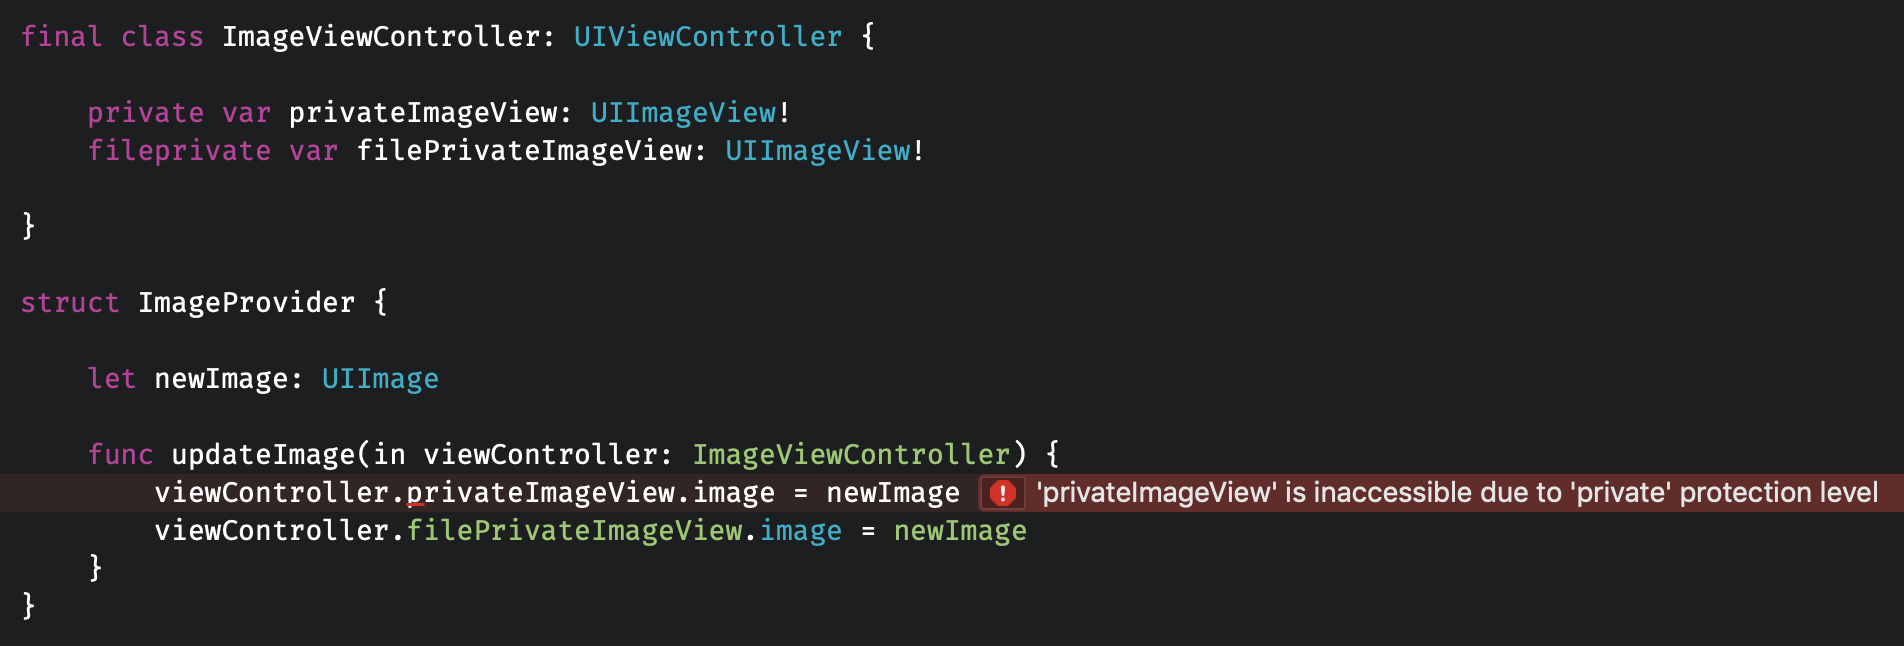
The keyword differences explained in code
As you can see, the fileprivate declared image view is accessible within the same file. The private image view, however, is not accessible as it’s only visible within the entity itself. An extension to the `ImageViewController` would have had access to this private declared image view.

Comments

  1. Khi sử dụng fileprivate đến đây rồi sao nữa tác giả bị thiếu rồi

    ReplyDelete

Post a Comment

Popular posts from this blog

Alamofire vs URLSession

Alamofire vs URLSession: a comparison for networking in Swift Alamofire and URLSession both help you to make network requests in Swift. The URLSession API is part of the foundation framework, whereas Alamofire needs to be added as an external dependency. Many  developers  doubt  whether it’s needed to include an extra dependency on something basic like networking in Swift. In the end, it’s perfectly doable to implement a networking layer with the great URLSession API’s which are available nowadays. This blog post is here to compare both frameworks and to find out when to add Alamofire as an external dependency. Build better iOS apps faster Looking for a great mobile CI/CD solution that has tons of iOS-specific tools, smooth code signing, and even real device testing? Learn more about Bitrise’s iOS specific solutions! This shows the real power of Alamofire as the framework makes a lot of things easier. What is Alamofire? Where URLSession...

Swift Tool Belt, Part 1: Adding a Border, Corner Radius, and Shadow to a UIView with Interface Builder

During my iOS work, I’ve assembled a set of code that I bring with me on every iOS project. I’m not talking about large frameworks or CocoaPods here. These are smaller Swift extensions or control overrides that are applicable to many projects. I think of them as my tool belt. In this post, I’ll show you an extension that will add a border, a corner radius, and a shadow to any UIView, UIButton, or UILabel and allow you to preview what it will look like in Interface Builder. Back in 2014, I wrote a blog post on Expanding User-Defined Runtime Attributes in Xcode where I added a border, corner radius, and shadow to a UIView using Interface Builder’s user-defined runtime attributes. This solution had no type checking—you had to type the property you wanted to modify by hand and often had to look up what it was called. You also had to run your project in order to see the effect of the runtime attribute. Starting with Xcode 6 , there is a new mech...

Frame vs Bounds in iOS

This article is a repost of an answer I wrote on Stack Overflow . Short description frame = a view’s location and size using the parent view’s coordinate system ( important for placing the view in the parent) bounds = a view’s location and size using its own coordinate system (important for placing the view’s content or subviews within itself) Details To help me remember frame , I think of a picture frame on a wall . The picture frame is like the border of a view. I can hang the picture anywhere I want on the wall. In the same way, I can put a view anywhere I want inside a parent view (also called a superview). The parent view is like the wall. The origin of the coordinate system in iOS is the top left. We can put our view at the origin of the superview by setting the view frame’s x-y coordinates to (0, 0), which is like hanging our picture in the very top left corner of the wall. To move it right, increase x, to move it down increase y. To help me remember bound...