Nếu
bạn không muốn dùng tool được tích hợp sẵn trong Xcode(Xcode ->
Source Control -> Commit, Push, Pull,...) hoặc các phần mềm quản lý
source riêng biệt như Source Tree,... thì bạn cũng có thể sử dụng các
command trong Terminal để quản lý source của project.
Dưới đây là một danh sách các lệnh git được sắp xếp có thứ tự trong một project thực tế.
Fork, Clone
Mở website của github , tìm đến project, và nhấn nút Fork ở phía trên bên phải của website để tạo 1 sub-project của project cha, nó là project mới trong git hub cá nhân mình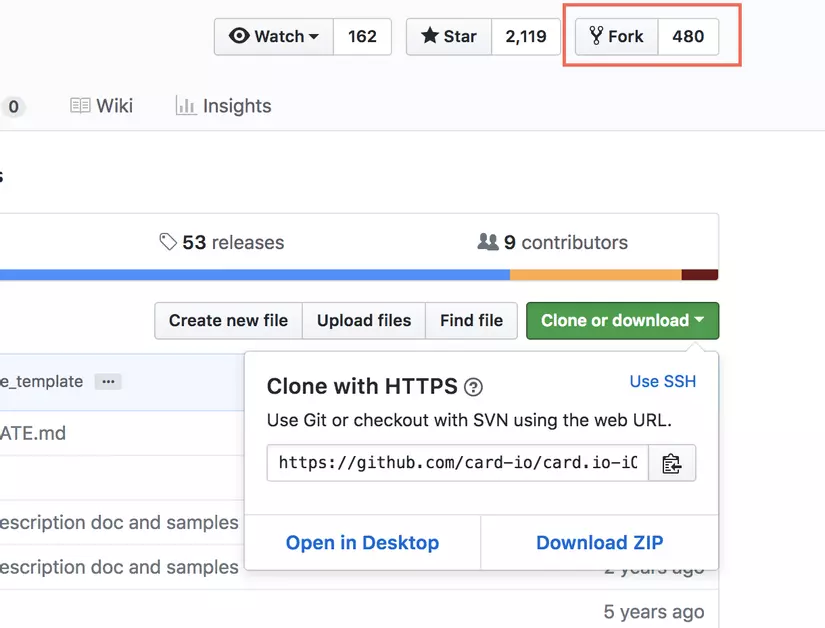
Sau đó, trở lại website project cha, nhấn nút "Clone or download" để lấy code xuống máy, có 2 cách clone là "HTTPS" và "SSH"
Chúng ta phải tạo ít nhất 2 remote cho project 1 cho super-project và 1 cho sub-project mới vừa clone.
Mặc định khi mới clone về máy thì ta chỉ có 1 remote với tên là origin, nó là remote của super-project vì nãy mình clone từ project đó.
Thông thường, mình đặt tên remote cho super-project là company và remote cho sub-project là origin, vậy nên mình sẽ sửa lại remote như sau
Đầu tiên, move đến project và kiểm tra lại danh sách các remote hiện tại
Code
Thông thường thì super-project có 2 branch là master(mặc định) và develop, và mình sẽ chỉ code trên develop branch, còn chỉ khi release xong các mốc cố định thì mới merge code từ develop vào master.
Ta checkout 1 branch mới từ develop để làm những task của mình.
Chẳng hạn làm UI cho màn hình search.
Gõ lệnh tạo 1 commit cho branch đó
Xong phần commit code, đến phần rebase những code đã thay đổi đó đến develop branch để xem có xung đột với code của develop không, vì team có nhiều người, đôi lúc người ta cũng thay đổi code ở chỗ mình thay đổi, và nếu code của người ta đã được merged trước vào develop thì code của mình đã trở nên cũ và gây xung đột, cho nên, bắt buộc phải rebase code trong mọi trường hợp tạo pull request.
Trước hết phải chuyển qua develop branch
Sau khi pull xong thì chuyển qua lại search_ui của chúng ta
Tiếp, add các file đã thay đổi vào commit hiện tại
Tổng hợp 1 list thứ tự các lệnh git thông thường trong project đã tồn tại
Sau khi code đã lên trên website của github, thì chúng ta lên trên đó để tạo Pull Request, merge code từ search_ui into develop, web hướng dẫn rất rõ ràng và dễ làm, không cần phải nói thêm nữa.
Dưới đây là một danh sách các lệnh git được sắp xếp có thứ tự trong một project thực tế.
Fork, Clone
Mở website của github , tìm đến project, và nhấn nút Fork ở phía trên bên phải của website để tạo 1 sub-project của project cha, nó là project mới trong git hub cá nhân mình
Sau đó, trở lại website project cha, nhấn nút "Clone or download" để lấy code xuống máy, có 2 cách clone là "HTTPS" và "SSH"
- "HTTPS" thì sử dụng web url
- "SSH" thì nó sử dụng SSH key và passphrase của tài khoản của mình, và mỗi lần tương tác với project cha thì buộc phải nhập passphrase, vì vậy, khi cấu hình SSH thì các bạn nên đặt passphrase cho dễ nhớ, và ngắn gọn, đơn giản thôi. Vì trong thực tế coding, bạn sẽ phát cáu với git nếu chẳng may đặt pass lộn xộn như mấy ông khách hàng Nhật.
git clone link
Chúng ta phải tạo ít nhất 2 remote cho project 1 cho super-project và 1 cho sub-project mới vừa clone.
Mặc định khi mới clone về máy thì ta chỉ có 1 remote với tên là origin, nó là remote của super-project vì nãy mình clone từ project đó.
Thông thường, mình đặt tên remote cho super-project là company và remote cho sub-project là origin, vậy nên mình sẽ sửa lại remote như sau
Đầu tiên, move đến project và kiểm tra lại danh sách các remote hiện tại
git remote -v

==>
origin link (fetch)
origin link (push)
git remote add company super-project-link
git remote remove origin
git remote add origin sub-project-link
git remote -v

==>
company super-project-link (fetch)
company super-project-link (push)
origin sub-project-link (fetch)
origin sub-project-link (push)
Code
Thông thường thì super-project có 2 branch là master(mặc định) và develop, và mình sẽ chỉ code trên develop branch, còn chỉ khi release xong các mốc cố định thì mới merge code từ develop vào master.
Ta checkout 1 branch mới từ develop để làm những task của mình.
Chẳng hạn làm UI cho màn hình search.
git checkout -b search_ui
Gõ lệnh tạo 1 commit cho branch đó
git commit -am "implement search ui"
git status
git add .
git add link_file_1
git add link_file_2
...
git commit --amend
Xong phần commit code, đến phần rebase những code đã thay đổi đó đến develop branch để xem có xung đột với code của develop không, vì team có nhiều người, đôi lúc người ta cũng thay đổi code ở chỗ mình thay đổi, và nếu code của người ta đã được merged trước vào develop thì code của mình đã trở nên cũ và gây xung đột, cho nên, bắt buộc phải rebase code trong mọi trường hợp tạo pull request.
Trước hết phải chuyển qua develop branch
git checkout develop
git pull company develop
Sau khi pull xong thì chuyển qua lại search_ui của chúng ta
git checkout search_ui
git rebase -i develop
git status
Tiếp, add các file đã thay đổi vào commit hiện tại
git add .

//hoặc

git add changed_file_link_1
git add changed_file_link_2
...
git rebase --continue
git push origin search_ui
or
git push origin search_ui -f
Tổng hợp 1 list thứ tự các lệnh git thông thường trong project đã tồn tại
git checkout develop
git pull company develop
git checkout -b branch_a
git commit -am "message"
git checkout develop
git pull company develop
git checkout branch_a
git rebase -i develop
git push origin branch_a / git push origin branch_a -f
Sau khi code đã lên trên website của github, thì chúng ta lên trên đó để tạo Pull Request, merge code từ search_ui into develop, web hướng dẫn rất rõ ràng và dễ làm, không cần phải nói thêm nữa.
Comments
Post a Comment