
Configuring your custom controls with IBInspectable / IBDesignable


Nội dung

  • Giới thiệu
  • IBInspectable
  • IBDesignable
  • Kết Luận

Giới thiệu

Có thể chúng ta đã biết đến 2 thuộc tính khai báo của interface builder rất tiện lợi và sử dụng rất nhiều để tạo các custom view đó là IBInspectable và IBDesignable. Trong đó IBInspectable thể hiện properties của class trong interface builder Attribute Inspector và IBDesignable giúp cập nhật view realtime. Điều này thật tuyệt vời giúp chúng ta thiết kế, chỉnh sửa giao diện ngay trong interface builder rất nhanh mà hiệu quả.
Nào chúng ta cùng tìm hiểu nhé!

Step 0: IBInspectable

Các thuộc tính IBInspectable cung cấp khả năng truy cập mới vào một tính năng cũ: Hiện tại có thể truy cập được từ thanh Attributes, các thuộc tính này đã có sẵn từ trước khi Interface Builder được tích hợp vào Xcode. của mỗi đối tượng trong một NIB, XIB hoặc Storyboard:
Dưới đây là những valid types cho IBInspectable :
Int
CGFloat
Double
String
Bool
CGPoint
CGSize
CGRect
UIColor
UIImage
Mặc dù các thuộc tính trong runtime attributes có thể thực hiện việc thay đổi 1 cách nhanh chóng. Nhưng việc không có bất kỳ gợi ý nào ngoài việc thao tác với keypath, type, value sẽ gây khó khăn cho chúng ta. IBInspectable đã khắc phục nhược điểm này bằng việc trong xcode bạn có thể chỉ định bất kỳ thuộc tính như inspectable và Xcode sẽ xây dựng giao diện tương ứng với tùy chỉnh của bạn trong custom class.
Ví dụ:
class OverCustomizableView : UIView {
    @IBInspectable var integer: Int = 0
    @IBInspectable var float: CGFloat = 0
    @IBInspectable var double: Double = 0
    @IBInspectable var point: CGPoint = CGPointZero
    @IBInspectable var size: CGSize = CGSizeZero
    @IBInspectable var customFrame: CGRect = CGRectZero
    @IBInspectable var color: UIColor = UIColor.clearColor()
    @IBInspectable var string: String = "We ❤ Swift"
    @IBInspectable var bool: Bool = false
}
Trong Attribute Inspector bạn sẽ nhìn thấy các phần cài đặt ở Xcode hiển thị lên
Tất cả được thêm vào một vài thuộc tính định nghĩa người dùng trong runtime và được cài đặt giá trị khởi tạo khi View được load lên.
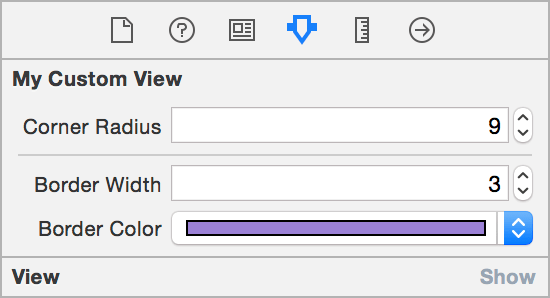
Chúng ta cùng tìm hiểu thêm ví dụ khá thông dụng về cornerRadius của UIView:
@IBInspectable var cornerRadius: CGFloat = 0 {
   didSet {
       layer.cornerRadius = cornerRadius
       layer.masksToBounds = cornerRadius > 0
   }
}
@IBInspectable var borderWidth: CGFloat = 0 {
   didSet {
       layer.borderWidth = borderWidth
   }
}
@IBInspectable var borderColor: UIColor? {
   didSet {
       layer.borderColor = borderColor?.CGColor
   }
}
Đánh dấu với @IBInspectable (hoặc IBInspectable trong Objective C), chúng có thể dễ dàng chỉnh sửa trong bảng điều khiển của Interface Builder’s.

IBDesignable

Chúng ta cùng làm quen với khái niệm khá thú vị tiếp theo là IBDesignable. Với nó, chúng ta sẽ thấy được sự thay đổi trực tiếp trên các giao diện như Xib, Storyboard. Tính năng này cho phép các tùy chình, thay đổi của bạn sẽ xuất hiện luôn mà không cần build hay run app sau mỗi lần thay đổi.
Để đánh dấu một view tùy chỉnh là IBDesignable, chúng ta hãy thêm vào trước class name với prefix là @IBDesignable (hoặc macro IB_DESIGNABLE trong Objective-C):
@IBDesignable
class MyCustomView: UIView {
    ...
}

Khi kết hợp với thuộc tính IBInspectable, các lập trình viên có thể dễ dàng điều chỉnh việc hiển thị, tùy chỉnh các kết quả mà chúng ta muốn. Ngoài ra có một tính năng rất hay giúp chúng ta debug liên quan đến UI mà không cần phải build và chạy app đó là chúng ta vào Interface Builder, và chọn Editor ➔ Debug Selected Views.

Kết Luận

Trên đây, mình đã giới thiệu 2 thuộc tính của Interface Builder là IBInspectable / IBDesignable. Với nó, các bạn sẽ giảm tối thiểu được thời gian khi phải vật lộn với mã để thay đổi giao diện cho UIView. Hi vọng các bạn có thể áp dụng vào dự án của mình 1 cách hiệu quả.
Quả thật, 2 thuộc tính của Interface Builder là IBInspectable / IBDesignable đã giúp cho việc tạo một custome class một cách dễ dàng hơn, dễ dàng thay đổi giao diện và tiết kiệm rất nhiều thời gian trong quá trình phát triển ứng dụng.
Cám ơn bạn đã dành thời gian cho bài viết này!
Nguồn:
http://nshipster.com/ibinspectable-ibdesignable/

Comments

Popular posts from this blog

Alamofire vs URLSession

Alamofire vs URLSession: a comparison for networking in Swift Alamofire and URLSession both help you to make network requests in Swift. The URLSession API is part of the foundation framework, whereas Alamofire needs to be added as an external dependency. Many  developers  doubt  whether it’s needed to include an extra dependency on something basic like networking in Swift. In the end, it’s perfectly doable to implement a networking layer with the great URLSession API’s which are available nowadays. This blog post is here to compare both frameworks and to find out when to add Alamofire as an external dependency. Build better iOS apps faster Looking for a great mobile CI/CD solution that has tons of iOS-specific tools, smooth code signing, and even real device testing? Learn more about Bitrise’s iOS specific solutions! This shows the real power of Alamofire as the framework makes a lot of things easier. What is Alamofire? Where URLSession...

Swift Tool Belt, Part 1: Adding a Border, Corner Radius, and Shadow to a UIView with Interface Builder

During my iOS work, I’ve assembled a set of code that I bring with me on every iOS project. I’m not talking about large frameworks or CocoaPods here. These are smaller Swift extensions or control overrides that are applicable to many projects. I think of them as my tool belt. In this post, I’ll show you an extension that will add a border, a corner radius, and a shadow to any UIView, UIButton, or UILabel and allow you to preview what it will look like in Interface Builder. Back in 2014, I wrote a blog post on Expanding User-Defined Runtime Attributes in Xcode where I added a border, corner radius, and shadow to a UIView using Interface Builder’s user-defined runtime attributes. This solution had no type checking—you had to type the property you wanted to modify by hand and often had to look up what it was called. You also had to run your project in order to see the effect of the runtime attribute. Starting with Xcode 6 , there is a new mech...

Frame vs Bounds in iOS

This article is a repost of an answer I wrote on Stack Overflow . Short description frame = a view’s location and size using the parent view’s coordinate system ( important for placing the view in the parent) bounds = a view’s location and size using its own coordinate system (important for placing the view’s content or subviews within itself) Details To help me remember frame , I think of a picture frame on a wall . The picture frame is like the border of a view. I can hang the picture anywhere I want on the wall. In the same way, I can put a view anywhere I want inside a parent view (also called a superview). The parent view is like the wall. The origin of the coordinate system in iOS is the top left. We can put our view at the origin of the superview by setting the view frame’s x-y coordinates to (0, 0), which is like hanging our picture in the very top left corner of the wall. To move it right, increase x, to move it down increase y. To help me remember bound...