1 Mở đầu
Trong quá trình khởi động, UIApllication của IOS khởi động vòng lặp chính trên luồng chính. Vòng lặp chính sẽ xử lí các sự kiện cũng như các cập nhập về giao diện Khi có một sự kiện xảy ra, chẳng hạn như touch, motion,... thì vòng lặp chính sẽ tìm phương thức xử lí thích hợp cho sự kiện đó. Trong khi các sự kiện đang được xử lý, và các yêu cầu thay đổi của giao diện không phải lúc nào cũng được xử lí ngay lập tức. Thay vào đó, hệ thống sẽ ghi lại các thay đổi và đánh dấu các view cần thay đổi. Sự khác biệt giữa 2 phương thức setNeedsLayout và LayoutIfNeed được mô tả thông qua chu kì câp nhật (update circle).2 setNeedsLayout
Phương thức setNeedsLayout của UIView cho hệ thống biết rằng bạn muốn thay đổi lại bố cục và chỉnh sửa nó và các subviews của nó. Đây là một hành động bất đồng bộ, vì phương thức này hoàn thành và trả về ngay lập tức. Nhưng sau đó một thời gian việc sửa đổi mới được xảy ra nên không biết được thời điểm chính xác chu kì cập nhật diễn ra.3 layoutIfNeeded
Ngược lại phương thức layoutIfNeeds là đồng bộ, nó cho hệ thống biết bạn muốn thay đổi lại view và subviews của nó và bạn muốn nó được thực hiện ngay lập tức không cần đợi chu kì cập nhật.Nói một cách ngắn gọn thì layoutIfNeeds là "cập nhật layout ngay lập tức", còn setNeedsLayout là "hãy cập nhật layout tôi có thể chờ đến chu kì cập nhật tiếp theo"
Có thể khi lần đầu đọc các phương thức này ban có thế nghĩ răng phương thức layoutIfNeeds có vẻ không cần xử lí ngay lập tức, còn phuơng thức setNeedsLayout lại có vẻ khẩn cấp. Tuy nhiên tên gọi có thể như một "cú lừa"
Trước khi bắt tay vào code, chúng ta cần hiểu qua về AutoLayout và update circle. Thực tế có ba giai đoạn để chỉnh sửa giao diện. Đầu tiên là cập nhật các constraint. Thứ hai là các layout (layout pass) và cuối cùng đó là hoàn thành hiển thị dựa trên các thông số của layout
4 Demo
Chúng ta cùng đi đến ví dụ để hiểu rõ hơn về hai phương thức nàyTrong ứng dụng này tạo 1 view màu xanh da trời tại màn hình chính. Cùng với một nút bấm để thay đổi chiều cao của view.
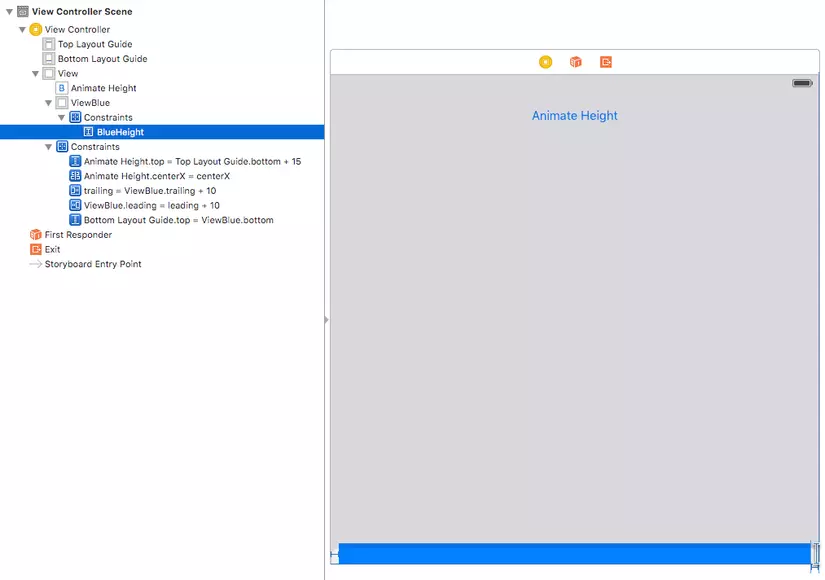
Ban có thể tạo chuyển động cho việc thay đổi chiều cao này với 1 block code. Với blueHeight constraint được kéo outlet trong Viewcontroller, Chúng ta có thể cập nhật lại constaint và view màu xanh sẽ to nhỏ khi nhấp nút.
import UIKit

class ViewController: UIViewController {

    @IBOutlet weak var blueHeight: NSLayoutConstraint!

    @IBAction func heightPressed(sender: AnyObject) {
        view.layoutIfNeeded()
        if(self.blueHeight.constant == 25.0)
        {
            self.blueHeight.constant = self.view.bounds.height - 100.0
        }
        else
        {
            self.blueHeight.constant = 25.0
        }
        UIView.animate(withDuration: 2.0) {
            self.view.layoutIfNeeded()
        }
    }

    override func viewDidLoad() {
        super.viewDidLoad()
    }

    override func didReceiveMemoryWarning() {
        super.didReceiveMemoryWarning()
    }
}
Việc cập nhật constraint vẫn như layoutIfNeeds, thay thế vào đó bằng hàm setNeeedLayout, Bạn hãy thử và sẽ thấy có sự khác biệt. Đó là với setNeedLayout sẽ không có chuyển động
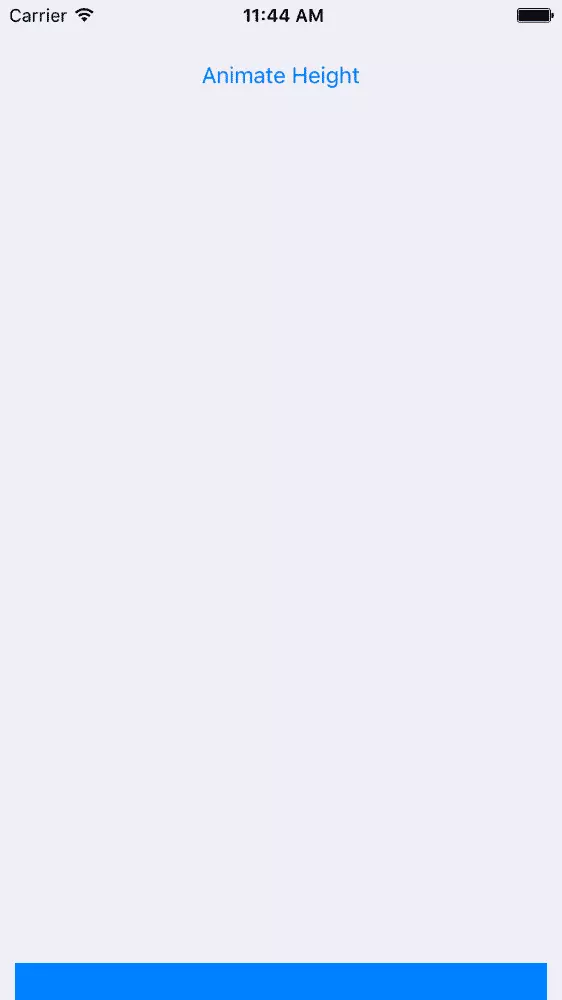
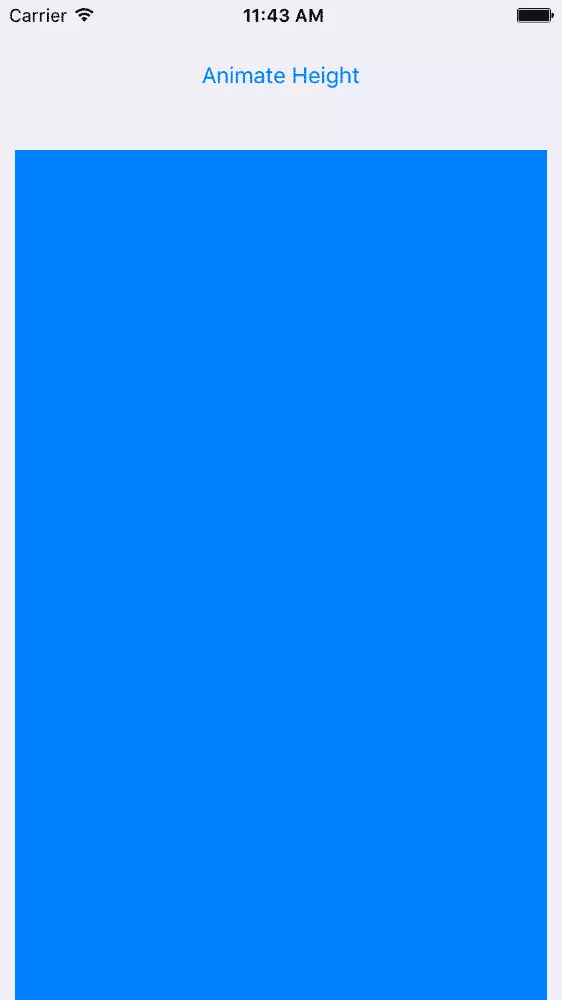
Trong trường hợp này, chúng ta tạo 2 giây cho chuyển động, chúng ta dùng hàm layoutIfNeeded để buộc hệ thống cập nhật giao diện ngay lập tức. Bởi vì layout được cập nhật đồng bộ, frame có sự di chuyển bằng cách thay đổi constaint trong một block code. Khi chạy ứng dụng bạn sẽ thấy view xanh sẽ dịch chuyển trong 2 giây từ to đến nhỏ và ngược lại
Chúng ta thay thế layoutIfNeeded bằng setNeedsLayout trong animation block như sau
UIView.animateWithDuration(2.0) {
    self.view.setNeedsLayout()
}
Khi click vào nút bấm thì sẽ không có hiệu ứng mà chiều cao sẽ được cập nhật ngay lập tức. Animation được kích hoạt trong chu kì tiếp theo. Trong trường hợp này, animation không thực hiện thay đổi với view, thay vào đó , khi việc xử lí của IBAction hoàn thành và không có sự kiện nào khác được xử lí, chu kì cập nhật diễn ra và thực hiện cập nhật giao diện ngay lập tức mà không có animation nào cả
Thanks for reading!
Nguồn tham khảo:
https://www.iosinsight.com/setneedslayout-vs-layoutifneeded-explained/
https://medium.com/@abhimuralidharan/ios-swift-setneedslayout-vs-layoutifneeded-vs-layoutsubviews-5a2b486da31c
Comments
Post a Comment