Giới thiệu.
Chắc hẳn với tất cả các app điện thoại nói chung và iOS nói riêng thì push notification là một phần không thể thiếu trong quá trình phát triển app đối với các lập trình viên.Khi sử dụng notifications, chúng ta có thể thông báo cho user những thông tin cũng như sự kiện quan trọng khi người dùng không bật app.
Push notification có 2 kiểu:
- Local notification tức là push thông báo ở dưới local.
- Push notification hay là Remote notifications là sử dụng các remote push như Firebase, SNS Amazon cloud service thông qua APNS.
Vấn đề.
Dạo gần đây khi iOS lên iOS 12.0 ứng dụng của mình gặp rất nhiều vấn đề về Push notification từ Local push đến Remote push. Tuy code của các tiền bối trước rất ngon lành rồi nhưng mình cần tìm hiểu thêm về push notification để có thể debug trong đống code push siêu nhân các tiền bối để lại.Hiện tại ứng dụng của mình đang dính đến 1 cái Local notificaiton không hoạt động theo ý muốn và cũng đang phải nhờ cao nhân chỉ giáo =))
Một cái oái ăm là iOS 10 run rất OK lên iOS 12 chết thẳng cẳng =))
Local notification.
Việc push này được thực hiện bằng cách đặt một thời điểm push thông qua thời gian hay là địa điểm.Ví dụ: Bạn đặt app của bạn cứ 11h45' là bật thông báo nhắc bạn đi ăn trưa chẳng hạn =))
Thực hiện local notification.
Trước khi bạn thực hiện bất cứ kiểu push notification nào thì chúng ta phải xin quyền push trước đã nhé ^^!. Điều này rất cần thiết vì dạng push là các thông báo rất nổi bật.Nếu người dùng muốn nhận thông báo của app đó là điều rất tốt. Nhưng nếu user không muốn nhận thông báo và disable nó đi.
Xin quyền push
Rất đơn giản. TrongapplicationDidFinishLaunchingWithOptions ở AppDelegate.swift chúng ta thực hiện.func application(_ application: UIApplication, didFinishLaunchingWithOptions launchOptions: [UIApplicationLaunchOptionsKey: Any]?) -> Bool {
UNUserNotificationCenter.current().requestAuthorization(options: [.alert, .badge, .sound]) { (granted, err) in
print("granted: (\(granted)")
}
return true
}
- Nhớ
import UserNotificationsframework đầu file.
import UserNotifications
- Phương thức
requestAuthorizationkích hoạt một alert view hỏi người dùng có muốn nhận thông báo hay là không. optionslà một mảng các options mà thông báo sẽ sử dụng trong quá trình push. Ví dụ ở trên bao gồm 1 thông báo (alert), có âm thanh (sound), có chỉ báo huy hiệu (badge) ở biểu tượng ứng dụng.- Tham số thứ 2 là một block chúng sẽ trả về kết quả sau khi người dùng chọn option trong alert.
grantedcho bạn biết rằng user cóđồng ýhaytừ chốinhận push.
Nếu người dùng cấp quyền, ứng dụng của bạn hiện đã sẵn sàng lên lịch và gửi thông báo.
Send Local notifications
Để send một Local notification chúng ta cần những thông số như sau.- Nội dung (content)
let content = UNMutableNotificationContent()
content.title = "Đây là cái title"
content.body = "Đây là cái nội dung."
content.sound = UNNotificationSound.default()
Tất nhiên bạn có thể thêm nhiều thông tin hơn như badge, âm thanh tuỳ chỉnh, thông tin bổ sung thêm khi user click vào thông báo....
Nói chung chúng ta custom được kha khá ở cái notification này. Hi vọng sẽ có bài thứ 2 cho các bạn.
- Một trigger
let trigger = UNTimeIntervalNotificationTrigger(timeInterval: 5, repeats: false)
UNTimeIntervalNotificationTrigger cái mà bạn sẽ phải định nghĩa một thời gian mà bạn sẽ phát ra thông báo.
Ví dụ ở trên là 5 giây sau khi bạn đặt hẹn phát. Repeats là bạn muốn lặp lại thông báo không mà thôi.Ngoài ra chúng ta có thêm 2 kiểu triggers nữa là
UNCalendarNotificationTriggerTrigger cho phép bạn hẹn ngày, thời gian để phát thông báo.UNLocationNotificationTriggerTrigger địa điểm. Khi user đến một địa điểm nào đó thì sẽ có thông báo.
- Một request
let request = UNNotificationRequest(identifier: "TestIdentifier", content: content, trigger: trigger)
identifier có ý nghĩa khi mà bạn push một thông báo có cùng định danh thì thông báo trước đó sẽ bị ghi đè bởi thông báo mới.- Fired
UNUserNotificationCenter.add(request, withCompletionHandler: nil)
center.add(request, withCompletionHandler: nil)
- Thử nghiệm
import UIKit
import UserNotifications

class ViewController: UIViewController {
    override func viewDidLoad() {
        super.viewDidLoad()
        let content = UNMutableNotificationContent()
        content.title = "Title"
        content.body = "Body"
        content.sound = UNNotificationSound.default()

        let trigger = UNTimeIntervalNotificationTrigger(timeInterval: 5, repeats: false)
        let request = UNNotificationRequest(identifier: "TestIdentifier", content: content, trigger: trigger)
        UNUserNotificationCenter.current().add(request, withCompletionHandler: nil)

    }
}
Rất "y ri ờ" đúng không nào ^^!.
Hiển thị thông báo khi app ở foreground.
Như đã giới thiệu. Thông báo thường được dùng để thông báo khi người dùng không sử dụng app.Chúng ta cần delegate implement
UNUserNotificationCenterDelegate. Chúng ta thực hiện như sau:func userNotificationCenter(_ center: UNUserNotificationCenter, willPresent notification: UNNotification, withCompletionHandler completionHandler: @escaping (UNNotificationPresentationOptions) -> Void) {
completionHandler([.alert, .sound])
}
Thông báo sẽ hiển thị khi app ở foreground.
Để method thực hiện chúng ta cần delegate bên trong method
didFinishLaunchingWithOptions như sau:UNUserNotificationCenter.current().delegate = self
Trước iOS 10, không thể tự động hiển thị thông báo khi ứng dụng ở nền trước. Thay vào đó, bạn phải hiển thị chúng bằng cách sử dụng triển khai tùy chỉnh.
Xử lý notifications.
Khi người dùng taps vào notifications. User kì vọng ứng dụng sẽ mở và thực hiện một số công việc nào đó.Ứng dụng sẽ tự động mở. Nếu bạn muốn phản ứng với một thông báo, bạn phải thực hiện một số hành vi tùy chỉnh.
Đối với điều này, chúng tôi thực hiện một phương pháp khác của
UNUserNotificationCenterDelegate là:func userNotificationCenter(_ center: UNUserNotificationCenter, didReceive response: UNNotificationResponse, withCompletionHandler completionHandler: @escaping () -> Void) {
if response.notification.request.identifier == "TestIdentifier" {
print("handling notifications with the TestIdentifier Identifier")
}
completionHandler()
}
Push notification.
Là dạng push được send bằng backend tức là bằng server.Backend có thể là một server bạn code hoặc có thể là dịch vụ clound nào đó như firebase hay sns của amazone ...
Push notification hoạt động như thế nào?
Chúng ta sẽ có 4 bên tham gia vào việc push này.
- Ứng dụng của chúng ta.
- Điện thoại iphone.
- Backend server or Cloud service.
- APNS: Apple push notification service
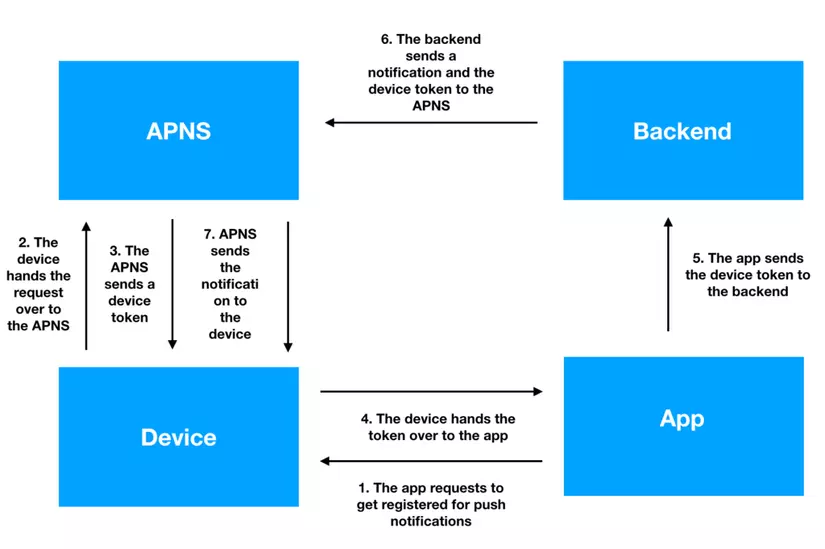
Flow như sau
- Bước 1: Ứng dụng yêu cầu đăng kí một remote thông báo.
- Bước 2: Thiết bị yêu cầu lên APNS
- Bước 3: Nếu đăng kí thành công, APNS gửi token cho device.
- Bước 4: Thiết bị đưa token cho ứng dụng.
- Bước 5: Ứng dụng thực hiện gửi token lên cho backend (hoặc một cloud service nào đó.) để backend biết chính xác là thiết bị nào yêu cầu.
- Bước 6: Khi backend muốn gửi một thông báo đến thiết bị. Nó sẽ gửi tin nhắn và mã thông báo thiết bị tương ứng tới APNS.
- Bước 7: APNS sẽ gửi thông báo cho device.
Điều này có vẻ khá phức tạp, nhưng đừng lo lắng. Chúng ta sẽ xem xét từng bước.
Yêu cầu cho ứng dụng của bạn để nhận thông báo
Đăng kí push notifications
Cũng giống như local push, chúng ta cũng phải xin quyền user.func application(_ application: UIApplication, didFinishLaunchingWithOptions launchOptions: [UIApplicationLaunchOptionsKey: Any]?) -> Bool {
UNUserNotificationCenter.current().delegate = self
UNUserNotificationCenter.current().requestAuthorization(options: [.alert, .badge, .sound]) { (granted, error) in
print("granted: (\(granted)")
}
UIApplication.shared.registerForRemoteNotifications() //(I)
return true
}
Để ý (I) đây chính là chúng ta đăng kí nhận Push notifications đó.
Chúng ta gọiregisterForRemoteNotifications
Nhận Push Device token
Nếu bước trên đăng kí push notifications thành công. APNS sẽ gửi cho chúng ta một Device token. Để nhận token chúng ta thực hiện method củaUIApplicationDelegatefunc application(_ application: UIApplication, didRegisterForRemoteNotificationsWithDeviceToken deviceToken: Data) {
let token = deviceToken.map { String(format: "%02.2hhx", $0) }.joined()
print("token: \(token)")
}
func application(_ application: UIApplication, didFailToRegisterForRemoteNotificationsWithError error: Error) {
print("failed to register for remote notifications with with error: \(error)")
}
Bạn thấy không? Chúng ta có 2 func 1 func cho việc đăng kí thành công, 1 func cho việc đăng kí thất bại.
Xử lý gửi device token lên backend
- Backend cần biết được Device token để định danh thiết bị.
- Việc gửi thì chúng ta dựa vào từng dự án backend cụ thể thường sẽ sử dụng API để gửi lên.
Bạn cần lưu ý: Việc nhận Device token sẽ được gọi mỗi khi ứng dụng khởi chạy.
Trong hầu hết trường hợp Device token là không đổi. Vì vậy backend cần có dịch vụ để cập nhật Device token.Để thử nghiệm chúng ta sẽ sử dụng một Backend MacOS client là Pusher
Tạo push certificates
Việc bạn đang sử dụng kiểu backend nào không quan trọng - bạn luôn cần một push certificates được gọi là để backend của bạn có thể tự xác định được với APNS.Chúng ta cũng cần push certificates này cho Backend Mac OS. Bạn có thể tạo push certificates trong website dành cho nhà phát triển của Apple.Developer Apple.
- Bước 1: Sau khi bạn đã đăng nhập
- Bước 2: Hãy chuyển đến phần Certificates, Identifiers & Profiles.
- Bước 3: Sau đó chọn App IDs.
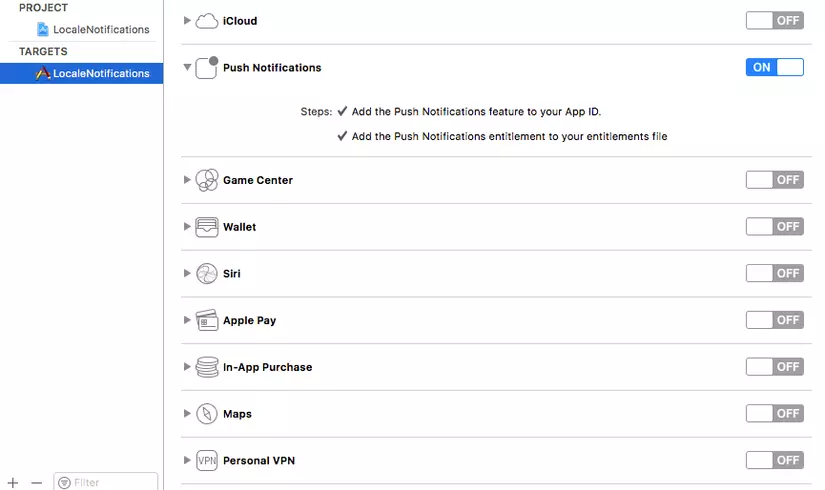
- Bước 4: Xcode nên tạo sẵn cho bạn một App identifier .Chọn nó và nhấp vào Edit. Bây giờ bạn có thể kích hoạt Push Notifications và tạo các chứng chỉ bằng cách làm theo hướng dẫn:
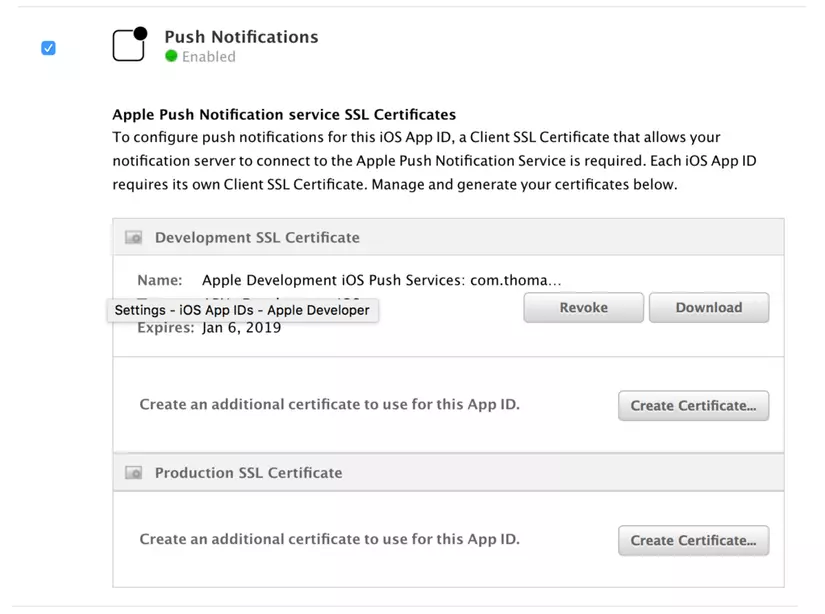
Lưu ý: Có 2 kiểu certificates là Development certificate và production certifcate
Mình nhớ không nhầm thì tài khoản apple mất phí thì mới có thể tạo được certificates :v Tài khoản free không tạo được thì phải huhu.
Gửi push notifications
Chúng ta sử dụng Pusher.

Bạn để ý payload message sẽ như này:
{"aps":{"alert":"Testing.. (30)","badge":1,"sound":"default"}}
Xử lý kết quả
Chúng ta xử lý tương tự như local notifications. Nhưng đặc biệt ở đây là Payload. Thông tin quan trọng mà server sẽ trả về cho ứng dung.func userNotificationCenter(_ center: UNUserNotificationCenter, didReceive response: UNNotificationResponse, withCompletionHandler completionHandler: @escaping () -> Void) {
print("handling notification")
if let notification = response.notification.request.content.userInfo as? [String:AnyObject] {
let message = parseRemoteNotification(notification: notification)
print(message as Any)
}
completionHandler()
}
private func parseRemoteNotification(notification:[String:AnyObject]) -> String? {
if let aps = notification["aps"] as? [String:AnyObject] {
let alert = aps["alert"] as? String
return alert
}
return nil
}
Một ví dụ khác. Payload có thể trả về bất cứ gì để bạn có thể phân biệt được đó loại thông báo cho cái gì để xử lý cho phù hợp cũng như hiển thị cho user đúng ý của ứng dụng.
Ví dụ:
func userNotificationCenter(_ center: UNUserNotificationCenter, didReceive response: UNNotificationResponse, withCompletionHandler completionHandler: @escaping () -> Void) {
    print("handling notification")
        if let notification = response.notification.request.content.userInfo as? [String:AnyObject] {
            let message = parseRemoteNotification(notification: notification)
            print(message as Any)
        }
        completionHandler()
    }

private func parseRemoteNotification(notification:[String:AnyObject]) -> String? {
    if let identifier = notification["identifier"] as? String {
        return identifier
    }

    return nil
}
Trên đây là 2 cách Push notification hi vọng sẽ giúp ích cho các bạn mới làm quen với push như mình.
Comments
Post a Comment