Ở bài viết trước mình đã giới thiệu về bug và debug, các bạn có thể tham khảo tại đây:
Các sai lầm thường mắc phải khi Debug.
Trong series bài viết này mình sẽ tổng hợp các kĩ năng cơ bản mà ai cũng cần biết và kèm theo đó là những tips, tricks mà mình cóp nhặt được để debug cùng Xcode một cách hiệu quả.
Tại đây nếu mình click vào icon cho phép tiếp tục hoặc dừng xử lí (keyboard shortcut: ⌃ + ⌘ + Y) thì Xcode sẽ dừng tại thời điểm trước khi code ở dòng số 24 được thực thi. Sau đó nếu mình click icon này một lần nữa thì code sẽ chạy như bình thường.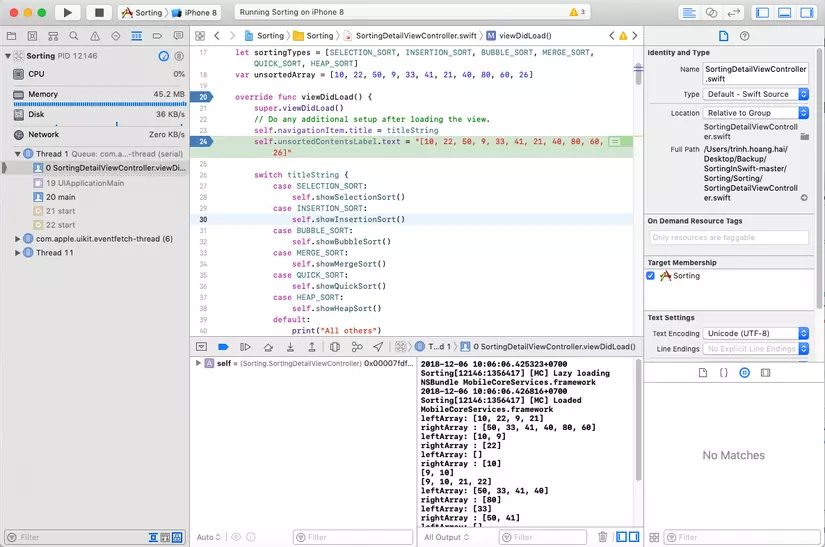
Tuy nhiên nếu tại đây mình không cho Xcode tiếp tục chạy như bình thường mà click vào Step over: thực thi dòng code tiếp theo (keyboard shortcut F6) thì Xcode sẽ dừng lại trước dòng code tiếp theo phải thực thi.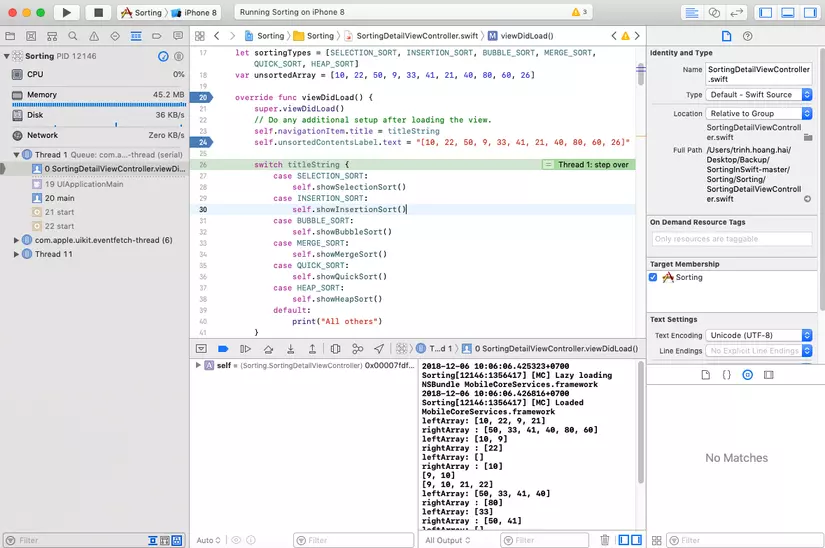
Tiếp theo trước đó mình đã chọn tab Quicksort nên trong vòng switch dòng gọi hàm Quicksort sẽ được nhảy vào.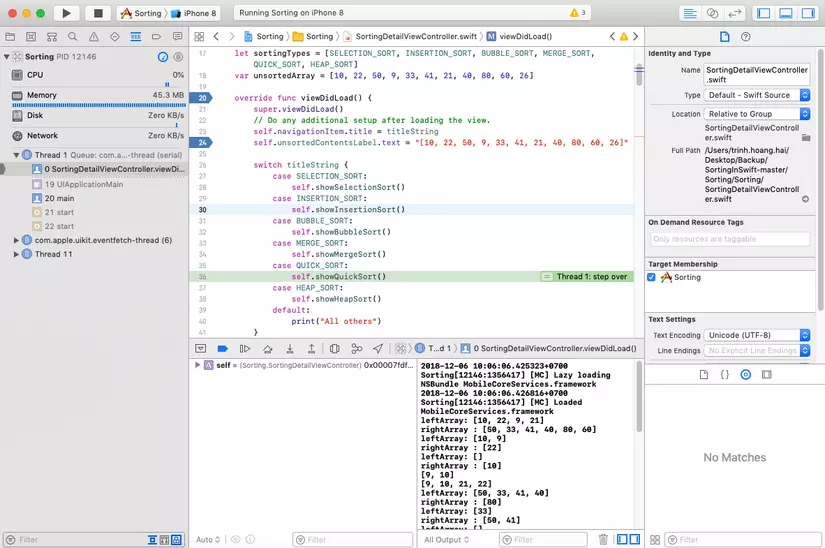
Tại đây chúng ta có thể click vào Step Into: đi vào bên trong function được gọi xem xét (keyboard shortcut F7) để xem chi tiết phần code được thực thi trong function được gọi này.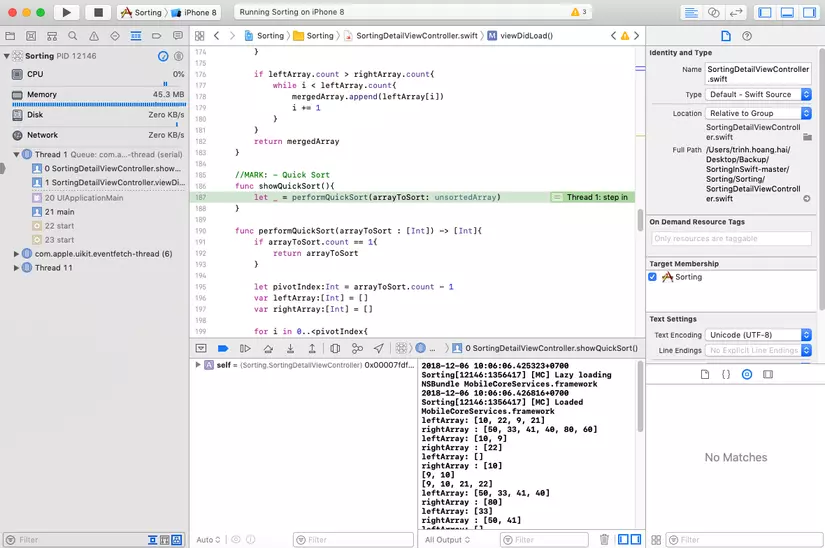
Ngoài ra nếu muốn dừng việc inspect bên trong function nhưng chưa muốn kết thúc việc tracking sau function đó thì chúng ta có thể click vào Step Out: nhảy ra khỏi function (keyboard shortcut F8).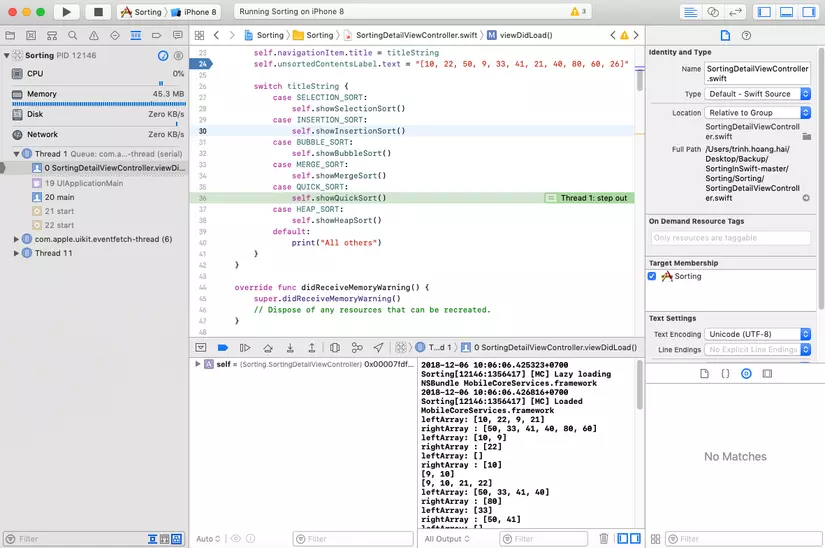
Nếu muốn loại bỏ breakpoint đã được đặt, chúng ta có thể click chuột phải tại vị trí của breakpoint để hiện thị các options, chúng ta cũng co thể kéo thả breakpoint ra ngoài để loại bỏ nó, ngoài ra click chuột phải sẽ disable breakpoint (làm nó mờ đi chứ không biến mất).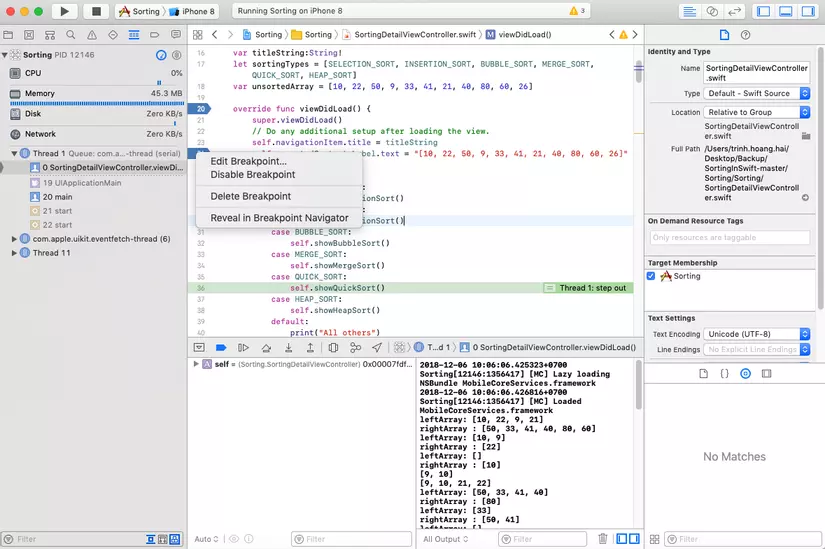
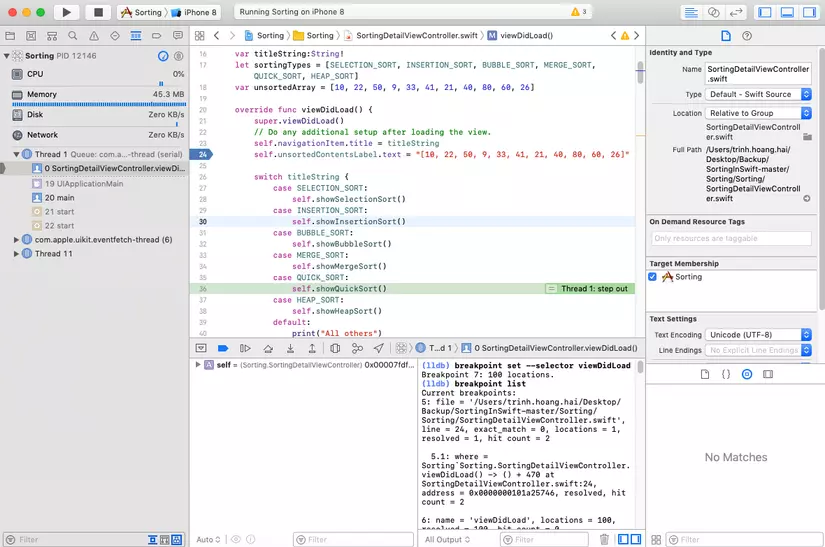
Dòng thông báo (lldb) xuất hiện khi ta đặt breakpoint mang ý nghĩ là "low level debugger", Xcode cung cấp cho chúng ta một môi trường debug cho ứng dụng iOS thông qua console.
Trong phần console mình đã dùng lệnh
Trên đây là sơ lược về cách sử dụng breakpoint để debug trong Xcode, mình sẽ tiếp tục giới thiệu về các phương pháp debug trong các bài viết tiếp theo. Hi vọng rằng bài viết này có ích cho mọi người trong công cuộc diệt "bọ" sau này. Cảm ơn vì đã quan tâm đến bài viết của mình.
Các bạn cũng có thể tham khảo:
Xcode’s Debugging Tools
Apple’s GDB and LLDB Command Examples
Udacity Course (free) — Debugging
Xcode Debugging with Breakpoints (for Beginners)
Trong series bài viết này mình sẽ tổng hợp các kĩ năng cơ bản mà ai cũng cần biết và kèm theo đó là những tips, tricks mà mình cóp nhặt được để debug cùng Xcode một cách hiệu quả.
Phần 1: Xcode Debugging sử dụng breakpoints.
Bài viết này sẽ chỉ tập trung vào giới thiệu về kĩ thuật debug Xcode sử dụng breakpoint - một debugging tool của Xcode.A breakpoint is a debugging tool that allows you to pause the execution of your program up to a certain moment.Chúng ta có thể hiểu breakpoint là một công cụ hỗ trợ được tích hợp trong Xcode để giúp chúng ta ngưng việc xử lí của chương trình tại một thời điểm. Việc tạm thời dừng xử lí giúp chúng ta có thể đánh giá, kiểm tra, đảm bảo code của ta chạy đúng, đồng thời hỗ trợ điều tra dấu vết của Bug khi có lỗi ngoài ý muốn xảy ra.
Creating “pause” points in your code can help you investigate your code to see where bugs occur.Làm thế nào để tạo và sử dụng breakpoint?
Easy. Decide on where you want to pause the execution of your code and click in the left gutter to create a blue breakpoint.Bất kì đầu dòng code nào của Xcode đều có thể đặt breakpoint bằng cách đơn giản là click vào số dòng ở phía bên trái của khu vực code.
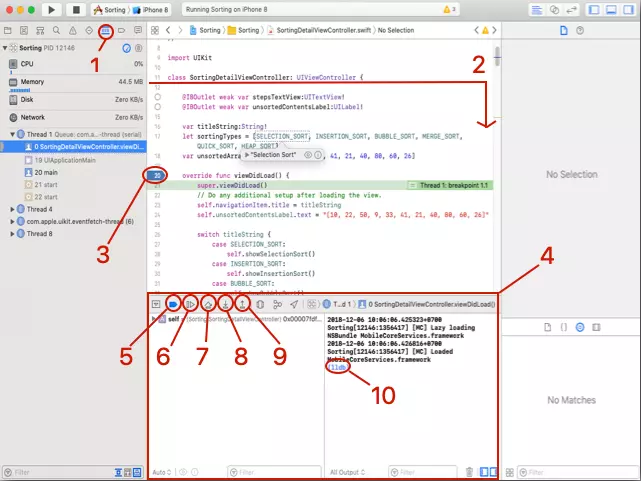
- Ghi chú:
- Debug Navigator: hiển thị tất cả threads và breakpoints.
- Thời điểm thread được tạo ra và xử lí code.
- Có thể dễ dàng đặt breakpoint bằng các click vào số thứ tự của dòng code ở phía bên trái khu vực code
- Khu vực debug.
- Active và Deactive Breakpoints.
- Tiếp tục hoặc dừng xử lí (keyboard shortcut: ⌃ + ⌘ + Y).
- Step Over: thực thi dòng code tiếp theo (keyboard shortcut F6).
- Step Into: đi vào bên trong function được gọi xem xét (keyboard shortcut F7).
- Step Out: nhảy ra khỏi function (keyboard shortcut F8).
- "lldb" nghĩa là "low level debugger"
Tại đây nếu mình click vào icon cho phép tiếp tục hoặc dừng xử lí (keyboard shortcut: ⌃ + ⌘ + Y) thì Xcode sẽ dừng tại thời điểm trước khi code ở dòng số 24 được thực thi. Sau đó nếu mình click icon này một lần nữa thì code sẽ chạy như bình thường.
Tuy nhiên nếu tại đây mình không cho Xcode tiếp tục chạy như bình thường mà click vào Step over: thực thi dòng code tiếp theo (keyboard shortcut F6) thì Xcode sẽ dừng lại trước dòng code tiếp theo phải thực thi.
Tiếp theo trước đó mình đã chọn tab Quicksort nên trong vòng switch dòng gọi hàm Quicksort sẽ được nhảy vào.
Tại đây chúng ta có thể click vào Step Into: đi vào bên trong function được gọi xem xét (keyboard shortcut F7) để xem chi tiết phần code được thực thi trong function được gọi này.
Ngoài ra nếu muốn dừng việc inspect bên trong function nhưng chưa muốn kết thúc việc tracking sau function đó thì chúng ta có thể click vào Step Out: nhảy ra khỏi function (keyboard shortcut F8).
Nếu muốn loại bỏ breakpoint đã được đặt, chúng ta có thể click chuột phải tại vị trí của breakpoint để hiện thị các options, chúng ta cũng co thể kéo thả breakpoint ra ngoài để loại bỏ nó, ngoài ra click chuột phải sẽ disable breakpoint (làm nó mờ đi chứ không biến mất).
Dòng thông báo (lldb) xuất hiện khi ta đặt breakpoint mang ý nghĩ là "low level debugger", Xcode cung cấp cho chúng ta một môi trường debug cho ứng dụng iOS thông qua console.
LLDB stands for “low level debugger” which provides the underlying debugging environment for developing for iOS applications. It can be used to find and eliminate issues in your Swift and Objective-C code.Vậy thì Breakpoint và LLDB liên quan gì đến nhau? LLDB cho phép chúng ta sử dụng các câu lệnh để debug trên console của Xcode: set breakpoint, liệt kê tất cả breakpoint cũng như disable breakpoint.
You can type in shortcut commands into the LLDB to help you set breakpoints at certain lines of code, set breakpoints at many points in your code, list all your breakpoints, and disable breakpoints.
Trong phần console mình đã dùng lệnh
breakpoint set --selector viewDidLoad để set breakpoint tại tất cả các vị trí tồn tại keyword "viewDidLoad". Lệnh breakpoint list
để liệt kê tất cả các breakpoint hiện tại đang được set. Chúng ta có
thể xem chi tiết thông tin của từng breakpoint, thậm chí có thể nắm được
số lần Xcode đã chạy đến breakpoint đó thông qua hit count. Lệnh breakpoint disable
dùng để disable tất cả các breakpoint hiện hành, nếu mình thêm một số n
là Int ngay sau, xcode sẽ hiểu là mình đang muốn disable breakpoint ở
vị trí thứ n.Trên đây là sơ lược về cách sử dụng breakpoint để debug trong Xcode, mình sẽ tiếp tục giới thiệu về các phương pháp debug trong các bài viết tiếp theo. Hi vọng rằng bài viết này có ích cho mọi người trong công cuộc diệt "bọ" sau này. Cảm ơn vì đã quan tâm đến bài viết của mình.
Các bạn cũng có thể tham khảo:
Xcode’s Debugging Tools
Apple’s GDB and LLDB Command Examples
Udacity Course (free) — Debugging
Xcode Debugging with Breakpoints (for Beginners)
Comments
Post a Comment