Như
bạn đã biết, mọi thứ mà bạn nhìn thấy trong ứng dụng iOS là một view.
Nó có thể là button view, table view, slide view, và thậm chí là parent
view (chứa nhiều view con khác).
Tuy nhiên bạn có thể không biết rằng mỗi view trong iOS lại dựa trên một
lớp khác gọi là layer - cụ thể là CALayer.
Trong bài viết này bạn sẽ biết về CALayer và cách thức mà CALayer hoạt
động. Bạn cũng có thể tìm thấy các ví dụ về cách sử dụng cơ bản CALayer.
Để tìm hiểu về CALayer chúng ta hãy cùng khởi tạo một dự án mới, sau đó tạo một view ở giữa màn hình. Thay thế nội nung của ViewController.swift bằng đoạn code sau:
Thật dễ dàng phải không, ta có thể làm việc này với bất cứ view nào trong ứng dụng bởi tất cả các view đều được hỗ trợ bởi layer.
Update phương thức pinchGestureRecognized() như sau:
CALayer còn có rất nhiều các thuộc tính và phương thức mà ta có thể linh hoạt sử dụng để tạo ra những UI hay hiệu ứng đẹp. Bạn có thể tìm hiểu sâu hơn về CALayer để áp dụng vào dự án của mình một cách hiệu quả.
CALayer liên quan tới UIView như thế nào?
UIView quản lý rất nhiều thứ bao gồm layout hoặc xử lí các touch event. Điều thú vị là nó không hề quản lý trực tiếp các drawing hay aminations mà CoreAnimation sẽ đảm nhận nhiệm vụ này. Thực tế UIView chỉ bao bọc bên ngoài CALayer. Khi set bound trên một UIView thì view sẽ set bound cho CALayer của nó. Nếu ta gọi layoutIfNeeded trong UIView, lệnh gọi sẽ được truyền tới root CALayer. Mỗi UIView có một root CALayer, mỗi root CALayer có thể chứa nhiều layer con.Để tìm hiểu về CALayer chúng ta hãy cùng khởi tạo một dự án mới, sau đó tạo một view ở giữa màn hình. Thay thế nội nung của ViewController.swift bằng đoạn code sau:
import UIKit
class ViewController: UIViewController {
@IBOutlet weak var viewForLayer: UIView!
var layer: CALayer {
return viewForLayer.layer
}
override func viewDidLoad() {
super.viewDidLoad()
setUpLayer()
}
func setUpLayer() {
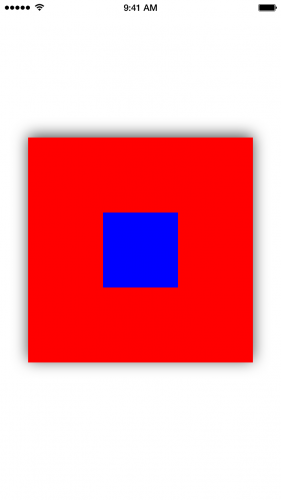
layer.backgroundColor = UIColor.blue.cgColor
layer.borderWidth = 100.0
layer.borderColor = UIColor.red.cgColor
layer.shadowOpacity = 0.7
layer.shadowRadius = 10.0
}
@IBAction func tapGestureRecognized(_ sender: Any) {
}
@IBAction func pinchGestureRecognized(_ sender: Any) {
}
}
Thật dễ dàng phải không, ta có thể làm việc này với bất cứ view nào trong ứng dụng bởi tất cả các view đều được hỗ trợ bởi layer.
Các thuộc tính cơ bản của CALayer
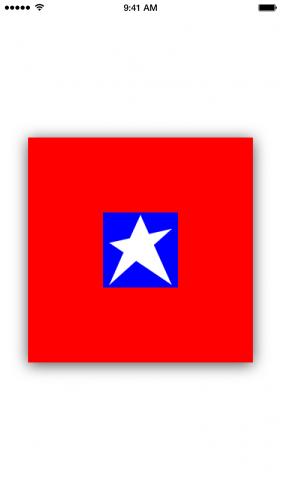
CALayer có một vài thuộc tính cho phép ta tuỳ chỉnh bề ngoài của nó. Ta đã thay đổi background color của layer từ mặc định không màu sang blue, thêm vào border bằng việc gán border width từ 0 thành 100, đổi màu mặc định từ black sang red và đổ bóng cho nó. Đó là những thuộc tính cơ bản của CALayer, ngoài ra ta còn có thể custom nhiều hơn thế, ví dụ bạn hãy thử thêm đoạn code sau vào:layer.contents = UIImage(named: "star")?.cgImage
layer.contentsGravity = kCAGravityCenter
Thay đổi appearance của layer
Hãy thêm tap gesture và pinch gesture recognizers cho view. Sau đó tạo IBAction, và thêm dòng code sau vào:@IBAction func tapGestureRecognized(_ sender: UITapGestureRecognizer) {
layer.shadowOpacity = layer.shadowOpacity == 0.7 ? 0.0 : 0.7
}
Update phương thức pinchGestureRecognized() như sau:
@IBAction func pinchGestureRecognized(_ sender: UIPinchGestureRecognizer) {
  let offset: CGFloat = sender.scale < 1 ? 5.0 : -5.0
  let oldFrame = layer.frame
  let oldOrigin = oldFrame.origin
  let newOrigin = CGPoint(x: oldOrigin.x + offset, y: oldOrigin.y + offset)
  let newSize = CGSize(width: oldFrame.width + (offset * -2.0), height: oldFrame.height + (offset * -2.0))
  let newFrame = CGRect(origin: newOrigin, size: newSize)
  if newFrame.width >= 100.0 && newFrame.width <= 300.0 {
    layer.borderWidth -= offset
    layer.cornerRadius += (offset / 2.0)
    layer.frame = newFrame
  }
}
CALayer còn có rất nhiều các thuộc tính và phương thức mà ta có thể linh hoạt sử dụng để tạo ra những UI hay hiệu ứng đẹp. Bạn có thể tìm hiểu sâu hơn về CALayer để áp dụng vào dự án của mình một cách hiệu quả.
Comments
Post a Comment