
About the pattern
Facade pattern is one of the Structural Patterns. The main aim of it is to hide the complexity of a system, class or logic and provide all functionalities behind a simple interface. Commonly, Facade is implemented in a way that one class is related to other classes which represents a system logic. Please take a look at the diagram: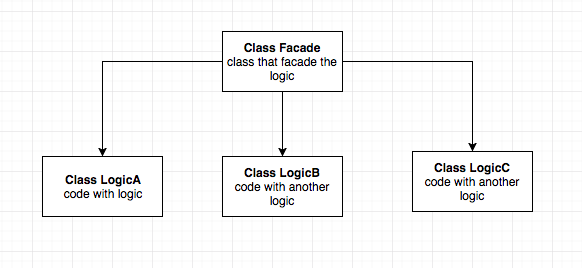
As you can see, there is one class called
Facade which separates the logic from LogicA, LogicB, LogicC classes. As a result our client only call the Facade class in order to execute some methods that are implemented in other classes.Implementation
Let’s imagine a simple scenario. You have already created a great app calledSuper-Photo. One of the core features of your app is saving/converting images with JPEG or PNG extension. In order to do this you want to save UIImage representation in two ways. One is saving it as a PNG type, the second is saving it as a JPEG file type.Fistly, in order to handle our image types and possible errors in our code - it will be nice to have two enums that will make our code cleaner and more readable.
enum ImageSaverError: Error {
    case couldNotCreateDestinationPath
    case couldNotCreateJPEGDataFromImage
    case couldNotCreatePNGDataFromImage
    case couldNotSaveImageInDestinationPath
}

enum ImageType {
    case png
    case jpeg(compressionQuality: CGFloat)
}
class ImageDataProvider {
    func data(from image: UIImage, type: ImageType) throws -> Data {
        switch type {
        case .jpeg(let compressionQuality):
            return try jpegData(from: image, compressionQuality: compressionQuality)
        case .png:
            return try pngData(from: image)
        }
    }

    private func pngData(from image: UIImage) throws -> Data {
        guard let imageData = UIImagePNGRepresentation(image) else { throw ImageSaverError.couldNotCreateJPEGDataFromImage }
        return imageData
    }

    private func jpegData(from image: UIImage, compressionQuality: CGFloat) throws -> Data {
        guard let imageData = UIImageJPEGRepresentation(image, compressionQuality) else { throw ImageSaverError.couldNotCreatePNGDataFromImage }
        return imageData
    }
}
ImageDataProvider takes image and type parameters and creates the image data with proper extension JPEG or PNG.The last step is to create class which is needed to save
UIImage. So let’s name it a PathProvider.class PathProvider {
func createDestinationPath(fileName: String) throws -> URL {
guard let path = FileManager.default.urls(for: .documentDirectory, in: .userDomainMask).first else {
throw ImageSaverError.couldNotCreateDestinationPath
}
let destinationPath = path.appendingPathComponent("\(fileName)")
return destinationPath
}
}

Create a class called
ImageSaverFacade :class ImageSaverFacade {
private let pathProvider = PathProvider()
private let dataProvider = ImageDataProvider()
func save(image: UIImage, type: ImageType, fileName: String, overwrite: Bool) throws {
let destinationURL = try pathProvider.createDestinationPath(fileName: fileName)
let imageData = try dataProvider.data(from: image, type: type)
let writingOptions: Data.WritingOptions = overwrite ? (.atomic) : (.withoutOverwriting)
try imageData.write(to: destinationURL, options: writingOptions)
}
}
ImageSaverFacade class has two private objects of PathProvider and ImageDataProvider class. Because the client doesn’t need to know anything about logic inside, the only thing which ImageSaverFacade exposes to a public is one method:func save(image: UIImage, type: ImageType, fileName: String, overwrite: Bool) throws
Now let’s move on to the facade usage part:
let imageSaver = ImageSaverFacade()
let image = UIImage(named: "my_image")!
do {
    try imageSaver.save(image: image, type: .png, fileName: "my_file_name", overwrite: true)
} catch  {
    //handle Error
}
// or
do {
    try imageSaver.save(image: image, type: .jpeg(compressionQuality: 1.0), fileName: "my_file_name", overwrite: false)
} catch  {
    //handle Error
}
Conclusion
Please notice that our facade covers logic associated withData providing and creating a valid URL for file destination. And because of that, it is super easy to save UIImage as PNG or JPEG using our ImageSaverFacade. Only thing to do is to pass the correct parameters to facade method.Facade design pattern can be used in many cases. Facade creates for you a simple gateway to a complicated system. By using it you will definitely make your code simpler to understand and read.
Comments
Post a Comment