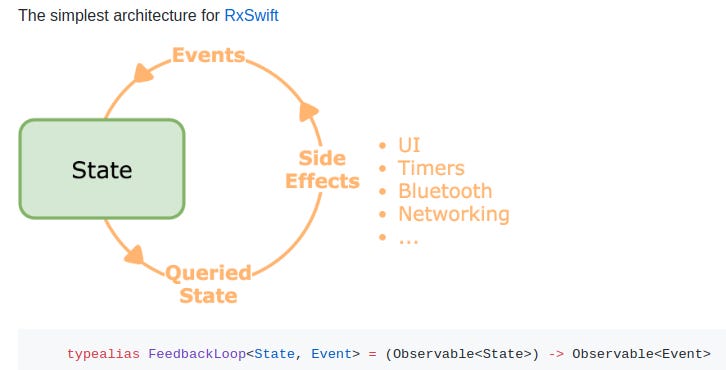
Bạn có nghe qua về Reactive Programming chưa, đây là một khái niệm lập trình hoàn toàn mới.
“Reactive Programming là lập trình theo hướng bất đồng bộ các dòng chảy dữ liệu(data streams)”
Sau khi đọc khái niệm các bạn có lẽ rất mơ hồ, vậy các data streams là gì.
Vậy để mình ví dụ cho các bạn:
- Trong lập trình bình thường (imperative programming) a = b + c , tức a được gắn với kết quả cộng của b và c .Khi b với c thay đổi thì tất nhiên sẽ không ảnh hưởng tới a, nhưng trong Reactive Programming này a sẽ tự động thay đổi khi b hoặc c thay đổi, kết quả của a sẽ lập tức thay đổi theo.
Bạn có thể thấy với tác vụ như vậy thì trong ios chúng ta có thể bạn nhớ đến KVO (Key-Value-Observing)/Property Observer, và đây cũng chính là kĩ thuật chính của Reactive Programming.
Ví dụ : KVO khi ta change property “date” của class MyDate.
class MyDate:NSObject {
   @objc dynamic var date = Date()
}private var contextKVO = 0class ViewController: UIViewController {
   override func viewDidLoad() {
      super.viewDidLoad()
      let myDate = MyDate()      myDate.addObserver(self, forKeyPath: “date”, options:            NSKeyValueObservingOptions.new, context: &contextKVO)      DispatchQueue.main.asyncAfter(deadline: .now() + 3) {
        myDate.date = Date()
      }
   }   override func observeValue(forKeyPath keyPath: String?, of object: Any?, change: [NSKeyValueChangeKey : Any]?, context: UnsafeMutableRawPointer?) {      if context == &contextKVO {         print(“Date is changed. \(String(describing: change![NSKeyValueChangeKey.newKey]))”)

          //Update UI ở đây        }
   }}
Với
ví dụ trên bạn có thể thấy khi tạo 1 class MyDate có thuôc tính date,
khi nào property date change thì sẽ bắn tới 1 hàm đc override
observeValue.
Nhưng nếu dùng KVO sẽ có những khuyết điểm sau :
+ Thread Unsafe
: Vì khi bạn bắt đầu gắn “myDate.addObserver”, thì nó sẽ chạy trong
thread background, sau khi giá trị “date” thay đổi sẽ chạy vào hàm
observeValue và trong hàm đó chúng ta có thể sẽ update UI của chúng ta ở
đây, và update UI ở thead background sẽ không đúng, vì update đó chỉ
chạy trên thread main.
+ Khó dùng
: khi bạn addObserver cần các tham số truyền vào :
keyPath,Context,Options.Với keyPath các bạn có định nữa đúng property
chúng ta cần observe, options cũng có nhiều loại như : .New,.Old,
.Inital.Bạn phải hiểu rõ các options này, nếu không bạn sẽ làm sai.
+ Khó Refactor : khi dùng “myDate.date = Date()” ở các chỗ khác nhau , cần thay đổi bạn phải tìm đúng vị trí để thay đổi.
+ Phải gọi
removeObserver : trong hàm deinit của class mà bạn đã addObserver , không bạn sẽ ko release được gây leak memory.
+ Không có lifecycle notification : khi instance myDate release, bạn sẽ không biết khi nào event đó xảy ra.
Vậy tại sao nên dùng RXSwift:
+
Giúp ứng dụng của bạn hoạt động 1 cách như là real time update ui khi
có thay đổi data flow, mang đến trải nghiệm tuyệt vời cho User.
+
Dễ dàng lập trình bất đồng bộ (Async) thay vì phải dùng : callbacks,
delegates, notifications, kvo… Bạn phải dùng nhiều thứ gây ra ứng dụng
của bạn phức tạp, khó kiểm soát.
+ Chuyển đổi các thread khi thực hiện 1 cách dễ dàng.
+ Viết code 1 cách ngắn ngọn với các function,operator(toán tử) hỗ trợ.
+ Binding UI : cho các label,talbeview,collection 1 cách đơn giản, mà bạn không cần phải làm nhiều.
+ Quản lí và giản phóng bộ nhớ tốt, tránh bị leak memory.
+
Multi-platform : Vì khái niệm này được sử dụng trên nhiều ngôn ngữ khác
nhau trong 1 cách thức hoạt động nên cách sử dụng, tên hàm nó giống
giống nhau.
Các thành phần tổng quan cơ bản của RXSwift :
1. Observable Sequence : Đơn giản nó là thứ sẽ bắn ra các thay đổi của object để cho 1 lớp khác nhận ở đây RXSwift định nghĩa đó là (Subscriber).
2. DisposeBag : Dọn rác, giúp tự động giải phóng bộ nhớ, cơ chế Automatic Reference Counting (ARC).
3. Subjects : là các dạng đặc biệt của Observable Sequence như : PublishSubject , BehaviourSubject,ReplaySubject,Variable với mỗi loại cung cấp cho chúng ta những chức năng cách nhận value change của các subscriber khi đã đăng kí nhận hoặc chưa.
4. Transform : Gồm các toán tử chuyển đổi từ objectA qua object B được thực hiện trước khi trả về return cho các Subcribers : Map , Flat Map, Scan, Buffer…
5. Filter : Cũng bao gồm các toán tử nhưng là về lọc dữ liệu : Filter,DistinctUntilChanged,Debounce,Throttle,TakeDuration,Skip…
6. Combine : Bao gồm các toán tử kết hợp như : Merge, Zip, Concat, CombineLatest, SwitchLatests,StartWith…
7. Schedulers : Quản
lí các thread trước khi và sau khi subscriber nhận được return value.Để
set thread mà subscriber đợi nhận observable bạn dùng : observeOn , còn sau khi nhận đc value sẽ ra 1 thread khác dùng : subscribeOn. Ví dụ như : Bạn fetch api từ server(để ở background thread dùng observeOn), sau khi có kết quả sẽ reload lại Table (để ở main thread để update dùng subscribeOn).
Trong RXSwift có 5 loại scheduler cho bạn sử dụng : MainScheduler, CurrentThreadScheduler, SerialDispatchQueueScheduler, ConcurrentDispatchQueueScheduler, OperationQueueScheduler.
Trong RXSwift có 5 loại scheduler cho bạn sử dụng : MainScheduler, CurrentThreadScheduler, SerialDispatchQueueScheduler, ConcurrentDispatchQueueScheduler, OperationQueueScheduler.
Trong các bài sau mình sẽ nói chi tiết hơn cho các bạn về thành phần chính của RXSwift và code thực hành.
Sites:
- Flow diagram của các toán tử : http://rxmarbles.com/
- Github: https://github.com/ReactiveX/RxSwift
- Flow diagram của các toán tử : http://rxmarbles.com/
- Github: https://github.com/ReactiveX/RxSwift
Comments
Post a Comment