Trong phần này mình sẽ giới thiệu về RXCocoa vs Binding
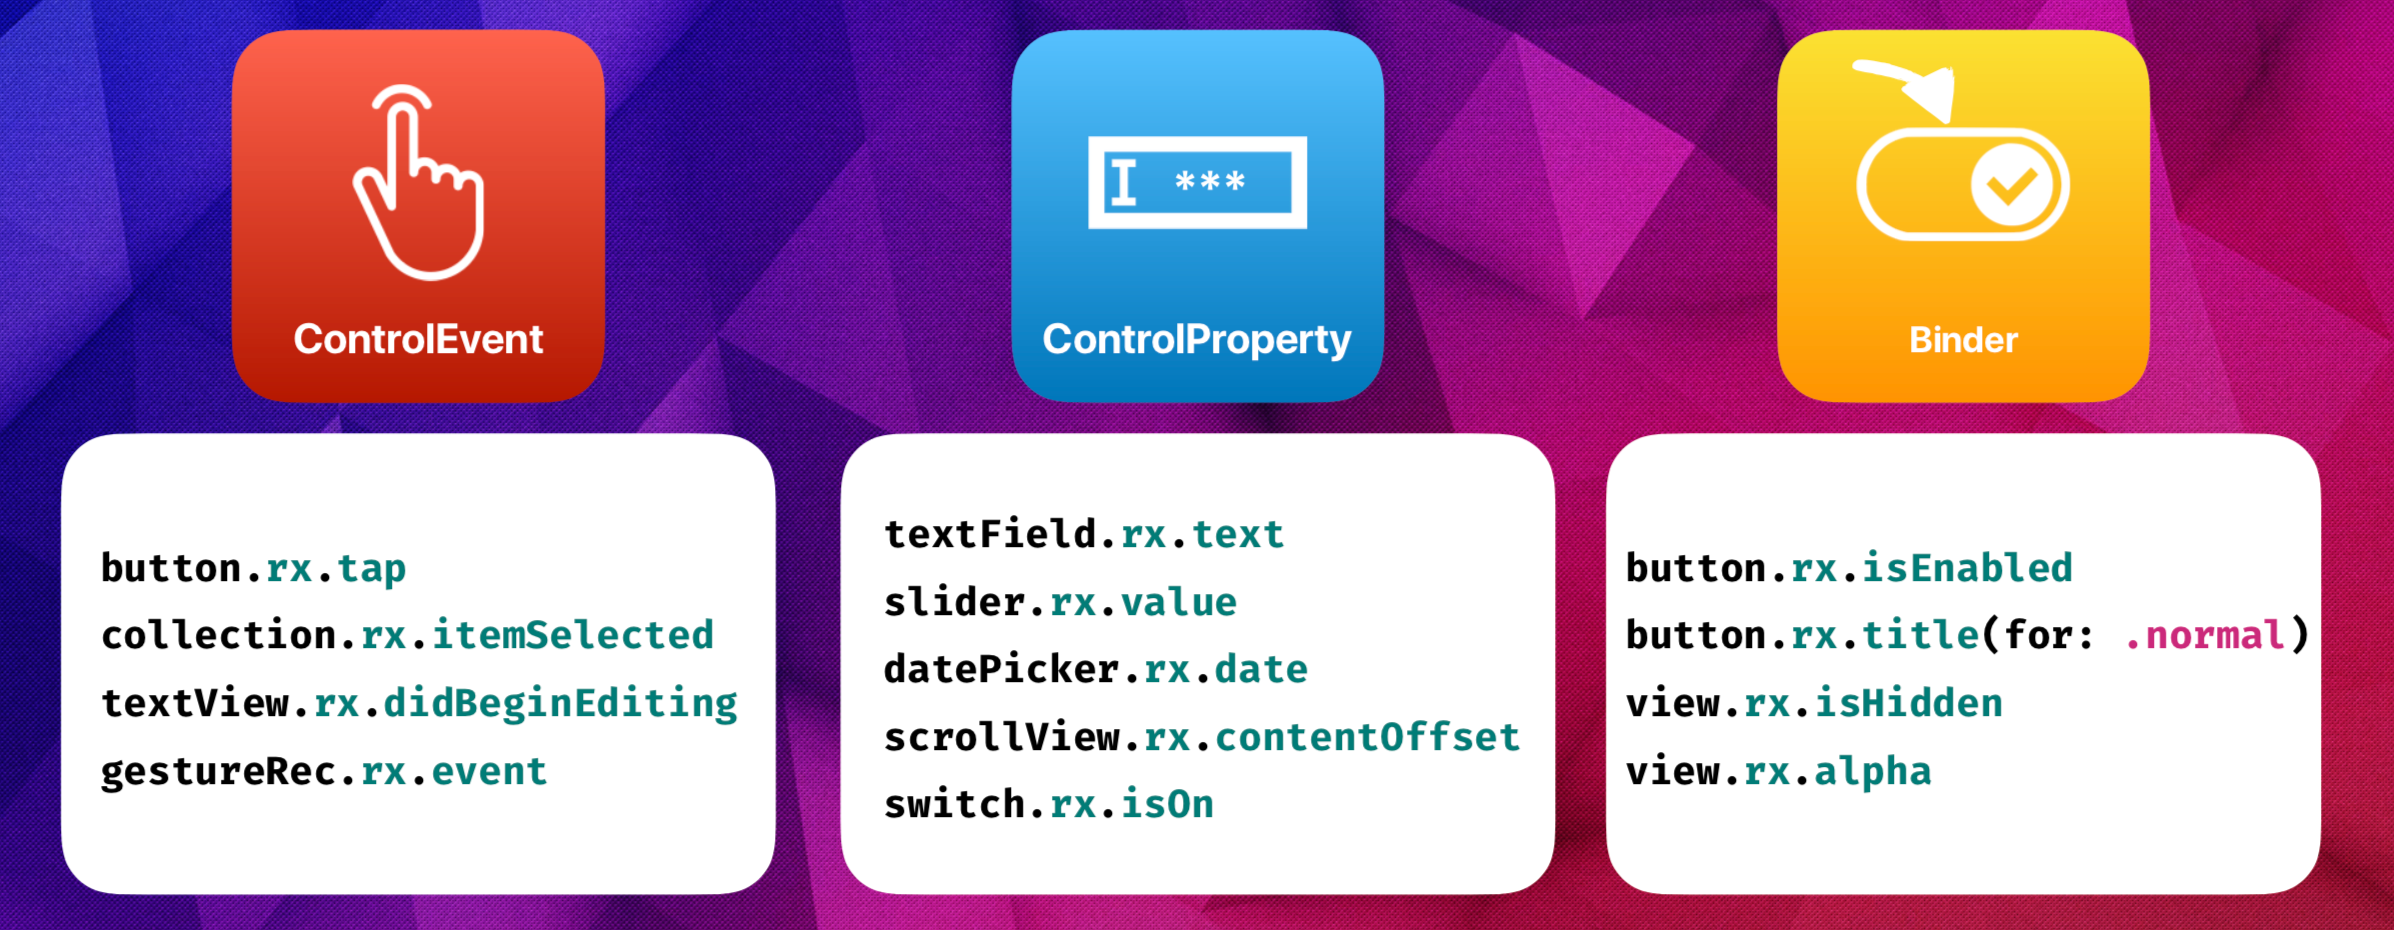
- RXCocoa : sử dụng RX đã được viết extension sẵn để tương tác với các UI Controls.Mình sẽ giới thiệu 1 số control hay dùng
- UIButton : on click
btn.rx.controlEvent(UIControlEvents.touchUpInside).subscribe { (event) in
    print("Btn Clicked")
}
btn.rx.tap.bind { (event) in
    print("Btn Clicked")
}
- UITextfield : text change
tf.rx.text.asObservable().subscribe(onNext: { (text) in
       guard let textGet = text else {
           return
       }
       print("Tf change : \(textGet)")
 })
- UIScrollView : bắt event contentOffset change, didScroll.
scrollView.rx.contentOffset.subscribe(onNext: { (point) in
    print("Scroll offset : \(point)")
})
scrollView.rx.didScroll.subscribe(onNext: { _ in
     print("Did scroll : \(self.scrollView.contentOffset)")
})
- UISlider : value change
slider.rx.value.asObservable().subscribe(onNext: { (value) in
    print("Slider change : \(value)")
})
- UIGesture
let tap = UITapGestureRecognizer()
self.view.addGestureRecognizer(tap)
tap.rx.event.asObservable().subscribe(onNext: { (tapGestures) in
     print("Tap Gesture tap")
})
- NotificationCenter
NotificationCenter.default.rx.notification(Notification.Name.UIApplicationDidEnterBackground, object: nil).subscribe(onNext: { (noti) in
    print("App enter background")
})
- Method : đợi trigger các method sẽ phát ra
//Ví dụ trong UIViewController đợi viewDidAppearself.rx.methodInvoked(#selector(self.viewDidAppear(_:))).subscribe(onNext: { (event) in
   print("View did Appear")
})
2.Binding : nhận các obserser có value và đổ vào control như tableview, collectionview
- TableView
// Tạo 1 model
struct ModelDetail {
    var title:String = ""
}// Register cell
self.table.register(UINib(nibName: "MyCell", bundle: nil), forCellReuseIdentifier: "MyCell")// Tạo data source
let items = Observable.of([
ModelDetail(title:"Item1"),
ModelDetail(title:"Item2"),
ModelDetail(title:"Item3"),
ModelDetail(title:"Item4")])// Binding
items.bind(to: self.table.rx.items(cellIdentifier: "MyCell", cellType: MyCell.self)){ (index,model,cell) in
    cell.lbl.text = model.title
}.disposed(by: dispose)
Table selected indexPath
// Did Selected Indexpath
self.table.rx.itemSelected.asObservable().subscribe(onNext: { (indexPath) in
    print("Row Selected :\(indexPath.row)")
})
.disposed(by: dispose)
- CollectionView : cũng giống như tableView
// Bindingitems.bind(to: collectionView.rx.items) { (collectionView, row, element) in
        let indexPath = IndexPath(row: row, section: 0)
        let cell = collectionView.dequeueReusableCell(withReuseIdentifier: "MyCell", for: indexPath) as! MyCell
        cell.lbl?.text = element.title
        return cell
    }
    .disposed(by: dispose)// Selected IndexPath
self.collectionView.rx.itemSelected.subscribe(onNext: { (indexPath) in
    print("CollectionView Row Selected :\(indexPath.row)")
})
.disposed(by: dispose)
Bạn cũng có thể custom delegate, dùng song song với rx
// set delegate
table.rx.setDelegate(self).disposed(by: dispose)
collectionView.rx.setDelegate(self).disposed(by: dispose)// implement delegate
extension ViewController : UITableViewDelegate {
    func tableView(_ tableView: UITableView, didSelectRowAt indexPath: IndexPath) {
    }
}
extension ViewController : UICollectionViewDelegate {
    func collectionView(_ collectionView: UICollectionView, didSelectItemAt indexPath: IndexPath) {
    }
}
Bạn
có thể thấy dùng rxswift giúp cho chúng ta viết code rất ngắn gọn.
Amazing :D. Hãy follow để nhận được những bài viết mới nhất nhé.
Comments
Post a Comment