
Phân biệt các hàm xử lí Collection trong Swift. (Map, FlatMap, Filter, CompactMap..)

Giới thiệu

Đối với lập trình viên, việc thao tác với collection là kĩ nẵng quan trọng. Trong bài viết này tôi sẽ trình bày về chức năng của các hàm xử lí với Collection trong Swift (Filter, Map, FlatMap, CompactMap, Reduce)

Filter():

Filter là một trong những hàm khá thông dụng trong Swift. Chức năng của filter là duyệt các phần tử trong mảng và trả về 1 mảng chua các phần tử thỏa mãn điều kiện cho trước.

  • func filter(_ isIncluded: (Self.Element) throws -> Bool) rethrows -> [Self.Element]

Quan sát closure isInclude (self.Element) -> Bool là tham số tuyền vào, có chức năng kiểm kiểm tra phan tử có thõa mãn điều kiện để thêm lọc mảng. Nếu closure return true phần tử sẽ được thêm vào mảng và ngược lại.

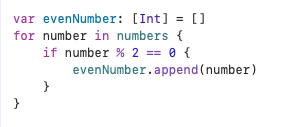
Ví dụ: Tìm các phần tử chia hết cho 2 trong mảng số nguyên.

Khi không sử sự Filter:
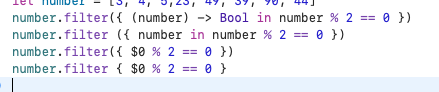
Ví dụ với Filter:

Rút gọn:

Map():

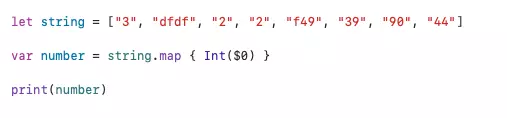
Map là hàm có chức năng duyệt các phần tử trong mảng và trả về mảng chữa các phần tử theo một biến đổi T.

func map<T>(_ transform: (Element) throws -> T) rethrows -> [T]
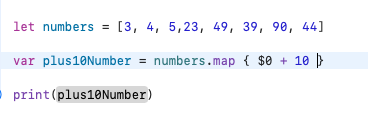
  • Ví dụ:

Ví dụ duyệt mảng với map.

  • Trong ví dụ này hàm Map() sẽ duyệt các phần tử trong mảng và trả về mảng các phần tử theo biến đổi T.
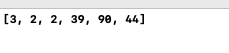
  • Kết quả :

FlatMap():

  • FlatMap tương tự như map tuy nhiên nó gộp các mảng con trong mảng trở thành 1.

ví dụ với FlatMap:

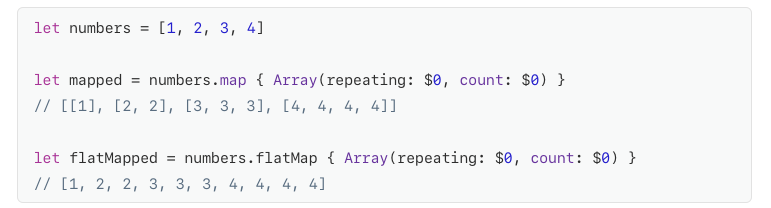
Ta có thể hiểu flatMap tương đương với cấu trúc sau trong Map.

s.flatMap(transform) == Array(s.map(transform).joined()).

Compact map():

CompactMap có chức năng tương tự như Map như giá tri trả về là một mảng không chua phần tử nil.

Xem ví dụ với Map:

Trong ví dụ với Map. các phần tử trả về sẽ chưa các phần tử không thể Convert sang Int. Và mảng trả về là Optional.

Đối với CompactMap:

Tổng kết

Trong bài viết này tôi đã trình bày các hàm duyệt và xử lí cơ bản đối với Collecttion trong swift


Comments

Popular posts from this blog

MVVM và VIPER: Con đường trở thành Senior

Trong bài viết trước chúng ta đã tìm hiểu về MVC và MVP để ứng dụng cho một iOS App đơn giản. Bài này chúng ta sẽ tiếp tục ứng dụng 2 mô hình MVVM và VIPER . Nhắc lại là ứng dụng của chúng ta cụ thể khi chạy sẽ như sau: Source code đầy đủ cho tất cả mô hình MVC, MVP, MVVM và VIPER các bạn có thể download tại đây . MVVM MVVM có thể nói là mô hình kiến trúc được rất nhiều các cư dân trong cộng đồng ưa chuộng. Điểm tinh hoa của kiến trúc này là ở ViewModel , mặc dù rất giống với Presenter trong MVP tuy nhiên có 2 điều làm nên tên tuổi của kiến trúc này đó là: ViewModel không hề biết gì về View , một ViewModel có thể được sử dụng cho nhiều View (one-to-many). ViewModel sử dụng Observer design pattern để liên lạc với View (thường được gọi là binding data , có thể là 1 chiều hoặc 2 chiều tùy nhu cầu ứng dụng). Chính đặc điểm này MVVM thường được phối hợp với các thư viện hỗ trợ Reactive Programming hay Event/Data Stream , đây là triết lý lập trình hiện đại và hiệu

Alamofire vs URLSession

Alamofire vs URLSession: a comparison for networking in Swift Alamofire and URLSession both help you to make network requests in Swift. The URLSession API is part of the foundation framework, whereas Alamofire needs to be added as an external dependency. Many  developers  doubt  whether it’s needed to include an extra dependency on something basic like networking in Swift. In the end, it’s perfectly doable to implement a networking layer with the great URLSession API’s which are available nowadays. This blog post is here to compare both frameworks and to find out when to add Alamofire as an external dependency. Build better iOS apps faster Looking for a great mobile CI/CD solution that has tons of iOS-specific tools, smooth code signing, and even real device testing? Learn more about Bitrise’s iOS specific solutions! This shows the real power of Alamofire as the framework makes a lot of things easier. What is Alamofire? Where URLSession can be found within the s

Fileprivate vs private: Giải thích sự khác biệt

Fileprivate vs private in Swift: The differences explained Fileprivate and private are part of the access control modifiers in Swift. These keywords, together with internal, public, and open, make it possible to restrict access to parts of your code from code in other source files and modules. The private access level is the lowest and most restrictive level whereas open access is the highest and least restrictive. The documentation of Swift will explain all access levels in detail to you, but in this blog post, I’m going to explain the differences between two close friends: fileprivate and private. Build better iOS apps faster Looking for a great mobile CI/CD solution that has tons of iOS-specific tools, smooth code signing, and even real device testing? Learn more about Bitrise’s iOS specific solutions! Open access is the highest (least restrictive) access level and private access is the lowest (most restrictive) access level. This will improve readability and mak